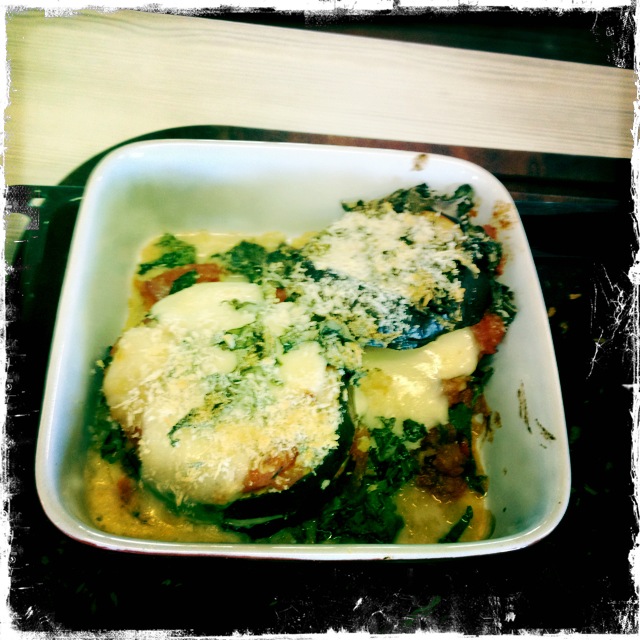
Posts Tagged With: Baking

Lemon butter biscuits

Jamie says, “These biscuits are dead easy to make and perfect for a simple gift. If you fancy jazzing them up for Christmas, try using an orange in place of the lemons and add a pinch of cinnamon to your demerara – lovely and festive!”

ourkitchengarden.net

Fresh from the garden: lemons, egg
Recipe source: Jamie Oliver on www.jameoliver.com
Makes: 30

Equipment:

  • Stand mixer & bowl
  • Microplane zester
  • Scales
  • Measures – tablespoon, ¼ teaspoon
  • Plastic wrap
  • Rolling pins
  • Biscuit cutters
  • Baking paper
  • Baking trays
  • Wire rack
  • Serving plates
Ingredients:

  • 125g butter, at room temperature
  • 100g caster sugar
  • 1 free-range egg
  • 200g plain flour plus extra for dusting
  • 2 lemons
  • ¼ teaspoon baking powder
  • 1 pinch sea salt
  • 3 tablespoons demerara sugar

What to do:

  • Preheat your oven to 180°C.
  • Measure out the butter and sugar in to the bowl of the stand mixer and then beat until creamy.
  • Beat in the egg until the mixture is light and fluffy.
  • Meanwhile zest the lemons with the microplane.
  • Add the flour, lemon zest, baking powder and salt to the butter mixture and mix until you have a ball of dough. Cover and place in the fridge for about 30 mins (or at home for 2 hours until firm).
  • Roll out the dough on a floured surface until ½cm thick. Line your trays with baking paper. Cut out shapes and place on the trays. Sprinkle with demerara sugar and bake for 10 to 12 minutes until the edges are light brown. Transfer to a wire rack to cool.
  • Divide among serving plates & eat!

Notes: Why do we let dough rest? What happens if we don’t? What is zest? What does demerara look like?

Categories: Kitchen Garden, Recipe | Tags: , , , , , | Leave a comment

Pizza with broccoli, garlic and anchovies

We love kneading out any sort of dough but pizza is the best – you can take away any sort of bad mood or grumpiness in pounding out pizza dough! Fed up with homework? Whack! Not allowed to watch telly? Thump! Must tidy your room? Whump! (Insert gripe here:____________________________________)

PIzza broccoli, anchovy, garlic

Fresh from the garden: broccoli, onion, garlic, oregano, thyme
Recipe source: Melissa
Serves: 8 or 24 tastes

Equipment:

  • 2 wooden chopping boards & knives
  • 2 frying pans
  • Bowls – large, med
  • Salad spinner
  • Small saucepan
  • Measures – ¼ cup, tablespoons, teaspoons
  • Colander, grater
  • Scales
  • Wooden spoon
  • Kitchen towel
  • 2 pizza trays
  • Metal tablespoons
  • Wide egg lifter
  • Pizza cutting wheels
  • Serving plates
Ingredients:

  • 1 amount Hugh’s magic dough recipe

For the pizza topping:

  • 1 tub bocconcini
  • 1 head broccoli
  • 2 tablespoons extra-virgin olive oil
  • 6 anchovies
  • 2 cloves garlic
  • 30g parmesan

Tomato sauce:

  • 1 onion
  • 2 cloves garlic
  • 3 sprigs each oregano & thyme
  • ¼ cup extra-virgin olive oil
  • 1 tin diced tomatoes
  • Flaked salt and black pepper

What to do:

  • Preheat the oven to 220C.

For the tomato sauce:

  • Peel and finely chop the onion and garlic, reserving half of the garlic for the broccoli.
  • Heat the olive oil in the frying pan & gently cook the onion and garlic until translucent but not brown.
  • Open the tin of tomato and add to the frying pan with a pinch of salt and a grind of pepper.
  • Wash, dry and pick the herbs. Roughly chop then add to the tomatoes.
  • Simmer gently for 10 minutes, stirring occasionally, until quite reduced.

For the topping: 

  • Fill the saucepan with water and set to boil.
  • Wash the broccoli, and cut finely into 1cm slices, keeping the florets intact. Drop them into the boiling saucepan with a teaspoon of salt and cook for 2 minutes. Drain into the colander.
  • Gently set the 2nd frying pan to heat and add the 2 tablespoons of olive oil, the reserved garlic and the anchovies. Simmer slowly until the anchovies have almost melted, and then add the broccoli and toss or stir to incorporate. Taste for seasoning.
  • Open the tub of bocconcini and cut each ball into 3 or 4 slices.
  • Grate the parmesan.

Assembling the pizza:

  • Scatter some flour on the workbench, divide the dough in two and roll to form two thin shapes about 26 cm in diameter.
  • Assemble the pizzas directly onto the trays, flouring the trays first.
  • Using the metal spoon, swirl a couple of spoonfuls of tomato sauce onto the pizza bases, spreading so that they become totally covered with a clean border.
  • Layer the bocconcini on top, spoon on the garlicky broccoli with a drizzle of the oil, then slide the pizzas into the oven.
  • Wash and dry the wooden chopping boards and set them out ready.

Baking the pizza:

  • Bake the pizzas for 12 minutes or until the edges are very crusty and the cheese is bubbling.
  • Use this time to make the dough for the next class if needed.
  • You may want to slip the pizza off the tray onto the rack for the last few minutes, so that you get a really crusty base.
  • Once the pizzas are done, transfer them to the wooden boards using the wide egg lifter.
  • Cut the pizzas in half first, and then each half into squares for each plate. Sprinkle with the grated parmesan.
  • Lift onto serving plates and eat!

Notes: Where does pizza come from? What other sort of vegetables could you use in a pizza? What sort of other pizza could we make? What other cheeses could we use?

ourkitchengarden.net

Categories: Kitchen Garden, Recipe | Tags: , , , , , , , , , , , | Leave a comment

Parmesan and dried rosemary biscuits

When I worked at bel mondo a few years ago for the Manfredis we used to serve the parmesan biscuits with little bowls of marinated olives to guests as they sat down at the table – and tried not to eat them while we worked!

ourkitchengarden.net

Parmesan biscuits & olives, simply

Fresh from the garden: rosemary, egg
Recipe source: adapted from a recipe by Steve Manfredi 
Makes: about 30 biscuits

Equipment:

  • Grater
  • Bowls – small
  • Fork
  • Paper towel
  • Chopping board & knife
  • Food processor
  • Scales
  • Cling film & baking paper
  • Baking sheets
  • Serving plates
Ingredients:

  • 80g parmesan
  • 1 egg
  • A few stalks of dried rosemary
  • 125g salted butter at room temperature
  • 250g plain flour
  • Cooking salt

 What to do:

  • Grate the parmesan. Crack the egg into the small bowl and lightly whisk with the fork.
  • Slide the rosemary leaves from the stalks and run them through the food processor. Then add in the salted butter, plain flour, grated parmesan, egg and a pinch of salt.
  • Pulse until they are well incorporated and the dough forms a ball. If the ingredients are too dry add a little water until the dough catches.
  • Remove from the processor, form the dough into a sausage about the diameter of a 50c piece, wrap in cling film and rest in the refrigerator for 20 minutes.
  • Preheat the oven to 180C and line the baking sheets with baking paper.
  • Cut the sausage into coins 3-4mm thick and place on the baking sheets.
  • Cook for 10-12 minutes until golden.

Notes: How is the dried rosemary different to the fresh? Why do we ‘rest’ the dough? What would you serve these biscuits with? What other herbs could you use?

Categories: Kitchen Garden, Recipe | Tags: , , , , , , , | Leave a comment

Melanzane alla Parmigiana

Eggplant Parmigiana

The key here is to make sure the eggplant is well-cooked and therefore slippery and succulent… combined with melted cheese, tomato and basil, well – that’s a marriage made in heaven!
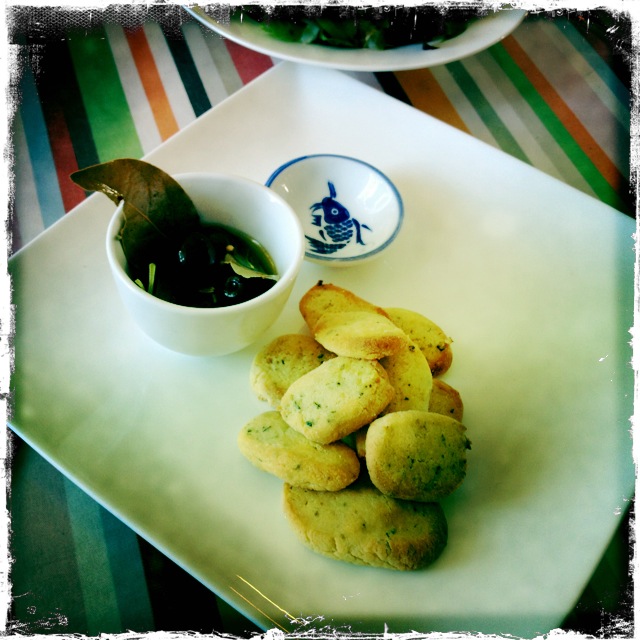
ourkitchengarden.net

Eggplant parmie!

Fresh from the garden: eggplant, basil, onion, garlic, thyme, carrot
Recipe source: adapted from a recipe by Mario Batali in Molto Mario
Serves: 6 or 24 tastes

Equipment:

  • Pastry brush
  • Baking sheet
  • Paper towel
  • Chopping board & knife
  • Bowls – big, med, small
  • Scales
  • Grater
  • Peeler
  • Frying pan
  • Wooden spoon
  • Plate
  • Measures – cup, ¼ cup, tablespoon, teaspoon
  • Egg slice
  • 4 small baking dishes
  • Pot holders
  • Serving plates
Ingredients:

  • Extra-virgin olive oil
  • 2 large eggplant
  • Flaked salt and black pepper
  • 2 cups basic tomato sauce (recipe below)
  • 1 bunch fresh basil
  • A 200g pot of bocconcini
  • 50g Parmigiano-Reggiano
  • 1/4 cup bread crumbs

Basic tomato sauce

  • 2 tablespoons extra-virgin olive oil
  • 1 Spanish onion
  • 4 garlic cloves
  • A handful thyme sprigs
  • 1 small carrot
  • 1 can chopped tomatoes
  • Flaked salt


What to do:

  • Preheat the oven to 230C. Using a pastry brush, oil a baking sheet.
  • Wipe the eggplant and then carefully cut each into slices about ½ cm thick – you may need the mandoline for this, set to the thickest setting. Lightly season each disc with salt and pepper and place on the oiled sheet. Bake the eggplant for about 10 minutes until the slices begin turning deep brown on top.

Then make the tomato sauce:

  • Peel the onion and finely chop. Peel the garlic and finely slice. Wash and wipe the thyme dry, and then strip off the leaves to yield 3 tablespoons. Wash, peel and grate the carrot.
  • Then: Heat the olive oil in the frying pan over medium heat. Add the onion and garlic and cook until soft, about 5 minutes. Add the thyme and carrot and cook 5 minutes more, until the carrot is quite soft. Add the tomatoes and juice and bring to a boil, stirring often. Lower the heat and simmer until thick. Season with salt to taste.

Continued…

  • While the eggplant is baking and the sauce is simmering,  you can organise the rest of the dish: pick the basil leaves, wash them well and spin them totally dry. Rolling up a few leaves at a time into a roll, slice them into very fine ribbons (chiffonade).
  • Drain the bocconcini and carefully cut the balls into thin slices.
  • Measure the parmesan and grate it. Weigh the breadcrumbs and have ready.
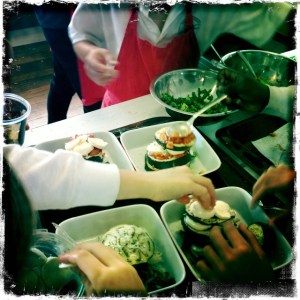
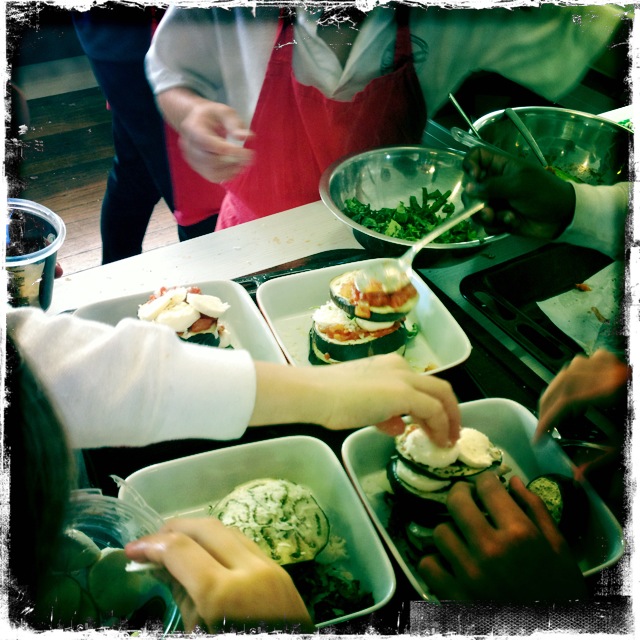
ourkitchengarden.net

The stacking game

To complete the dish:

  • When the eggplant slices are done, slide them out of the oven and lower the oven temperature to 180C.
  • We are going to layer the different ingredients into each of the four small baking dishes – to start, sprinkle half a teaspoon or so of olive oil into each dish and then carefully place the largest eggplant slices on top of the oil.
  • Over each slice, spread a spoon or two of tomato sauce over the top and sprinkle with a teaspoon of basil. Place one layer of mozzarella over each and sprinkle with 1 teaspoon grated parmesan. Place the smaller slices of eggplant over each of the discs and repeat with tomato sauce, basil, and the 2 cheeses. Repeat the layering again until all the ingredients are used.
  • Sprinkle the breadcrumbs over the top of the eggplant dish, and bake uncovered until the cheese melts and the tops turn light brown, about 15/20 minutes.
  • Using pot holders, carefully place on serving plates and serve immediately.

Notes: This dish’s original name is melanzane alla Parmigiana – what does it mean and which language is it from? What other foreign language dishes can you name?

ourkitchengarden.net

Categories: Kitchen Garden, Recipe | Tags: , , , , , , , , , , , , , | Leave a comment

Mushroom and rocket frittate

We love eggs! They are so versatile… and we also love the magic combination of eggs with mushrooms… this recipe has heaps of different things to do so great for budding chefs! The original also calls for spinach but we had heaps of rocket to use instead – the pepperiness isn’t so obvious once the rocket has wilted…

Fresh from the garden: spring onions, mushrooms, rocket, thyme, eggs
Recipe source: adapted from a recipe by Martha Stewart
Serves: 12 frittate or about 30 small

Equipment:

  • Muffin tins (12-hole large or 2 x 24-hole mini)
  • Pastry brush
  • Chopping board & knife
  • Bowls – large, medium
  • Salad spinner
  • Large frying pan
  • Wooden spoon
  • Whisk, spoons
  • Scales
  • Serving plates
Ingredients:

  • 2 tablespoons olive oil plus extra for greasing
  • 2 spring onions
  • 300g mushrooms of your choice!
  • 300g fresh rocket
  • A sprig or two of thyme
  • A good grind of pepper
  • 1 pinch flaked salt
  • 8 eggs
  • 1/3 cup milk
  • 100g feta cheese


What to do:

  • Preheat the oven to 180C. Lightly grease the muffin tin holes with a pastry brush and a teaspoon or 2 of olive oil.
  • Wash the spring onions, stripping the first layer off and trimming any dried-up ugly parts.  Thinly slice the white & green parts but keep them in separate bowls.
  • Wipe the mushrooms with a piece of paper towel – do not wash them! Slice finely.
  • Wash and spin-dry the rocket. Roll it up & slice into thin ribbons.
  • Wash and wipe the thyme dry, then strip from the stalks.
  • In the frying pan, heat oil over medium-high heat; cook the white parts of spring onions, stirring for 1 minute. Add the mushrooms, thyme, pepper and salt and cook on a low heat, stirring occasionally until no liquid remains and mushrooms are light golden for about 5 minutes.
  • Stir in the rocket and cook, stirring, until wilted for about 1 minute. Remove from heat and then stir in the green parts of green onions. Divide among the muffin cups and set aside.
  • Break the eggs into a large bowl and whisk lightly, then add the milk and beat again. Spoon the egg mixture evenly among muffin cups. Weigh the feta cheese & then crumble it up and then sprinkle into each hole.
  • Bake in 180C oven until edges are set, about 10 minutes for the large (or 7-8 minutes for the small) then let cool in pan on rack for a few minutes.
  • Divide among serving plates. Yum!

Notes: Why do we separate the spring onion parts? Why shouldn’t we wash mushrooms?What does thyme smell like? Where does the word frittate come from?

Categories: Kitchen Garden, Recipe | Tags: , , , , , , , , , , , , , , | Leave a comment

Crispy rosemary flatbread

Smittenkitchen says: Nothing could be easier than making this cracker, but that doesn’t mean you shouldn’t tell people you slaved all day over it because they’re going to be impressed, and I see no reason not to milk it. I think you could easily swap the rosemary for other herbs, such as thyme or tarragon, or punch it up with black pepper or other spices, but personally, I like it just the way it is here.

ourkitchengarden.net

Crispy crispy!

Fresh from the garden: rosemary
Recipe source: adapted by smittenkitchen.com from a recipe in Gourmet magazine
Serves: 8 or about 30 tastes

Equipment:

  • 3 heavy, large baking sheets
  • Paper towel
  • Chopping board & knife
  • Measures: cup, ½ cup, ¼ cup, tablespoon, ½ teaspoon
  • Baking paper
  • Large bowl
  • Rolling pins
  • Pastry brushes
  • Wire racks
  • Serving plates
Ingredients:

  • 3½ cups unbleached plain flour
  • 4 large sprigs rosemary
  • 1 teaspoon baking powder
  • 1 teaspoon cooking salt
  • 1 cup water
  • 1/2 cup olive oil plus more for brushing
  • Flaky sea salt

What to do:

  • Preheat oven to 230°C with 3 heavy baking sheets inside.
  • Wash, dry and chop 1 sprig of rosemary.
  • Stir together flour, 1 tablespoon chopped rosemary, baking powder, and salt in a medium bowl. Make a well in centre, then add water and oil and gradually stir into flour with a wooden spoon until a dough forms. Knead dough gently on a work surface 4 or 5 times.
  • Divide dough into 3 pieces and roll out each piece separately on sheets of baking paper into shapes large enough to fit  each baking tray (shape can be rustic; dough should be thin).
  • Lightly brush the tops with additional oil and then strip the remaining rosemary, scattering small clusters of leaves on top, pressing in slightly. Sprinkle with flaked salt.
  • Slide rounds (still on baking paper) onto the preheated baking sheets and bake until pale golden and browned in spots, 8 to 10 minutes.
  • Transfer flatbread (discard baking paper) to racks to cool.
  • Break into pieces and serve.
  • Flatbread can be made 2 days ahead and cooled completely, then kept in an airtight container at room temperature. 

Notes: Why is this called flatbread? Why is this unleavened bread? What is kneading?

Categories: Kitchen Garden, Recipe | Tags: , , , , , , , , , | 2 Comments

Carrot muffins with garlic butter

These are wonderful straight out of the oven, with the garlicky butter melting away in a hole in the middle…It’s a great recipe to make with the kids as there’s lots of grating, mashing and snipping, measuring and weighing… If you have no cupcake cases, just melt a tablespoon of butter in a small saucepan and, using a pastry brush cover each hole with a thin film of butter. This will stop the muffins sticking to the pan. We also used chives instead of parsley – snipping them with kids’ scissors – & made them even better!

ourkitchengarden.net

Carrot muffins with garlic butter

From the garden: carrots, parsley, eggs, garlic
Recipe source: adapted from Stephanie Alexander’s Kitchen Garden Cooking with Kids
Makes: 12 large or about 30 mini muffins

Equipment:

  • 12 or 24 hole muffin tin
  • 12 large or 24 small cupcake cases
  • Peeler, grater
  • Chopping board & knives
  • Bowls – 2 medium, 1 small
  • Measures: ½ cup, ¼ cup, teaspoon
  • Scales
  • Garlic press, whisk
  • Baking paper
  • Wire rack
  • Serving plates
Ingredients:

  • 2 large or 4 medium carrots
  • 15 stalks parsley
  • 60g cheddar or gruyere
  • 220g self-raising flour
  • 1 teaspoon table salt
  • 1 egg
  • 3/4 cup buttermilk
  • 1/2 cup vegetable oil
  • 2 cloves garlic
  • 100g unsalted butter at room temperature
  • Flaked salt

ourkitchengarden.net What to do:

  • Preheat oven to 180C. Drop the cupcake cases into the tin.
  • Wash, peel and grate the carrot to yield about ½ a cup. Wash, dry and chop the parsley. Weigh the cheese & then grate it.
  • Weigh the flour then mix it with the cheese, carrot, parsley and table salt together in a medium bowl.
  • In the other medium bowl whisk the egg, buttermilk and oil together.
  • Make a well in the dry ingredients and add the liquid mixture. Mix lightly and then spoon into muffin cases to about 2/3 full. Bake for 25 minutes for the large & about 15-20 for the small muffins.
  • While the muffins are cooking, make the garlic butter: Squeeze the garlic through the garlic press into the small bowl and add the butter and a pinch of salt. Mix until smooth. Place in a log shape on a piece of baking paper, roll up lightly, sealing the edges and put in freezer until firm.
  • Remove muffins from the oven. Allow to sit for a minute before turning out onto the wire rack to cool. Remove the butter from the freezer and slice into thin discs.
  • When the muffins are cool, make a slit in the top of each insert a slice of garlic butter and place on serving plates.

 Notes: What is buttermilk? What is a well in the centre of the dry ingredients?

ourkitchengarden.net

Buttery garlic goodness…

Categories: Kitchen Garden, Recipe | Tags: , , , , , , , , , , , | 1 Comment

Apricot, cranberry and cardamom hot cross buns

‘… if you have no daughters, give them to your sons…’ At this time of year it is possible to buy hot cross buns anywhere – but I think there is nothing better than freshly made ones!

ourkitchengarden.net

Warm cross dough

Recipe source: adapted from a recipe by Jeremy Strode in Good Living 2011
Makes: 12 large or 24 small buns

Equipment:

  • Stand mixer & dough hook
  • Bowls – large, small
  • Measuring – ½ teaspoon, tablespoon
  • Small saucepan
  • Fork
  • Spatula
  • Plastic wrap & baking paper
  • Large baking tray
  • Chopping board & knife
  • Small snap lock bags
  • Scissors
  • Pastry brush
  • Serving plates
Ingredients:

  • 20g dried yeast
  • 100g caster sugar plus a pinch
  • 100g butter at room temperature
  • ½ teaspoon salt
  • ½ teaspoon ground cardamom
  • 500g plain flour
  • 2 eggs
  • 150g apricots
  • 50g dried cranberries

Crosses

  • 90g self-raising flour
  • 10g skim milk powder

Glaze

  • 1/3 cup water
  • 2 tablespoons caster sugar

What to do:

The dough mixture:

  • Mix yeast with 200ml warm water & pinch of sugar in a small bowl and leave in a warm place for 5 minutes to activate.
  • Chop the apricots.
  • Place butter, salt, cardamom, the rest of the sugar and the plain flour in the mixer and combine.
  • Add eggs and yeast mixture and beat until smooth.
  • Add apricots and when combined, leave in a warm place for 1 to 1½ hours to double in size.

Start of lesson:

  • Line a large baking tray with non-stick baking paper. Punch dough down to its original size. Knead on a lightly floured surface until smooth. Divide into 12 even portions. Shape each portion into a ball. Place balls onto baking paper-lined tray so that the balls just touch. Cover with plastic wrap. Set aside in a warm, draught-free place to prove for 30 minutes. Preheat oven to 190°C.
  • Whilst the buns are proving you can make the next dough mixture (above) for the next class.
  • After the 30 minutes is up, mix self-raising flour, milk powder and 100ml water together in a small bowl until smooth. Spoon into a small snap-lock bag. Snip off a tiny hole in 1 corner of bag. Pipe flour paste over tops of buns to form crosses. Bake for 20 minutes until buns are cooked through.
  • Meanwhile make the glaze: Place 1/3-cup water and sugar into a small saucepan over low heat. Stir until sugar dissolves. Bring to the boil. Boil for 5 minutes. Brush warm glaze over warm hot cross buns. Divide among serving plates – slicing if needed – & then eat!

Notes: If you have no skim milk powder for the crosses then the self-raising flour will work with milk or even water!

ourkitchengarden.net

Hot cross bunsters

Categories: Kitchen Garden, Recipe | Tags: , , , , , , , , , | 2 Comments

Hugh’s Magic Dough

Bondi kids love making dough: bread, pizza and pasta regularly grace our table! This ‘magic’ dough recipe can form the base for pizza, flatbreads, breadsticks etc…

Recipe source: Hugh Fearnley-Whittingstall, Veg Every Day
Makes: 2 large pizza or 2 calzone

Equipment:

  • Scales
  • Stand mixer& dough hook
  • Measures – tablespoon, teaspoon, ½ teaspoon
  • Bowls – large, medium
  • Cling film
Ingredients:

For the magic dough:

  • 250g plain white flour
  • 250g strong white flour
  • 1½ level teaspoons fine sea salt
  • 1 teaspoon instant dried yeast
  • 1 tablespoon olive oil, plus a little extra for oiling

What to do:

For the magic dough:

  • Put the two flours into the bowl of the stand mixer with the salt and yeast. Mix well using the dough hook. Add the oil and 325ml warm water and mix to a rough dough. Knead for 5–10 minutes, until smooth. This is quite a loose and sticky dough, which is just as it should be – you get better-textured bread this way – so try not to add too much flour if you can help it, it will become less sticky as you knead.
  • Trickle a little oil into a clean bowl, add the kneaded dough and turn it in the oil so it is covered with a light film. Cover with a tea towel or cling film and leave in a warm place to rise until doubled in size – at least an hour, probably closer to two – or if using the next day, wrap bowl in cling film and put straight into the fridge to prove slowly.
  • When the dough is well risen and puffy, tip it out and ‘knock it back’ by poking it with your outstretched fingers until it collapses to its former size. It’s now ready to be shaped to your will.

Notes: Why do we leave the dough to rise? What is this process called?

Categories: Kitchen Garden, Recipe | Tags: , , , , , , , , , | 3 Comments

Mini Christmas cakes

I love this idea of mini Christmas cakes for everybody! Don’t forget to let everybody have a stir of the mixture so that they can make a wish for the coming year…

ourkitchengarden.net

Recipe source: adapted from a recipe by Kookaburra on food.com
Makes: 32

Equipment:

  • Large non-reactive bowl, spoon
  • 3 x 12 hole muffin tins
  • 36 cupcake cases
  • Peeler, grater
  • Scales, wooden spoon
  • Small saucepan, spatula
  • Bowls – large, med
  • Measures –cup, ½ cup, tablespoon
  • Sieve, skewer
Ingredients:

  • 1½ kg mixed dried fruit
  • 50ml vanilla extract or dark rum
  • 4 large eggs
  • 1 granny smith apple
  • 1 tablespoon treacle or 1 tablespoon molasses
  • 1 cup brown sugar, firmly packed
  • 250g butter
  • 1½ cups plain flour
  • ½ cup self-raising flour
  • 200g blanched almonds (if using)
  • 150g glace cherries

What to do:

The night before:

  • Place mixed fruit into a very large bowl. Add vanilla extract or rum and mix well. Cover with plastic wrap and allow to stand overnight.

Start of lesson:

  • Preheat oven to 150°C and arrange oven racks to accommodate muffin tins in the centre section of the oven.
  • Place a muffin case into each hole of the muffin tins. Peel and grate the apple. Place the butter in the small saucepan and gently heat until melted. Remove from the heat to cool. Break the eggs into a medium bowl and lightly beat.
  • One ingredient at a time, add the beaten eggs, grated apple, treacle and sugar to the fruit mixture, mixing well with a wooden spoon after each addition.
  • Sift the flours into a big bowl, then add the cooled, melted butter and flours to the mixture and mix thoroughly – make sure to let every member of the group have a stir of the mixture while they make a Christmas wish!
  • Spoon the mixture into the muffin cases, filling to almost full. Use the back of a spoon to smooth the top of each cake.
  • Press a glace cherry into the centre of each cake and, if you like, around each cherry press in 5 almonds to make ‘petals’- pointy end closest to the cherry.
  • Bake at 150°C for about 40-45 minutes or until a skewer inserted into the centre of a cake comes out clean. Cool then store in airtight tins or the refrigerator. Or eat!

Notes: They can be eaten immediately or wrapped tightly in cling film, still in their paper. They will keep for a month at least, long after the festivities (and ham) have finished!

ourkitchengarden.net

Categories: Kitchen Garden, Recipe | Tags: , , , , , , , , | Leave a comment

Create a free website or blog at WordPress.com.