Posts Tagged With: school

Kitchen News 1st March

Image 2

A little individual gluten-free tart we made with a corn tortilla

Lots going on this fortnight – and lots of people helping which has been absolutely great!

Last week I sent an email out to each class in the SAKGP with all their lessons listed until the end of Term 2 – so that those who have busy schedules may be able to lock something in down the track. Please ask your class rep if you’d like to see it. There are only 6 or so kitchen lessons for each class until July so not that many!

Mish and the garden kids have been frantically getting new seedlings and seeds into the ground but for the moment we’re making the best of our late summer garden beds: the little baby wild tomatoes have been sliced into a flaky French tomato tart, the baby zucchinis we’ve been stuffing into the spiralisers for Zucchini, mint and feta salad with crunchy pangrattato, and we’ve tried to tame the feral celery into one of our faves, Celery and nutmeg soup.

A new recipe for us has been a veritable hit in the Cottage: crispy Red lentil fritters with green yoghurt, green from all the coriander, parsley and green chilli, and it’s a surefire winner for an easy midweek dinner! And to round out the menu, we’ve been chopping up rolling out crunchy and delicious Rosemary and thyme grissini breadsticks.

5P and 6Y had their first kitchen lesson this week due to Camp and other factors, so to welcome them back I surprised them with a special Pancake Day menu: Spinach and feta crepes with ratatouille (see, you can have savoury pancakes!), Oat pancakes with roasted nectarines and plums, and Pikelets with vanilla mascarpone and lemongrass syrup. Leftovers? Kidding right?!

So thanks for coming along in Kitchen, we all really appreciate it!

See you soon, Melissa

PS. If you have any unwanted forks at home please send them in to the Cottage! I’m having trouble finding any at Vinnies! x

Advertisement
Categories: Kitchen Garden, News | Tags: , , , , | Leave a comment

Red lentil fritters with green yoghurt

IMG_4905

These little morsels may be on the diminutive side, but they punch well above their weight in the flavour stakes. If you wanted to make them gluten-free, you could substitute the flour with teff flour or GF self-raising flour – you may need to add a little more to make the required consistency.

Fresh from the garden: lemon, onion, coriander, parsley, garlic, chilli
Recipe source: adapted from a recipe on gourmetraveller.com.au
Serves: 6 or 24 tastes

Equipment:

  • Frying pan
  • Measures: jug, cup, tablespoon, teaspoon, ½ teaspoon
  • Mortar and pestle
  • Chopping boards and knives
  • Large saucepan and lid
  • Mixing bowls – large, medium, small
  • Microplane zester
  • Citrus juicer
  • Salad spinner
  • Tongs
  • Scales
  • Mini chopper processor
  • Whisk
  • Serving plates and little bowls
Ingredients:

·       ½ onion

·       2 garlic cloves

·       2 teaspoons coriander seeds

·       2 teaspoons cumin seeds

·       2 tablespoons olive oil

·       200g (1 cup) red lentils

·       2 eggs

·       100g self-raising flour

·       2 lemons

·       Rice Bran oil, for shallow-frying

Green yoghurt

·       Small bunch coriander

·       Small bunch flat-leaf parsley

·       1 garlic clove

·       ¼ long green chilli

·       ½ teaspoon ground cumin

·       ¼ teaspoon ground cardamom

·       1 tablespoon olive oil

·       100g Greek yoghurt

What to do:

For the lentil fritters:

  1. Measure the spices into the frying pan and heat, gently toasting for a few minutes. Remove from the heat and leave to cool, then coarsely grind with the mortar and pestle.
  2. Peel and finely chop the onion and 2 cloves of garlic.
  3. Heat the 2 tablespoons of olive oil in the saucepan over medium-high heat, add onion and garlic and sauté until tender for about 5 minutes.
  4. Stir in spices and fry until fragrant for 30 seconds, then add lentils and 650ml water, bring to a simmer, cover and cook until lentils are tender and liquid is absorbed for about 10 minutes. Transfer to a bowl to cool.

 For the green yoghurt:

  1. Wash the lemon and zest only the thin layer of yellow rind, reserving for the lentil mixture, then juice both halves.
  2. Wash the herbs and spin dry. Add just the leaves from the parsley and all the coriander to the small mini-chopper.
  3. Peel the remaining clove of garlic and add to the mini chopper.
  4. Slice the chilli in half (using gloves if you wish). Remove the seeds, discarding into compost, and slice chilli into small bits, adding to the mini chopper.
  5. Finally add the spices to the mini chopper, olive oil and lemon juice and process to a fine purée. Transfer to a bowl, season to taste, swirl in yoghurt and divide into serving bowls.

To finish the lentils:

  1. Separate the eggs, carefully, so that the yolks remain intact and the whites are clean.
  2. Stir egg yolks into lentils, then stir in flour and lemon rind and season generously to taste. Whisk egg whites and a pinch of salt in a separate clean and dry bowl to firm peaks and fold into lentil mixture.
  3. Preheat oven to 180C and heat 3cm oil in the frying pan over medium-high heat. When hot, add heaped tablespoonfuls of lentil mixture in batches and cook, turning occasionally, until golden brown for about 2-3 minutes.
  4. Drain on paper towels, then slice in half if needed. Cut remaining lemon into quarters to serve.
  5. Divide onto serving plates, pop bowls of yoghurt and lemon wedges on and take to the table.

Notes: Why do we need to use gloves when preparing chillies? How can you tell when the oil is hot enough to fry?

Categories: Kitchen Garden, Recipe | Tags: , , , , , , , , , | Leave a comment

French tomato tart

IMG_4904

The simple tarte à la tomate is a favourite French dish that makes use of all of those excess ripe summer tomatoes in the kitchen. This classic recipe is without cream or eggs in the filling but just a little kick of mustard smeared over the free-form pastry base.

Fresh from the garden: tomatoes, thyme, oregano
Recipe source: adapted from a recipe on sbs.com.au
Serves: 4 or 24 tastes

Equipment:

  • Food processor
  • Measures: tablespoon, teaspoon
  • Plastic wrap
  • Mixing bowls – large, medium
  • Colander
  • Chopping boards and knives
  • Salad spinner
  • Large baking tray
  • Rolling pin
  • Serving plates
Ingredients:

·       300g (2 cups) plain flour

·       150g cold butter, chopped

·       1 egg

·       1 tablespoon cold milk

·       2 tablespoons whoegrain mustard

·       A couple of heirloom tomatoes

·       250g vine-ripened cherry tomatoes

·       4 sprigs thyme, plus extra to garnish

·       4 sprigs oregano, plus extra to garnish

·       Olive oil, to drizzle

What to do:

For the pastry:

  1. Process flour, butter and 1 teaspoon salt in a food processor until mixture resembles fine crumbs. Add whisked egg and milk, and process until a dough forms. Wrap dough in plastic wrap and refrigerate while you wash the tomatoes.

For the filling:

  1. Wash all the tomatoes and drain in the colander. Slice the large tomatoes into slices.
  2. Wash the herbs and spin dry. Strip off the leaves and reserve.

To finish the dish:

  1. Preheat oven to 200°C. Roll out dough between 2 sheets of baking paper to form a 3 mm-thick round. Transfer to a large oven tray and remove top sheet of baking paper.
  2. Spread dough with mustard, leaving a 3cm border around edge.
  3. Arrange sliced tomatoes over mustard so they are overlapping, then top with cherry tomatoes. Pinch and fold over edge of tart, then scatter with thyme and oregano leaves.
  4. Drizzle with oil and season with salt and pepper.
  5. Bake for 30 minutes or until pastry is golden and crisp. Garnish with extra oregano and thyme sprigs.
  6. Serve cut into slices.

Notes: What is tomato in French? What does freeform tart mean?

Categories: Kitchen Garden, Recipe | Tags: , , , , , , , | Leave a comment

Kitchen News 14th February 2017

image-4

This article originally appeared in the school newsletter on 16th February.

Week 4 already! The Chinese Banquet Menu has reared its Roostery head again in Kitchen, with Chicken, spinach and coriander pot-sticker dumplings with honey soy on the menu, the children diligently filling gow gee wrappers with the blended green mush, and sealing the dumplings up tightly… the Vegetable spring rolls have the students preparing all the veggies and then stir-frying with rice vermicelli noodles in a big wok, then rolling up in the pastry and sticking firm with waterdrops, and serving with their homemade sweet green chilli sauce. I learnt today that my recipe is incorrect in chopping up the noodles as the long ones are supposed to signify a long life, and by chopping them up we have been shortening everybody’s lifespan! Sorry about that everybody!

Another success is the Shanghai-style eggplant. I cannot tell you enough how amazingly delicious this dish is! If you have a steadfast eggplant-hater in your life (as I do, two of them) then I implore you to try the recipe at home – it’s available on Edmodo via the SAKGP Bondi group page (see code below to join if you haven’t already). It’s a winner, and renders the eggplant almost unrecognisable. It’s like vegetable chocolate! (ish).

Kylie Kwong’s Chilled cucumber salad is brilliant, especially on a hot day like these, and we have now introduced Special fried rice to the list, with long grain rice cooked the day before and wok-fried with beaten egg and spring onions. Delish!

And served with a really delicate and powder-pink Chinese cup of Jasmine tea. Yum cha indeed.

By the time you read this we should have our timetables sorted and our class reps elected. Please look out for your next Class News with details of Kitchen Garden lessons, and if you can spare the time, please come along and help as we really do need you! Parents from Kindergarten, Year 1 and Year 2 gratefully received too.

The SignUp link for all classes: http://signup.com/go/n5ciGB – please remember to bring your Working With Children signed form to show the office if you haven’t already!

image-3

Categories: Kitchen Garden, News | Tags: , , , , , , , | Leave a comment

Chicken, spinach and coriander dumplings with honey soy

img_4865

Dumplings are so easy to make once you’ve mastered the art of folding the dumpling skin! They can be frozen after Step 8, just make sure you freeze them separately on trays and once frozen, pop them into an airtight bag. They can be cooked straight from frozen.

Fresh from the garden: baby spinach, coriander, spring onions, ginger, garlic
Recipe source: Melissa from The Bondi Cook
Makes: 40 dumplings

Equipment:

  • Mixing bowls – big, med, small
  • Salad spinner
  • Chopping boards and knives
  • Microplane zester
  • Food processor
  • Scales
  • Measures: jug, cup, tablespoon, teaspoon
  • Spatula
  • Large baking tray
  • Small saucepan
  • Potato peeler
  • Small sauce bowls
  • Large non-stick frying pan with lid
  • Serving plates


Ingredients:

  • 1 bunch coriander
  • A large handful baby spinach
  • 2 small spring onions
  • 1 small piece of ginger
  • 250g minced chicken
  • 1 tablespoon Shaoxing rice wine
  • 1 tablespoon dark soy sauce
  • 1 teaspoon light soy sauce
  • 1 teaspoon salt
  • A few grinds of black pepper
  • 2 teaspoons sesame oil

To wrap

  • 2 tablespoons cold water
  • 1 packet 40 gow gee wrappers
  • Cornflour

For the dipping sauce

  • 1 clove of garlic, small piece ginger
  • Small handful coriander
  • 1 cup soy sauce
  • 1 tablespoon honey

To cook

  • 2 tablespoons Rice Bran oil
  • 75ml water

What to do:
For the filling

  1. Wash the coriander in a big bowl of cold water and spin dry. Finely chop the stalks and leaves.
  2. Wash and spin dry the spinach and finely chop.
  3. Wash the spring onions and finely slice.
  4. Peel the skin from the ginger and finely chop or grate with the microplane zester.
  5. Combine them all into the bowl of the food processor, weigh the mince and add in and then measure in the rest of the ingredients. Blitz for a few seconds to combine thoroughly. Scoop out into a large bowl, using a spatula to scrape down the sides.

Preparing the dumplings

  1. Fill a small bowl with clean water and make sure your hands are clean. Wipe down and dry your work surface. Lightly flour a large baking tray with cornflour. Open the packet of wonton wrappers and peel off one per person and lay it on the surface in front of you.
  2. Place a large teaspoon of filling in the centre of each wrapper and moisten the edges with a finger dipped in water. Fold the dough in half and pinch together with your fingers.
  3. Pleat around the edge, pinching with your fingers to seal well. The dumpling should look like a small Cornish pasty with a flat base and rounded top.
  4. Transfer each finished dumpling to the tray and keep it covered until you have stuffed all the dumplings in this way.

To make the sauce

  1. Peel the garlic and squeeze through the garlic press into the small saucepan.
  2. Peel the ginger using a potato peeler and zest into the saucepan using the microplane grater.
  3. Wash the coriander well and spin dry. Finely chop stalks and leaves and reserve.
  4. Heat the saucepan with garlic and ginger and a tablespoon of oil, on low heat and gently cook the garlic and ginger until soft. Do not let them go brown! Add in the honey and let cook until bubbling, and then add in the soy sauce and cook for another minute.
  5. Add in the chopped coriander and pour into small serving bowls to dip.

To cook

  1. Heat a large non-stick frying pan until it is very hot. Add the oil and place the dumplings flat-side down into the pan.
  2. Reduce the heat and cook for about two minutes until they are lightly browned. Add the water, cover the pan with the lid and simmer gently for about 10 minutes or until most of the liquid is absorbed. Check the water half-way through and add more if necessary. Uncover the pan and continue to cook for a further two minutes.

To serve

  1. Divide the dumplings onto serving plates and serve with dipping sauce in a bowl on the side.

Notes: Why is it important not to lick your fingers while preparing this recipe? What others fillings could we put in a dumpling?


Categories: Kitchen Garden, Recipe | Tags: , , , , , , , , | Leave a comment

Quinoa tabbouleh

IMG_1419

White quinoa is the most common variety, but red quinoa is also available and has a nuttier flavour. They can be used interchangeably. Quinoa is a fab alternative to grains and is gluten-free.

Fresh from the garden: basil, parsley, lemons, mint, cucumbers, tomatoes
Recipe source: adapted from a recipe by Martha Stewart on marthastewart.com
Serves: 6 or 24 tastes

Equipment:

  • Stockpot with lid
  • Measures: cup, ½ cup, tablespoon, teaspoon, ¼ teaspoon
  • Wooden spoon, fork, teaspoon
  • Salad spinner
  • Mezzaluna
  • Microplane zester
  • Citrus juicer
  • Chopping board & knife
  • Peeler
  • Bowls – 1 large & 4 small
  • Measuring jug
  • Serving bowls
Ingredients:

Cook quinoa:

  • 1 cup quinoa
  • 1½ cups water
  • 1 teaspoon cooking salt

Make tabbouleh:

  • 4 large handfuls of parsley (about 2 cups when chopped)
  • 1 large handful mint leaves (about ½ cup when chopped)
  • 1 large handful basil leaves (about ½ cup when chopped)
  • 1 teaspoon flaked salt
  • ¼ teaspoon freshly ground black pepper
  • 2 lemons
  • 1 medium cucumber
  • 2 medium tomatoes
  • ½ cup extra-virgin olive oil

What to do:

  1. Toast quinoa in a stockpot over gentle heat, stirring frequently until fragrant for 6 to 8 minutes. Add the water and a teaspoon of cooking salt and bring to a boil. Reduce heat to medium-low, cover, and simmer until grains are tender, about 15 minutes. Remove from heat and let stand, covered, for 10 minutes, then fluff with a fork and let cool to room temperature.
  2. Wash, spin dry and pick the leaves from the stems of the herbs. Coarsely chop using the mezzaluna.
  3. Zest one lemon to yield 1 teaspoon zest then cut both lemons and squeeze through the citrus juicer to yield 4 tablespoons juice.
  4. Peel the cucumber, cut in half lengthways and scrape out the seeds with the teaspoon. Cut the cucumber into small dice about ½cm square to yield about 1 cup.
  5. Cut the tomatoes into small dice about ½cm square to yield about 1 cup.
  6. Add all the ingredients to the large bowl, measure the olive oil and pour into the bowl, mixing thoroughly to combine.
  7. Divide amongst serving bowls and serve at room temperature.

Notes: What is quinoa? Why do we toast the quinoa first? What does cutting into ‘dice’ mean?

Categories: Kitchen Garden, Recipe | Tags: , , , , , , , | Leave a comment

Back to the lunchbox grind…

Image 1

Ah, holidays… How I love you so! Endless days of surf, sun and sand: easy salad meals and fish-and-chip takeaways, late nights with later mornings and rhythm and roster thrown out the window. I used to dread the return to school with its shoelace tying, regimental checking of tooth-brushing and the almost-out-the-door sunblock slather, the dreary routine of homework and frantic transporting to after-school activities… But most of all I stressed about what to pack for lunch.

In the early days I used to pack too much food. Our boy would come home from school and be so upset that he hadn’t been able to finish everything before the play bell rang. I asked why he didn’t just continue eating his food after the bell? He looked at me like I was crazy and said No way! I’ll miss out on sandpit time!

In the first year of school our girl would come home and complain that the teachers said the children must eat everything in their lunchboxes and that they would inspect each box before play. I said why don’t zip up your box and pretend you’ve eaten it all? But that would be LYING MUMMY she said. And lying’s BAD! Good grief, I said.

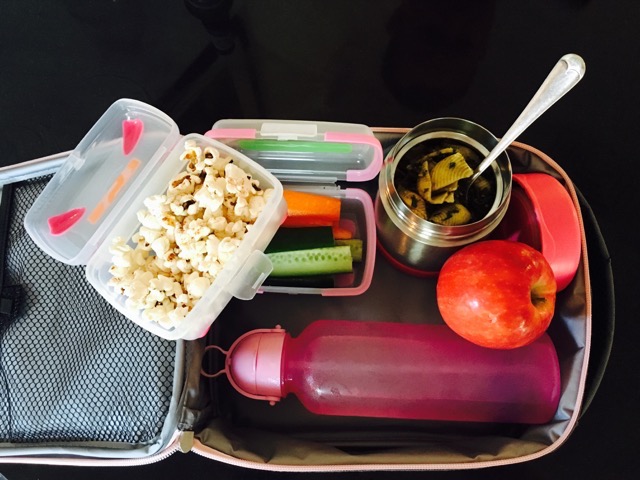
But then I slowly worked it out: Firstly not to pack too much. There’s a BIG difference between taking your children out for the day to the zoo, or driving down the coast on the holidays or even taking them to the beach for a few hours, where they will demand constant snacks and bits of fruit and drinks of water and little packets of rice crackers or tiny teddies, or mummy can we get sushi or icypoles or Peckish or Mentos or a lollipop pleeeeeeease? At school the children are so busy that they’re not bored enough to want lots of food – and nor are the teachers slaves to every whim like we seem to be – so they don’t need a snack for every half hour! A couple of different types of raw veggie and fruit, and a piece of cheese are ideal. A little pot of rice crackers or Jatz, or popcorn made at home in a big quantity with a little oil and pinch or two of salt and even a sprinkle of smoked paprika or ground coriander if that suits your fancy will last for a while and make it in to a few days’ worth of lunchboxes.

Second in my Book of Lunchbox Revelations was the news that the main lunch itself didn’t have to be too much of a mission either. My kids love taking pasta to school and will happily eat it every day, and even if it’s cold. I know, what a win! So I like to make fresh pesto or a herby tomato pasta sauce and toss it over penne or shells – long pasta like spaghetti or linguine always gets extremely messy with my kids and will most definitely end up all down the front of a school dress or shirt, especially if it’s brand new and spanking white. I invested in a couple of small Thermos pots – not the cheapest container on the market but they hold hot food or even runny soup without leaking, and the cost per use in our house has so far brought the cost down to about nought point three cents a go! Wraps or rice paper rolls are good too, made with grated cheese and avocado and ham slices or roast chicken or tinned tuna, or whatever’s in the damn cupboard! To make packing easy, I roll one into a square of plastic wrap and fold in all the edges until it’s a tight tube, and then cut it across the middle so that I have 2 easy small tubes to pack, and it’s easy for the kids to peel open and eat.

Thirdly, The Oracle spoke to me of easy-opening boxes and tubs, and lunchboxes that fit a water bottle in (more on that later). Make sure your child can open what they’ve got! Otherwise they’re waiting in line with twenty other kids for the teacher to crack open their packaged snack. My pet hate: the sucky yoghurt packs. Those little plastic tops are IMPOSSIBLE for little children to open by themselves, and they end up dropped all over the playground (the lids, not the kids) – and no doubt will still be spinning around in the South Pacific Gyre for decades to come… and don’t let me talk about the sugar content in those things! Or the fact it’s getting sucked straight onto their front teeth.

Next point: vital water. A great idea is to chuck their water bottle into the freezer overnight, so your kids will have super-chilled, refreshing water to drink during the day, and the bottle performs the double-act of keeping their food fresh, cool and safe too. Kids do not need flavoured milk or packaged juice.

Also while you’re there, think Nude Food and use the re-useable boxes that come in all lunchboxes nowadays. Instead of buying individually portioned sultanas, crackers, biscuits or the dreaded yoghurt, grab a big value box, decant into your little screw-lid pots and save on all the trips to the recycle bin!

And lastly don’t forget that when your child sees you at the end of their school day, they will suddenly remember that you are their servant/ butler/ slave and will immediately demand a snack equivalent to all the snacks they’ve missed out on during the day… so act like the Girl Guides and Be Prepared!

Mel’s top tips for a sane lunchbox life:

Recess – 1 or 2 from each category

  • Veggies: carrot, celery or cucumber sticks, cherry tomatoes
  • Crackers: Rice crackers, Jatz, popcorn, seaweed sheets
  • Wedge of cheese, babybel etc
  • Hummus or taramasalata spooned into a little pot
  • Fruit: Passionfruit or kiwifruit cut in half and popped in a little pot. Whole apples. Orange slices. Cherries and grapes. Bananas. Watermelon slices. Little chunks of pineapple. Real fruit!

Lunch

  • Pasta with veggies or tomato sauce, pesto, Bolognese
  • Soup in winter months, in a thermos-like safe pot
  • Fried or steamed rice with sauce as above
  • Roasted cold chicken drumsticks or wings
  • Wraps with ham, chicken, cheese, beetroot, salad etc
  • Rice paper rolls with soaked noodles and veggies
  • Sushi hand rolls
  • Leftovers! And definitely order extra next time you’re at a Chinese restaurant…

The after-school activities or pick-up zone starvation madness – in bulk!

  • Big box of popcorn – easy and cheap to make
  • Big box of mixed fruit sliced up: fruit as above!
  • The occasional treat – biscuits or small muffins

This article originally published on the Nutrikids website, Feb 2016


Categories: Nutrikids | Tags: , , , , | Leave a comment

Kitchen News 18th November 2015

ourkitchengarden.net

Ok so here we really are in spring. Finally! With pelting November rain again and burst of brilliant sunshine the garden is finally giving up its gorgeous primavera prizes… In class we’ve been discussing why it is that a lot of our veggies have bolted to seed without forming properly, like the onions that have flowers but no bulb, and the non-bulbous fennel bulbs shooting out with towering fronds: we know it’s the hot crazy October sun, great for swimming in the ocean early but havoc for the plants. Anyway at least now the winter veg is gone and we are totally seasonal baby! If you walk through at the garden now you’ll be amazed at all the activity and sprouting green stuff everywhere. Hallelujah!

So to our menu reflecting the hues and tones of green, green and green (with some orange bits thrown in too): a brand new orange and fennel salad with (the last of the) blood orange vinaigrette, slinky silverbeet and home-made garam masala soup with coriander, a burstingly spring salad of broad beans, radishes and goats cheese, and then to top it all off, some comfort food for the odd wintry day where you need something soulful: creamy polenta with poached eggs and sage. And we even found time to bottle up some of our famous rhubarb and vanilla jam too in some classes. So there you go. All these recipes up on this blog, so clink the links if interested…

Only a few weeks left of Kitchen Garden so make the most of us! And we still have lots of Chicken spots to fill over the holidays so please sign up if you can help 🙂

To Volunteer for Classes or Chickens: click on VolunteerSpot at http://vols.pt/8qCfEY

Peace

Categories: Kitchen Garden, News | Tags: , , , | Leave a comment

Spring salad of broad beans, radish and goats cheese

This salad is a beautiful celebration of spring, with lots of lovely texture from the broad beans, crunch from the radishes and creaminess from the goats cheese. At school the children love to run out and find edible flowers like nasturtiums or borage to garnish their salads. And if the broad beans are particularly small or very young, we don’t both to double-pod them.

IMG_0522

Fresh from the garden: lettuces, broad beans, radishes, marjoram, edible flowers

Recipe source: Melissa

Serves: 6 or 24 tastes

Equipment:

  • Saucepan & lid
  • Bowls – 2 large, 2 med, 2 small
  • Colander
  • 2 salad spinners
  • Paper towel
  • Mandoline slicer
  • Potato peeler
  • Measuring – 1/4 cup, tablespoon, teaspoon
  • A small jar with lid
  • Plates or bowls to serve
Ingredients:

  • A handful of lettuce leaves
  • A large handful broad beans in pod
  • A small handful of radishes
  • 2 sprigs marjoram
  • A small log of goats’ cheese
  • 1 tablespoon red wine vinegar
  • A teaspoon of honey
  • 1/4 cup extra-virgin olive oil
  • Flaked salt & black pepper
  • Edible flowers

What to do:

  1. Fill the saucepan with water & set to boil on high heat.
  2. Pod the broad beans, discarding the outer shell into the compost and add beans to the boiling water. Fill a large bowl with cold water and have ready.
  3. Boil the broad beans for 3 minutes, drain and then immediately refresh in the bowl of cold water. Drain again and double-pod by slipping the outer shell off into the compost. Reserve beans.
  4. Wash the lettuce leaves really well and spin dry in sections, reserving in a large clean, dry bowl. Wash & dry the marjoram sprigs, picking the leaves and leaving whole.
  5. Wash the flowers gently in a small bowl of cold water and reserve on a piece of paper towel until ready to use.
  6. Scrub the radishes clean, wipe dry and using the mandoline or a peeler, carefully slice into thin discs.
  7. For the dressing, measure the olive oil, red wine vinegar and honey and pour them into the jar. Add a sprinkle of salt and pepper, and then put the lid on & give the jar a good shake.
  8. Drizzle the dressing around the large lettuce bowl and gently turn the leaves with your fingers.
  9. Place the leaves in the serving bowls, then pour the broad beans, radish slices and snap peas into the bowl and mix to cover in the residual dressing. Then sprinkle over each bowl of leaves.
  10. Break the goats cheese into small chunks with your fingers and divide over the salads with the marjoram leaves.
  11. Finish by carefully placing the flowers on top of the bowls of salad. Serve immediately!

Notes: What does residual mean? Why do we use honey vinaigrette here instead of our usual lemony dressing? Can you name some edible flowers?

IMG_0426

Categories: Kitchen Garden, Recipe | Tags: , , , , , , , | Leave a comment

Honey pickled kohlrabi

Kohlrabi has to be the ugliest veg in the whole world, but its taste is somewhere between cabbage and apple! This is a great preserving recipe. Keep in the pantry for up to a year but once opened keep in the fridge and eat within 2 weeks.

ourkitchengarden.net

Fresh from the garden: kohlrabi

Recipe source: adapted from a recipe on puttingupwitherin.com

Makes: 4 large jars

Equipment:

  • Chopping boards and knives
  • Peelers
  • Measures: cup, tablespoon, teaspoon
  • Scales
  • Medium stockpot
  • Ladle & wooden spoon
  • Funnel
  • Paper towel
  • 4 x 470ml jars with lids
Ingredients:

  • 4 large kohlrabi heads
  • 1 litre apple cider vinegar
  • 1 litre water
  • 120g honey
  • 4 star anise
  • 2 teaspoons whole caraway seed
  • 1 tablespoon non-iodized sea salt

What to do:

To sterilize the jars:

  1. Wash the jars and lids in hot soapy water, rinse well and drain upside down.
  2. Place all the jars onto an oven tray, the right way up, and slide into the cold oven. Heat oven to 160C and leave to sterilize for 15 mins.
  3. Drain lids into the colander, then dry them with clean pieces of paper towel, taking care not to touch the inside of the lid.

To prepare the recipe:

  1. Wash the kohlrabi and then peel off the skin. You may need to ask an adult to help you slice the skin off if it is tough. Carefully cut into thin slices, then each slice into thin matchsticks.
  2. In a medium-sized stockpot combine vinegar, water, honey, star anise, caraway seeds and salt. Bring to a boil.
  3. Bring out the jars and leave to cool for a few minutes, then using tongs carefully pack the sterilized jars with kohlrabi matchsticks, leaving a bit of space at the top and not touching the inside of the jar.
  4. Then place the funnel into jar and ladle the hot honey brine (including caraway seeds) over kohlrabi leaving approx. 1cm headspace and including one star anise per jar.
  5. Using a clean piece of paper towel, wipe the rims, apply the dry lids and then process in hot water bath for 20 minutes (see Melissa).
  6. Let pickles sit a cool dry place for at least 3 weeks before consuming. 

Notes: What does kohlrabi look & smell like? Do you like pickles?

Categories: Kitchen Garden, Recipe | Tags: , , , , | Leave a comment

Blog at WordPress.com.

%d bloggers like this: