Posts Tagged With: children

Kitchen News 1st March

Image 2

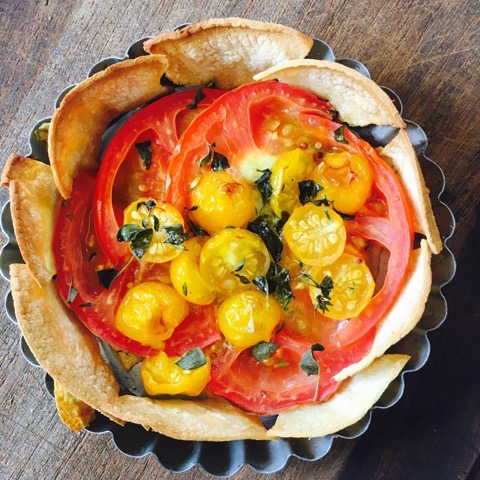
A little individual gluten-free tart we made with a corn tortilla

Lots going on this fortnight – and lots of people helping which has been absolutely great!

Last week I sent an email out to each class in the SAKGP with all their lessons listed until the end of Term 2 – so that those who have busy schedules may be able to lock something in down the track. Please ask your class rep if you’d like to see it. There are only 6 or so kitchen lessons for each class until July so not that many!

Mish and the garden kids have been frantically getting new seedlings and seeds into the ground but for the moment we’re making the best of our late summer garden beds: the little baby wild tomatoes have been sliced into a flaky French tomato tart, the baby zucchinis we’ve been stuffing into the spiralisers for Zucchini, mint and feta salad with crunchy pangrattato, and we’ve tried to tame the feral celery into one of our faves, Celery and nutmeg soup.

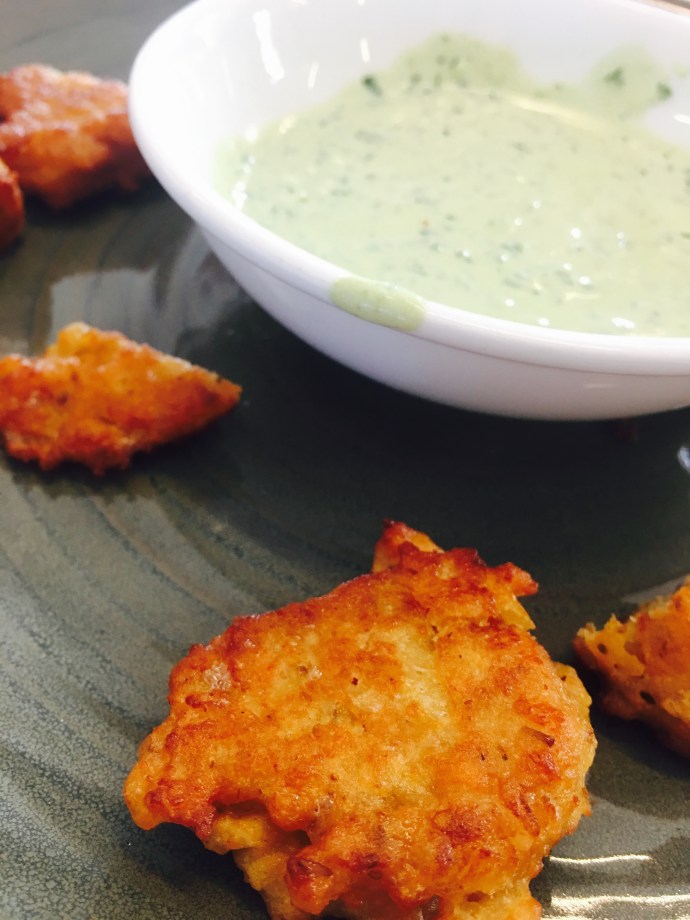
A new recipe for us has been a veritable hit in the Cottage: crispy Red lentil fritters with green yoghurt, green from all the coriander, parsley and green chilli, and it’s a surefire winner for an easy midweek dinner! And to round out the menu, we’ve been chopping up rolling out crunchy and delicious Rosemary and thyme grissini breadsticks.

5P and 6Y had their first kitchen lesson this week due to Camp and other factors, so to welcome them back I surprised them with a special Pancake Day menu: Spinach and feta crepes with ratatouille (see, you can have savoury pancakes!), Oat pancakes with roasted nectarines and plums, and Pikelets with vanilla mascarpone and lemongrass syrup. Leftovers? Kidding right?!

So thanks for coming along in Kitchen, we all really appreciate it!

See you soon, Melissa

PS. If you have any unwanted forks at home please send them in to the Cottage! I’m having trouble finding any at Vinnies! x

Advertisement
Categories: Kitchen Garden, News | Tags: , , , , | Leave a comment

Red lentil fritters with green yoghurt

IMG_4905

These little morsels may be on the diminutive side, but they punch well above their weight in the flavour stakes. If you wanted to make them gluten-free, you could substitute the flour with teff flour or GF self-raising flour – you may need to add a little more to make the required consistency.

Fresh from the garden: lemon, onion, coriander, parsley, garlic, chilli
Recipe source: adapted from a recipe on gourmetraveller.com.au
Serves: 6 or 24 tastes

Equipment:

  • Frying pan
  • Measures: jug, cup, tablespoon, teaspoon, ½ teaspoon
  • Mortar and pestle
  • Chopping boards and knives
  • Large saucepan and lid
  • Mixing bowls – large, medium, small
  • Microplane zester
  • Citrus juicer
  • Salad spinner
  • Tongs
  • Scales
  • Mini chopper processor
  • Whisk
  • Serving plates and little bowls
Ingredients:

·       ½ onion

·       2 garlic cloves

·       2 teaspoons coriander seeds

·       2 teaspoons cumin seeds

·       2 tablespoons olive oil

·       200g (1 cup) red lentils

·       2 eggs

·       100g self-raising flour

·       2 lemons

·       Rice Bran oil, for shallow-frying

Green yoghurt

·       Small bunch coriander

·       Small bunch flat-leaf parsley

·       1 garlic clove

·       ¼ long green chilli

·       ½ teaspoon ground cumin

·       ¼ teaspoon ground cardamom

·       1 tablespoon olive oil

·       100g Greek yoghurt

What to do:

For the lentil fritters:

  1. Measure the spices into the frying pan and heat, gently toasting for a few minutes. Remove from the heat and leave to cool, then coarsely grind with the mortar and pestle.
  2. Peel and finely chop the onion and 2 cloves of garlic.
  3. Heat the 2 tablespoons of olive oil in the saucepan over medium-high heat, add onion and garlic and sauté until tender for about 5 minutes.
  4. Stir in spices and fry until fragrant for 30 seconds, then add lentils and 650ml water, bring to a simmer, cover and cook until lentils are tender and liquid is absorbed for about 10 minutes. Transfer to a bowl to cool.

 For the green yoghurt:

  1. Wash the lemon and zest only the thin layer of yellow rind, reserving for the lentil mixture, then juice both halves.
  2. Wash the herbs and spin dry. Add just the leaves from the parsley and all the coriander to the small mini-chopper.
  3. Peel the remaining clove of garlic and add to the mini chopper.
  4. Slice the chilli in half (using gloves if you wish). Remove the seeds, discarding into compost, and slice chilli into small bits, adding to the mini chopper.
  5. Finally add the spices to the mini chopper, olive oil and lemon juice and process to a fine purée. Transfer to a bowl, season to taste, swirl in yoghurt and divide into serving bowls.

To finish the lentils:

  1. Separate the eggs, carefully, so that the yolks remain intact and the whites are clean.
  2. Stir egg yolks into lentils, then stir in flour and lemon rind and season generously to taste. Whisk egg whites and a pinch of salt in a separate clean and dry bowl to firm peaks and fold into lentil mixture.
  3. Preheat oven to 180C and heat 3cm oil in the frying pan over medium-high heat. When hot, add heaped tablespoonfuls of lentil mixture in batches and cook, turning occasionally, until golden brown for about 2-3 minutes.
  4. Drain on paper towels, then slice in half if needed. Cut remaining lemon into quarters to serve.
  5. Divide onto serving plates, pop bowls of yoghurt and lemon wedges on and take to the table.

Notes: Why do we need to use gloves when preparing chillies? How can you tell when the oil is hot enough to fry?

Categories: Kitchen Garden, Recipe | Tags: , , , , , , , , , | Leave a comment

Special Fried Rice

The key to successful fried rice is to cook the rice the night before, cool, cover and store in the fridge – that way the grains have time to cool and separate. At home feel free to add in some cooked chicken or prawns.

Fresh from the garden: eggs, spring onions, garlic, ginger
Recipe source: Melissa
Serves: 6 or 24 tastes

Equipment:

·       Chopping boards and knives

  • Peeler
  • Mixing bowls – large, small
  • Salad spinner
  • Large wok
  • Fork & knife
  • Measures – cup, tablespoon, teaspoon
  • Large saucepan & lid
  • Sieve
  • Serving bowls
Ingredients:

·       3 cups long grain rice

·       1 litre boiling water

·       1 teaspoon of cooking salt

·       2 garlic cloves

·       2 tablespoons sesame oil

·       1 thumb ginger

·       2 eggs

·       3 spring onions

·       4-6 tablespoons soy sauce

·       Small handful coriander

 What to do:

To cook the rice:

  1. Fill the kettle to the 1 litre mark and set to boil.
  2. Measure the rice grains into the saucepan. Wash the rice with cold running water and swish with your hands. Drain carefully into a sieve and repeat 3 more times until the water is no longer milky. This helps remove excess starch and cleans the grains.
  3. Empty the washed rice back into the pot and carefully pour in the litre of boiling water. Turn the heat to high – when the water starts to bubble, add a teaspoon of salt, stir and then cover the pot and reduce heat to the lowest flame. Cook for 14 minutes without disturbing or taking the lid off.
  4. After the 14 minutes is up, turn off the heat without disturbing the saucepan. Leaving the lid on, just let it sit for another 5 minutes to finish the steaming process.
  5. When the time is up, using a knife, fluff the rice up in the saucepan, and then transfer into a bowl or tub, leave to cool for 10 minutes and then cover and put in the fridge for at least an hour to chill, preferably overnight.

To prepare the fried rice:

  1. Peel the garlic and finely chop. Using a peeler, peel the ginger and grate using the microplane grater.
  2. Wash, trim and peel the spring onion and finely chop, reserving the white parts and green parts separately.
  3. Wash the coriander and spin-dry, then finely chop stalks and leaves.

To cook the fried rice:

  1. Heat vegetable oil in a large wok on high heat.
  2. Add ginger, garlic and white part of spring onions and fry for a minute, stirring.
  3. Crack the eggs into a small bowl, add sesame oil and whisk lightly with a fork.
  4. Add the pre-cooked rice and stir-fry until rice is hot.
  5. Add soy sauce and green spring onions and heat through for another minute.
  6. Spoon out into serving bowls, then garnish with fresh coriander and serve.

Notes: Where does rice come from? How is it grown? What other dishes can you make with rice?

Categories: Kitchen Garden, Recipe | Tags: , , , , , , , | Leave a comment

Chicken, spinach and coriander dumplings with honey soy

img_4865

Dumplings are so easy to make once you’ve mastered the art of folding the dumpling skin! They can be frozen after Step 8, just make sure you freeze them separately on trays and once frozen, pop them into an airtight bag. They can be cooked straight from frozen.

Fresh from the garden: baby spinach, coriander, spring onions, ginger, garlic
Recipe source: Melissa from The Bondi Cook
Makes: 40 dumplings

Equipment:

  • Mixing bowls – big, med, small
  • Salad spinner
  • Chopping boards and knives
  • Microplane zester
  • Food processor
  • Scales
  • Measures: jug, cup, tablespoon, teaspoon
  • Spatula
  • Large baking tray
  • Small saucepan
  • Potato peeler
  • Small sauce bowls
  • Large non-stick frying pan with lid
  • Serving plates


Ingredients:

  • 1 bunch coriander
  • A large handful baby spinach
  • 2 small spring onions
  • 1 small piece of ginger
  • 250g minced chicken
  • 1 tablespoon Shaoxing rice wine
  • 1 tablespoon dark soy sauce
  • 1 teaspoon light soy sauce
  • 1 teaspoon salt
  • A few grinds of black pepper
  • 2 teaspoons sesame oil

To wrap

  • 2 tablespoons cold water
  • 1 packet 40 gow gee wrappers
  • Cornflour

For the dipping sauce

  • 1 clove of garlic, small piece ginger
  • Small handful coriander
  • 1 cup soy sauce
  • 1 tablespoon honey

To cook

  • 2 tablespoons Rice Bran oil
  • 75ml water

What to do:
For the filling

  1. Wash the coriander in a big bowl of cold water and spin dry. Finely chop the stalks and leaves.
  2. Wash and spin dry the spinach and finely chop.
  3. Wash the spring onions and finely slice.
  4. Peel the skin from the ginger and finely chop or grate with the microplane zester.
  5. Combine them all into the bowl of the food processor, weigh the mince and add in and then measure in the rest of the ingredients. Blitz for a few seconds to combine thoroughly. Scoop out into a large bowl, using a spatula to scrape down the sides.

Preparing the dumplings

  1. Fill a small bowl with clean water and make sure your hands are clean. Wipe down and dry your work surface. Lightly flour a large baking tray with cornflour. Open the packet of wonton wrappers and peel off one per person and lay it on the surface in front of you.
  2. Place a large teaspoon of filling in the centre of each wrapper and moisten the edges with a finger dipped in water. Fold the dough in half and pinch together with your fingers.
  3. Pleat around the edge, pinching with your fingers to seal well. The dumpling should look like a small Cornish pasty with a flat base and rounded top.
  4. Transfer each finished dumpling to the tray and keep it covered until you have stuffed all the dumplings in this way.

To make the sauce

  1. Peel the garlic and squeeze through the garlic press into the small saucepan.
  2. Peel the ginger using a potato peeler and zest into the saucepan using the microplane grater.
  3. Wash the coriander well and spin dry. Finely chop stalks and leaves and reserve.
  4. Heat the saucepan with garlic and ginger and a tablespoon of oil, on low heat and gently cook the garlic and ginger until soft. Do not let them go brown! Add in the honey and let cook until bubbling, and then add in the soy sauce and cook for another minute.
  5. Add in the chopped coriander and pour into small serving bowls to dip.

To cook

  1. Heat a large non-stick frying pan until it is very hot. Add the oil and place the dumplings flat-side down into the pan.
  2. Reduce the heat and cook for about two minutes until they are lightly browned. Add the water, cover the pan with the lid and simmer gently for about 10 minutes or until most of the liquid is absorbed. Check the water half-way through and add more if necessary. Uncover the pan and continue to cook for a further two minutes.

To serve

  1. Divide the dumplings onto serving plates and serve with dipping sauce in a bowl on the side.

Notes: Why is it important not to lick your fingers while preparing this recipe? What others fillings could we put in a dumpling?


Categories: Kitchen Garden, Recipe | Tags: , , , , , , , , | Leave a comment

Kitchen news 3rd August 2016

IMG_2406

(This article first appeared on the School Newsletter on 5th August).

With NAIDOC Week we have been exploring bush tucker in our recipes: what it is, where it comes from and what we would have eaten in Bondi before the shops and houses and fast food places arrived. We talked about the planning needed to hunt, catch, prepare and eat a large animal like a kangaroo or crocodile, and the fact that none of the animal would have been wasted.

We discussed the similarities between bush tucker and the Kitchen Garden philosophies of eating local and seasonal foods, and most importantly about the knowledge passed on to recognise which plants, animals and fish were safe to eat.

I asked the children to smell the roasted and ground wattleseed I brought in and to tell me what they thought: Chocolate, coffee, Digestive biscuits, bread, peanuts and malt were some of the great suggestions. And so then the Carrots made some Wattleseed damper.

And I cut the finger limes we had in half and squeezed out the little lime ‘caviar’ balls for them to try. “WARHEADS!’ was the cry in most of the classes, sour as they were. The Artichokes made a Tom yum soup with finger limes with bok choi from the garden and mushrooms, and then squeezed in the little baubles as a citrusy garnish.

Paul brought us in some branches of lemon myrtle from his garden and we used them in three of the recipes: the Tomatoes made Risotto of broccoli and lemon myrtle, with the leaves infusing in the hot stock, and the Olives made Lemon myrtle shortbread – blending up caster sugar with dried lemon myrtle leaves for a lovely lemony oil flavour – and we also made some Lemon myrtle tea by simply steeping the leaves in hot water. Delicious and very easy! Not like catching a kangaroo…

A pity that we’ve needed to postpone The Rocket movie fundraiser. We’ll wait until warmer weather and try again then.

Melissa
To volunteer for classes or weekend chicken duty: http://signup.com/go/n5ciGB

Categories: Kitchen Garden, News | Tags: , | Leave a comment

Lemon myrtle tea

IMG_2401

We make all sorts of herbal tea variations at Bondi, using aromatic lemongrass leaves, lemon balm, lemon verbena, mint, lemon thyme, chamomile, citrus rind and ginger… The tea is easy to make and lovely chilled from the fridge overnight too, once the tea has brewed just remove the leaves so that it doesn’t stew.

Foraged bush tucker: lemon myrtle leaves
Recipe source: Melissa Moore
Makes: 3 litres

Equipment:

  • Stockpot
  • Serving jugs


Ingredients:

  • A bunch of lemon myrtle leaves
  • 3 litres water


What to do:

  • Fill the stockpot with water and set it on high to boil with the lid on.
  • Rinse the bunch of leaves well in cold water and shake dry. Remove the leaves from the branch, discarding the branch.
  • Once the water is boiling, turn the pot off and carefully drop the herbs in.
  • Let the tea steep for several minutes and serve, ladling the tea carefully into jugs.

Notes: What else is herbal tea know as? What other herbs or spices could you use? What does aromatic mean?

IMG_2360

Categories: Kitchen Garden, Recipe | Tags: , , , , , , , , | Leave a comment

Broccoli and lemon myrtle risotto

IMG_2414

This lovely risotto is textural and beautifully herby – especially with the subtle lemony tang of the lemon myrtle leaves – and very easy once you get past all the stirring! Serve just before eating while it’s still slightly soupy.

Foraged bush tucker: lemon myrtle leaves
Recipe source: Melissa Moore
Serves: 6 or 24 tastes

Equipment:

  • Saucepan
  • Measures: scales, jug, cup, ¼ cup, tablespoon
  • Salad spinner
  • Garlic press
  • Mixing bowls
  • Chopping boards & knives
  • Grater & microplane zester
  • Ladle
  • Wooden spoon with a straight end
  • Heavy based stockpot
  • 4 soup plates or bowls to serve
Ingredients:

  • 1.5 litres water with 2 tablespoons bouillon (or 1 litre stock)
  • 3 lemon myrtle leaves
  • 1 brown onion
  • 3 garlic cloves
  • 1 large stalk broccoli
  • 3 tablespoons extra-virgin olive oil
  • 20g butter
  • 300g Arborio rice
  • 40g parmesan or grana padano
  • A small handful marjoram
  • Flaked salt & black pepper

What to do:

  1. Pour the water and bouillon into a saucepan, and bring it to a boil. When boiling, turn down to bare simmer and add the lemon myrtle leaves.
  2. Peel and finely chop the onion. Squeeze the garlic cloves through the press into a small bowl.
  3. Wash the broccoli & shake dry. Chop the stems into ½ cm pieces and add stems to the stock, reserving the florets. Wash the leaves, strip from the stalks and finely slice the leaves.
  4. Heat the olive oil and butter over medium heat in the stockpot. Add the chopped onion and cook gently for about three minutes until translucent but not brown. Add the garlic and cook gently for another few seconds.
  5. Stir in the rice until the grains separate and begin to crackle.
  6. Begin adding the simmering stock, a ladle at a time, and stir in. The stock should just cover the rice and bubble. Stir every minute or so for about 15 minutes.
  7. After about 10 minutes, add the broccoli florets & sliced leaves to the rice and keep stirring for about another 5 minutes. When the rice is just tender all the way through but still slightly firm, usually in about 20 minutes all up, it is done.
  8. Meanwhile, weigh and cut the parmesan & grate it. Wash and spin dry the marjoram, strip and discard the stems.
  9. Add the last ladleful of stock and the rest of the broccolini in to the rice. Stir in the marjoram and parmesan, and remove from the heat. Taste now and check the seasoning. The mixture should be creamy and lose.
  10. Serve into the bowls and eat right away!

Notes: What sort of rice is Arborio? Why do we use this sort of rice? Why do we fry the rice off first? What does ‘yield’ mean? What do lemon myrtle leaves look like?

Categories: Kitchen Garden, Recipe | Tags: , , , , , , | Leave a comment

Tom yum soup with finger limes

IMG_2355

The finger lime is a unique and ancient Australian native – citrus australasica – found in the wild around the rainforest areas of SE Queensland and the northern rivers region of New South Wales. Inside the finger lime’s skin are hundreds of juice filled pearls or ‘lime caviar’ that burst in the mouth with a rare and exciting explosion of flavour. The finger lime’s lime caviar is rich in vitamin C and antioxidants. The colour varies according to the variety: it can be opaque, yellow, green, pink or red.

Foraged bush food: finger limes
Recipe source: Melissa Moore
Serves: 6 or 24 tastes

Equipment:

  • Kettle
  • Chopping boards and knives
  • Paper towel
  • Salad spinner
  • Measures – tablespoon, teaspoon
  • Mixing bowls – selection
  • Serving bowls
  • Ladle


Ingredients:

  • 1.5 litres water
  • A clove of garlic
  • 3 stalks lemongrass
  • A small handful assorted mushrooms
  • A head of bok choi
  • 1 bunch fresh coriander
  • 1 lime
  • 1 tablespoon bouillon
  • 1 quantity tom yum paste (see recipe)
  • 2 kaffir lime leaves
  • 1 tablespoon fish sauce (optional)
  • A small handful finger limes

What to do:

  1. Make the paste recipe first (see separate tom yum paste recipe).
  2. Fill the kettle to the 1.5 litre mark and set it to boil.
  3. Peel and finely chop the clove of garlic.
  4. Cut or strip the leaves from the lemongrass (reserving the leaves for another time) and wash the stalks. Chop them into 10cm lengths and bash lightly.
  5. Wipe the mushrooms clean with a piece of paper towel, then slice them into very thin slices.
  6. Wash the bok choi, separating out the leaves and cleaning, and slice into thin strips.
  7. Cut the lime into quarters.
  8. Pour the hot water into the large saucepan and add the bouillon. Bring back to the boil and stir in all the tom yum paste and garlic and cook for about 2 minutes.
  9. Stir in the lemongrass batons and whole kaffir lime leaves.
  10. Mix in the mushrooms and sliced bok choi. Add the fish sauce if using and a squeeze of the lime quarters and simmer for another 5 minutes.
  11. Wash and spin the coriander and basil dry, then finely chop.
  12. Remove from heat, sprinkle in the chopped coriander and ladle into bowls.
  13. Cut the finger limes in half and squeeze out the little globes into bowls as garnish.

Notes: What do finger limes look like? What is inside a finger lime?

IMG_2411

Categories: Kitchen Garden, Recipe | Tags: , , , , , , , | Leave a comment

Wattleseed damper

IMG_2363

Probably the most widely recognized bush tucker recipe is damper, a simple type of bread made of water and flour. Although the Aborigines originally baked this bread, it was the Europeans that gave it the name damper. Originally made with flour, salt, and water, it was baked in the hot coals of an open campfire. During colonial times it was a staple food in the bush because stockmen and drovers in remote areas could easily carry the dry ingredients. They needed to add only water to make the damper, and often served it with tea made in a cylindrical billy or billycan, a lightweight hanging pot with a close-fitting lid.

Bush tucker: wattleseed
Recipe source: adapted from australianflavour.net
Serves: 4 or 24 tastes

Equipment:

·       Bowls – large

·       Measures – cup, ½ cup, tablespoon, ½ teaspoon

·       Sifter or sieve

·       Table knife

·       Oven tray

·       Sharp knife

·       Pastry brush

·       Chopping board and knife

·       Serving plates

Ingredients:

  • 1/2 cup milk
  • 1/2 cup water
  • 20g ground roasted wattleseed
  • 3 cups plain flour
  • 3 teaspoons baking powder
  • 1 teaspoon salt
  • 60g butter


What to do:

  1. Preheat oven to 200°C.
  2. Measure the milk and water into a small saucepan and set to heat on low. Weigh out the ground wattleseed and then add in to the milk. Bring to a simmer and then turn off the heat, then leave for 10 minutes to infuse.
  3. Sift the flour, baking powder and salt into a bowl, then rub in butter until mixture resembles fine crumbs.
  4. Make a well in the centre, add the combined milk and water and mix lightly with a knife until the dough leaves the sides of the bowl.
  5. Gently knead on a lightly floured surface and then shape into a round, put on a greased oven tray. Pat into a round 15-16cm diameter.
  6. With sharp knife, cut two slits across dough like a cross, approximately 1cm deep.
  7. Brush top of dough with milk. Sift a little extra flour over dough.
  8. Bake for 10 minutes, or until golden brown.
  9. Reduce heat to 170°C. and bake another 20 minutes.
  10. Using oven mitts, carefully slide the damper out of the oven and check that it is done: if you knock the loaf it should sound hollow inside – or you can poke a fork into the centre and see if it’s clean when pulled out.
  11. We divided our loaf into 4 and served each quarter whole, for each table to pull apart their own piece.

Notes: How would you adapt the recipe if you had no access to refrigeration?

Categories: Kitchen Garden, Recipe | Tags: , , , , , , , , | Leave a comment

Kitchen news 22nd June 2016

IMG_1881

(This article originally appeared in the School Newsletter on 24th June.)

We’ve had an all-star cast of helpers these last few weeks – some of my original Kitchen Garden kids from 2011 have been in to assist the classes in the Cottage! It’s been great to see how beautifully they instruct the younger children and how far their cooking skills have come along after all these years. Taye, Mimi and Chandy (and their friend Elvenie) have taken care of quite a few groups over many lessons and we really appreciate it! And of course the food has been even more delicious than usual…

They have been helping some of the groups prepare the freshly picked cos lettuces, tossing them into a classic Caesar salad with anchovy and garlic-drenched crunchy baked croutons, and perfectly poached eggs plopped on top of it all.

Pumpkins are plentiful at this time of year – and really cheap at the shops: I saw some for 80c a kilo! So the big girls and the children have been carefully preparing chunks to add to sautéing leeks, thyme, ground cumin and coriander and then blending up into the Best pumpkin soup ever!

Mish and the garden crew have been harvesting carrots – and what crazy carrots they are! In class we’ve been laughing at the three-legged creatures, ugly as all get-out, and some looking like they desperately need to go to the loo! But of course they’re as delicious as can be, in Roasted winter veggies with rosemary and honey drizzle and crispy fennel bits, cauliflower florets and potato chunks.

We’ve also been experimenting with a different sort of bread too: Indian Garlic naan dough made with yoghurt and egg, baked briefly in the oven and then brushed with the garlic. Different from the usual magic dough we use, and fabulous served with Kerry’s tasty daal that some of the Broad Bean groups have made, with red lentils, mustard seeds and cumin, coconut milk, onion and capsicum. Creamily good indeed!

Next week we have the Year 1 kidlets coming to visit. Brace! Brace! Brace! Only joking – it will be lovely to see their little grobbley faces again – I’ve missed them since they moved up away from the kindy playground!

And then the week after that, holidays. A chance to recalibrate, fire up the oven and chill out a bit. Hopefully! And also Carolyn, Mish and I are running a school Kitchen Garden holiday program 13th to 15th July in the Cottage – check back for more details!

Keep safe! Mx

Categories: Kitchen Garden, News | Tags: , , , | Leave a comment

Create a free website or blog at WordPress.com.

%d bloggers like this: