Monthly Archives: January 2013

My baked Xmas ham

I can never get sick of ham and really love being able to pull a leg out of the fridge in its bag and then hack huge slices off the side… we’ve gone through quite a few jars of Jam Girls chilli jam these holidays I can tell ya!

It really does pay to hang the expense and invest in a happy pig as not only your conscience will be freer but the meat is super-juicy and has lots of fat (fat = flavour remember!) … but the price can be quite a shock!

This year I did both: I took a mortgage out for half a leg on the bone from Feather & Bone in Marrickville, but I also bought a sad pig from Aldi – and honestly, the F&B was super-amazing, but the Aldi one wasn’t bad either. So if you can afford to buy the premium one, please do – but we all have to be realistic too and when the price difference was about $120 sometimes one can’t have it all…

One thing is for sure though: It is SOOOOO worth baking your ham. For about an hour of your time and a little bit of basting, your lovely pink ham will turn into another level of deliciousness & the most fabulous of creations… go on DO IT!

One last thing: I think that if you have the choice of easy carve or on the bone, get the one on the bone.

Anyway here is my recipe for a freakin’ lip smackin’ deeeelicious baked ham. Sorry it’s now January, but you know what? I might just get in anothery before the end of the holidays…

ourkitchengarden.net

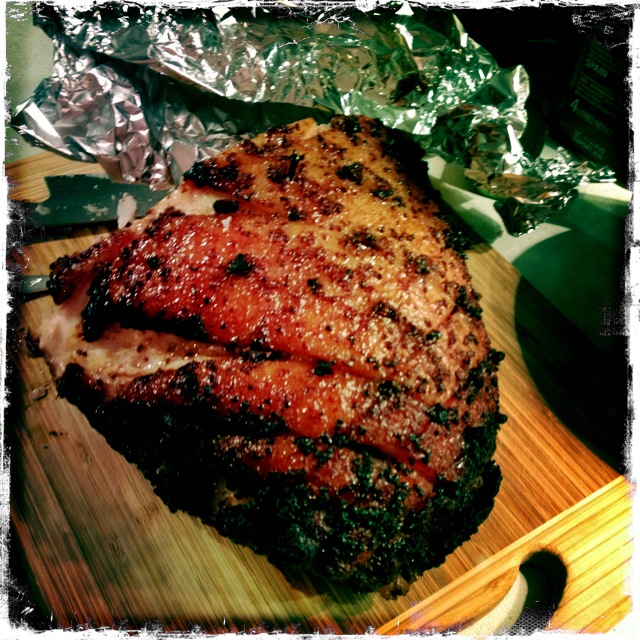
Baked hammy gorgeousness

For a 5 to 7kg leg ham on the bone

Glaze:
¼ cup orange marmalade or apricot jam
¼ cup Jam Girls chilli jam
½ cup dark brown sugar
¼ cup seeded mustard
1 teaspoon garam masala

1 pack star anise
a tablespoon whole cloves
a calico ham-bag, rinsed

1. Position an oven shelf at the lowest position in the oven and remove all the other shelves. Preheat oven to 160ºC. Place a rack over the largest baking dish you have (it could be the grill tray). Fill the base of the dish/tray with 1 cup water.

2. Remove the rind from ham: using the point of a sharp knife cut a zig zag pattern through the rind around the hock (about 10cm in from the end). Run your thumb around the entire edge of the ham to loosen the rim of the rind from the fat. Then slide your fingers between the fat and the skin, working upward toward the hock, until all the rind is free. Gently pull the rind away. Store the rind in the fridge.

3. Lightly score the fat in a diamond pattern, about 4mm deep, trying not to cut into the meat. Making a pattern with the spices, stud the centre of each diamond with a clove or star anise. Wrap hock with foil.

4. Place marmalade & chilli jam in a medium bowl and beat with a spoon for about a minute. Add the brown sugar, mustard and garam masala and stir to combine. Place ham, fat side up, on prepared rack. Brush half the glaze over the ham. 

Bake 20 minutes, then rotate ham 180º, to ensure even cooking.
Bake for 20 minutes longer.
Remove ham from oven and increase temperature to 200ºC. Brush ham with remaining glaze. Add more water to dish if necessary.
Bake 10 minutes, then rotate ham 180º and continue cooking for a further 10 minutes, or until surface is bubbling and a deep golden brown.

5. Allow ham to rest at least 10 minutes before slicing. Serve warm with more Jam Girls chilli jam & Iggy’s sourdough rolls and then when cold,  serve with with even more Jam Girls chilli jam & Iggy’s sourdough rolls…!

Some handy hammy household tips:

To store ham,  place the rind over top of the cut ham.
Soak the ham-bag in a solution of half white vinegar and half water.
Wring the bag out, then place the ham inside and wrap around. Refrigerate.
Every 2 days rinse out the bag and repeat the vinegar solution. The ham will keep up to 2 weeks – don’t forget to save a little meat for the ham soup!

ourkitchengarden.net

Waiting for the ham! Spot the classic Aussie icons: VB and sparkling burg on the table…


Advertisement
Categories: Kitchen Garden, Recipe | Tags: , , , , , , , , | Leave a comment

Granny’s Christmas Pudding

Now I realise that I’m some weeks (months even) late in posting this – but if I don’t do it now I never will and at least the recipe’ll be up here for next year!

ourkitchengarden.net

The pudding is traditionally made on Advent Sunday – about 4 weeks before Christmas Day – and hung to dry or cure the flavours a bit… I find in the humid atmos of Sydney success lies in hanging it out in the garden under cover so that it doesn’t get mouldy as inside our house there’s not enough airflow. Granny’s words are that there should always be a few spots of mould on the outside – and after 47 years of making them she should know! And if you’re unduly worried (as you undoubtedly will be…) then douse it in brandy. And never mind the fruitflies!

ourkitchengarden.net

Granny passed this recipe down to me in 2011, along with 8 threepences & 26 sixpences, and before Granny, my granddad’s mother Mumma made it. Granny thinks the recipe was Mumma’s grandmother’s…! Obv the recipe was in imperial measurements originally but I changed them as they were hurting my head.

ourkitchengarden.net

You will need:

75cm unbleached calico square
A large stockpot
A wooden spoon
A clean table-top
Old silver coins, threepences & sixpences – not modern coins.

ourkitchengarden.net

225g sultanas
½ cup dark rum (I used brandy)
450g dried mixed fruit
225g chopped nuts & dates (why these are together I don’t know, I love dates and walnuts so used about equal of each I think last time)
225g seeded raisins
225g butter
4 cups self raising flour
225g brown sugar
1 teaspoon mixed spice
4 eggs
1 teaspoon bicarb soda
½ cup milk

ourkitchengarden.net

The perfect pudding-hanging contraption!

What to do:

Soak the sultanas overnight in the rum.

The next day boil up the calico while you prepare the pudding.

Boil up the money separately. Do not use modern coins!

Set water-filled stockpot to boil.

Rub the butter into the flour, add the brown sugar and the mixed spice. Mix in fruit.

Beat the 4 eggs well. Mix the bicarb soda into the milk and then add to the eggs.

Stir the egg mixture into the flour and fruit mixture and add the money. Combine well.

Drain the calico and put it wet onto the clean table. Flour well the centre of the cloth and put the mixture on top. Gather and tie up the cloth 2.5cm above pud with string.

Suspend the pudding so it’s not touching the base of pot. Boil for 3 hours (you will need to top up with boiling water from the kettle). Hang for 1 month (see above).

Boil for 2 hours on Xmas Day. Lift out onto a plate and cut off the string. Pull the calico carefully off the top side. Place another plate carefully on top and without squashing, invert the plates and pudding. Set it down again and pull off the remaining calico.

Serve: If you like you can turn off all the lights, dash 1/2 a cup of brandy over the top of the pudding and then carefully light it.

Then serve with vanilla custard, brandy custard, brandy sauce and ice cream or whatever your custom dictates…!

ourkitchengarden.net

The perfect pud! (with a little crack to see the fruity goodness inside…)

Categories: Kitchen Garden, Recipe | Tags: , , , , , , , , | Leave a comment

Gluten-free pizza dough

This dough is great for a coeliac’s pizza, calzone or flatbreads – just follow the instructions below and use with any of our recipes. They turn out a treat!

ourkitchengarden.net

Recipe source: Melissa
Makes: 2 large pizza or 2 calzone

Equipment:

  • Scales
  • Stand mixer, bowl & dough hook
  • Measures – cup, ½ cup, tablespoon
  • Bowls – large, medium
  • Cling film
Ingredients:

For the magic dough:

  • 2½ cups gluten-free plain flour
  • 7g dried instant yeast (GF)
  • A pinch of salt
  • 1 cup warm water
  • 1 tablespoon extra-virgin olive oil plus extra for greasing

What to do:

  • Sift flour into the bowl of the stand mixer. Add the yeast and salt and mix to combine.
  • Make a well in the centre and add measured water and oil. Mix to form a soft dough and knead for about 5-7 minutes or until smooth and elastic.
  • Place in a lightly greased bowl and cover with cling film. Stand in a warm place for 45 minutes to 1 hour or until the dough has doubled in size.
  • Using your fist, punch dough the down. Knead on a lightly floured surface until smooth and then use with your favourite pizza or flatbread recipe.

Notes: Why do we leave the dough to rise? What is this process called?

ourkitchengarden.net

Categories: Kitchen Garden, Recipe | Tags: , , , , , , , , | 2 Comments

Hugh’s Magic Dough

Bondi kids love making dough: bread, pizza and pasta regularly grace our table! This ‘magic’ dough recipe can form the base for pizza, flatbreads, breadsticks etc…

Recipe source: Hugh Fearnley-Whittingstall, Veg Every Day
Makes: 2 large pizza or 2 calzone

Equipment:

  • Scales
  • Stand mixer& dough hook
  • Measures – tablespoon, teaspoon, ½ teaspoon
  • Bowls – large, medium
  • Cling film
Ingredients:

For the magic dough:

  • 250g plain white flour
  • 250g strong white flour
  • 1½ level teaspoons fine sea salt
  • 1 teaspoon instant dried yeast
  • 1 tablespoon olive oil, plus a little extra for oiling

What to do:

For the magic dough:

  • Put the two flours into the bowl of the stand mixer with the salt and yeast. Mix well using the dough hook. Add the oil and 325ml warm water and mix to a rough dough. Knead for 5–10 minutes, until smooth. This is quite a loose and sticky dough, which is just as it should be – you get better-textured bread this way – so try not to add too much flour if you can help it, it will become less sticky as you knead.
  • Trickle a little oil into a clean bowl, add the kneaded dough and turn it in the oil so it is covered with a light film. Cover with a tea towel or cling film and leave in a warm place to rise until doubled in size – at least an hour, probably closer to two – or if using the next day, wrap bowl in cling film and put straight into the fridge to prove slowly.
  • When the dough is well risen and puffy, tip it out and ‘knock it back’ by poking it with your outstretched fingers until it collapses to its former size. It’s now ready to be shaped to your will.

Notes: Why do we leave the dough to rise? What is this process called?

Categories: Kitchen Garden, Recipe | Tags: , , , , , , , , , | 3 Comments

Mini Christmas cakes

I love this idea of mini Christmas cakes for everybody! Don’t forget to let everybody have a stir of the mixture so that they can make a wish for the coming year…

ourkitchengarden.net

Recipe source: adapted from a recipe by Kookaburra on food.com
Makes: 32

Equipment:

  • Large non-reactive bowl, spoon
  • 3 x 12 hole muffin tins
  • 36 cupcake cases
  • Peeler, grater
  • Scales, wooden spoon
  • Small saucepan, spatula
  • Bowls – large, med
  • Measures –cup, ½ cup, tablespoon
  • Sieve, skewer
Ingredients:

  • 1½ kg mixed dried fruit
  • 50ml vanilla extract or dark rum
  • 4 large eggs
  • 1 granny smith apple
  • 1 tablespoon treacle or 1 tablespoon molasses
  • 1 cup brown sugar, firmly packed
  • 250g butter
  • 1½ cups plain flour
  • ½ cup self-raising flour
  • 200g blanched almonds (if using)
  • 150g glace cherries

What to do:

The night before:

  • Place mixed fruit into a very large bowl. Add vanilla extract or rum and mix well. Cover with plastic wrap and allow to stand overnight.

Start of lesson:

  • Preheat oven to 150°C and arrange oven racks to accommodate muffin tins in the centre section of the oven.
  • Place a muffin case into each hole of the muffin tins. Peel and grate the apple. Place the butter in the small saucepan and gently heat until melted. Remove from the heat to cool. Break the eggs into a medium bowl and lightly beat.
  • One ingredient at a time, add the beaten eggs, grated apple, treacle and sugar to the fruit mixture, mixing well with a wooden spoon after each addition.
  • Sift the flours into a big bowl, then add the cooled, melted butter and flours to the mixture and mix thoroughly – make sure to let every member of the group have a stir of the mixture while they make a Christmas wish!
  • Spoon the mixture into the muffin cases, filling to almost full. Use the back of a spoon to smooth the top of each cake.
  • Press a glace cherry into the centre of each cake and, if you like, around each cherry press in 5 almonds to make ‘petals’- pointy end closest to the cherry.
  • Bake at 150°C for about 40-45 minutes or until a skewer inserted into the centre of a cake comes out clean. Cool then store in airtight tins or the refrigerator. Or eat!

Notes: They can be eaten immediately or wrapped tightly in cling film, still in their paper. They will keep for a month at least, long after the festivities (and ham) have finished!

ourkitchengarden.net

Categories: Kitchen Garden, Recipe | Tags: , , , , , , , , | Leave a comment

Festive shortbread

Jill writes, ‘Free shortbread from the restrictively narrow timeframe of Christmas, and make it throughout the year. Hallelujah.’ I think by turning these into a festive treat (however short-lasting they may be!) they can be a great present for someone too…

Recipe source: adapted from Jill Dupleix’s recipe for Anytime Shortbread in ‘Simple Food’

Makes: about 30

ourkitchengarden.net

Equipment:

  • Baking trays and paper
  • Scales
  • Bowls – 2 medium
  • Food processor
  • Flour sifter
  • Chopping board and knife
  • Cling film
  • Rolling pins
  • Festive biscuit cutters
  • Ribbon, chopstick, skewer, cellophane
Ingredients:

  • 300g unsalted butter, soft
  • 150g icing sugar
  • Pinch of sea salt
  • 300g plain flour
  • 150g rice flour or cornflour


What to do:

  • Heat the oven to 150C. Line the baking trays with baking paper.
  • Combine the butter, icing sugar and sea salt in a food processor and whiz until smooth.
  • Sift in the flour and rice flour, then pulse off and on, scraping down the sides from time to time, until the mixture gathers into a ball. Knead for a minute or two with your hands until smooth, then cut into two, wrap in cling film and refrigerate for 30 minutes. Tidy & wipe down your workspace.
  • Turn out onto a floured surface and pat or lightly roll out the dough until 1cm thick. Cut into shapes with the biscuit cutters. Reshape the scraps and cut more shapes. Place on a baking tray and prick with a fork. If you want to, you can carefully pierce a hole in each shape with a skewer or chopstick, & later thread ribbon through to hang as a decoration.
  • Bake on the middle shelf of the oven for 10 minutes, then turn the tray around and bake for another 5 to 10 minutes until touched with colour. Leave to cool on the tray.
  • Pack gently into an airtight container, thread with a length of ribbon and tie into a cellophane bag – or simply gobble them up! 

Notes: This shortbread can be stored in an airtight container for up to 2 weeks. Or spread with homemade strawberry jam and whipped cream for a take on the classic Strawberry Shortcake…

Categories: Kitchen Garden, Recipe | Tags: , , , , , , , , | Leave a comment

Silverbeet, spring onion and ricotta calzone

These folded pizzas are great with a homemade Napoli sauce served alongside (or even added to the filling before baking) – and you can even add prosciutto, ham or roast chicken at home. Mandatory is a leafy salad!

ourkitchengarden.net

Recipe sourceMelissa
Fresh from the garden: silverbeet or spinach, spring onion, lemon, garlic
Makes: 4 large calzone

Equipment:

  • Rolling pins
  • 2 large baking sheets
  • Chopping board & knife, scissors
  • Large frying pan
  • Garlic press, wooden spoon, tongs
  • Large bowl
  • Grater, microplane grater
  • Baking paper
  • Scales
  • Measuring cup
  • Pastry brush
  • Serving plates
Ingredients:

  • 2 recipes Hugh’s Magic Dough
  • Plain flour, for rolling out dough
  • 1kg spinach or silverbeet
  • 4 or 5 spring onions
  • 2 garlic cloves
  • 3 cups ricotta
  • 1 tub bocconcini
  • 50g parmesan
  • 1 lemon
  • Flaked salt & black pepper
  • Coarse polenta for dusting baking sheet
  • Extra-virgin olive oil

What to do:

  • Preheat oven to 230C.
  • Lightly dust the work surface and rolling pin with flour. Divide the dough into 4 and press and roll it out into 4 x large rectangles. Dust the baking sheets with a sprinkle of polenta and drape 2 dough rectangles over each tray, leaving half off adjacent edges to fold back over later.
  • Wash the spinach or silverbeet, shake dry and slice or cut the leaves from the stalks (leaving the stalks for the chooks), then slice the leaves into thin strips. Squeeze the garlic through the press. Wash the spring onions and strip the tough outer leaf away. Chop into 1cm pieces.
  • Heat the frying pan with 2 tablespoons of olive oil and add the garlic and spring onion, gently cooking for 30 seconds. Then add the strips of spinach & a pinch of salt to wilt. Cook, tossing for 3 or 4 minutes until cooked through. Squeeze any moisture out with the back of the wooden spoon and place spinach in the large bowl.
  • Drain the bocconcini & pull each ball apart into little pieces, add to the spinach with the ricotta and season with salt and pepper.Grate the parmesan and add to the spinach, and using the microplane grater, zest the lemon into the mixture.
  • Place the filling on the tray half of each oval leaving a 2cm border along the edge.
  • Fold the remaining dough over the filling until the edges line up and pinch the edges together to seal. Gently roll the pinched edges under to form a rim and brush the tops with olive oil.
  • Bake for 15/20 minutes until golden brown and the centre is hot and melted, rotating midway through cooking.

 ourkitchengarden.net

Categories: Kitchen Garden, Recipe | Tags: , , , , , , , , , | Leave a comment

Kitchen News – 6th December 2012

(OK this is a bit late but I’ve finally managed to find time to get this all updated! Watch this space…)


IMG_1806

Sunny and hot, cold and windy, humid and foggy, sunny and windy, cold and rainy, warm and rainy, sunny and windy… What’s going on? Goodness, just as I think I can pack the heaters away and start chilling cucumber soup, the wind & rain get me reaching for the long sleeves & slow-braised lamb again… One thing’s for sure though: the broad bean season has definitely come to an end! I counted to about 25 kilos but then I reckon we plucked another 25kg after that… and even today I finished blanching & freezing another box-worth, so will be able to surprise and delight (!) some eager-beavers in the first few weeks back in 2013…

So to business: Weeks 9 and 10 of Term 4 traditionally only mean One Thing: the Festive Menu! We’re mixing it up though in the interest of sustainability and using up what we’ve got before the big break… so we’re balancing mini Christmas cakes and festive shortbread with rainbow silverbeet and spring onion calzone, and the return of our fabulous Nicoise salad as it’s just SO good with our spanking-fresh eggs, and those green dwarf beans just keep on comin’… the children have also been hard at work signing their thankyou cards and then completing them in our kitchen classes, and Ligia has been helping our groups create beautiful mandala-inspired patterns on them with some clever kitchen garden materials…

IMG_1805

This will be my last Kitchen News of 2012… So with that I would like to thank all the Bondi children for being so enthusiastic and inspiring, for being so helpful and happy, for saying hello in the playground and telling me that they made one of our dishes at home, for trying new foods and for being brave. I’m very sad to be saying goodbye to the beautiful Year 6s (and some year 4s too) who have been such a joy to work with this year, but in reality the circle of life continues and I’ll be a proud mum waving my big girl off at the school gates for the first time in the New Year…

Our heartfelt thanks too to our great community of KG volunteers who help these kids achieve so much every lesson – and that’s not just the delicious food: I see first-hand the changes in self-esteem, self-control, technical ability & fine motor skills, the ability to work as a team (and even vegetable identification and preparation!) – and then stay and sweep the floor too! And a big group-hug to all the amazing staff and teachers at Bondi who help me do this great job and keep me smiling day after day…

Thank you for a great year. Love, Melissa x

IMG_1867

Categories: Kitchen Garden | Tags: , , , , , , , , | Leave a comment

Create a free website or blog at WordPress.com.

%d bloggers like this: