Monthly Archives: May 2016

Kitchen news 25th May 2016

IMG_1553

It seems we’re straddling the seasons right now with cool nights and still lovely warm days, so we’re trying to reflect this in the menu we’re preparing in the cottage: some lovely light dishes with fresh herbs and citrus, a few crispy and delicious fritters and also something heavier to make you think of open fires and warm jumpers…

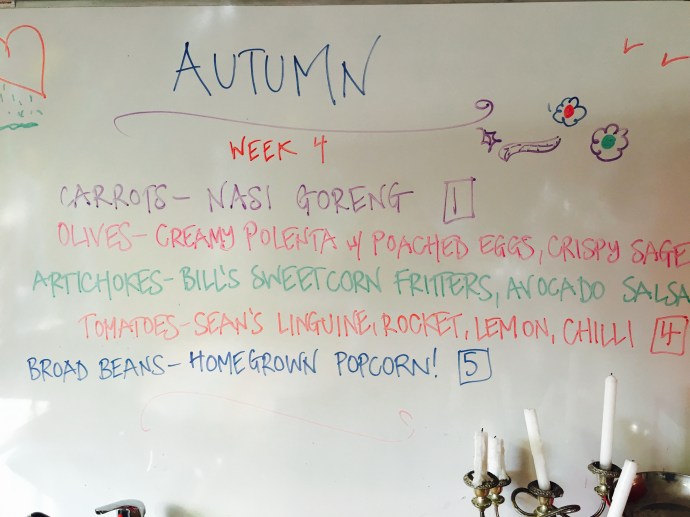
So we’ve rolled handmade pasta into something light, fresh and slightly spicy with Sean’s linguine with rocket, lemon, parmesan and chilli oil – a big dish to get made from scratch although we cheat slightly by using the pasta dough made by the class before, and then when the linguine has been cut and the rocket ready, we make the dough for the next class. There is a lot to do in a short time but every class has managed to achieve the bowls of steaming hot and fragrant pasta well in time to eat it!

Another Bondi chef features on this menu too, with Bill’s famous sweetcorn fritters with avocado, lime and coriander salsa – a generous dad brought in a bag of avocadoes from his trees and they were fab mashed up with a little red onion too.

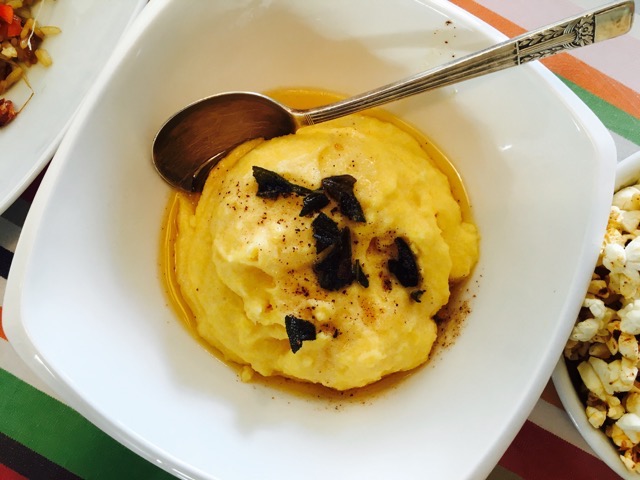
Autumn nights always make me feel like something a little richer, so we steeped some bay leaves in milk to whisk through polenta, and then added mascarpone and parmesan and finished with crispy sage leaves. Total comfort food – and totally gluten-free too! I reckon a slow-braise of lamb one weekend lunch soon would do just the job to match…

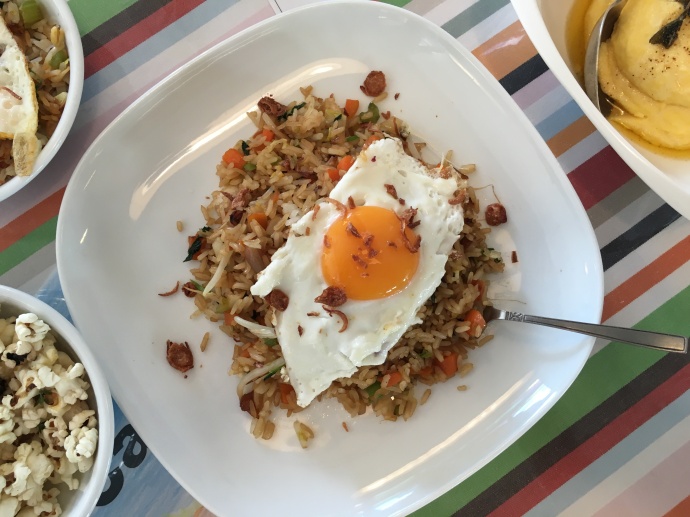
The Stage 3 kids have been talking in classroom activities about Asia, so to correspond with their lessons we’ve been wok-tossing Nasi Goreng – working out what the words actually mean – and also about how many languages put the noun first and the adjectives afterwards. And we’ve also been chatting about the nationalities that eat savoury food like rice and noodles for brekky instead of sweet cereal or toast and jam.

And finally we’ve been using up the popping corn we grew last term! The children have plucked and threshed the kernels from the cob, and made two flavours of popcorn: one with a rosemary and thyme oil, and the other with a spiced butter of cinnamon, smoked paprika and cumin. Delicious and fun… Sounds like the whole program to a tee!

Chooks: Thank you very much to the families that have signed up recently to feed and water the chooks or tuck ‘em in to bed! It’s great to have such community minded folk around!

Edmodo: do you want the recipes in advance of the lessons? Join the SAKGP group – ask me how!

IMG_1569

Advertisement
Categories: Kitchen Garden, News | Leave a comment

Popping corn with two flavours


Image

We made this recipe in my first lesson back in 2011, and just recently grew another crop of the little hard cobs.

Fresh from the garden: dried popcorn cob, rosemary, thyme
Recipe source: Melissa
Serves: 6 or 24 tastes

Equipment:

  • 2 tea towels
  • A large sieve
  • 2 large saucepans with lids
  • A small saucepan
  • Tongs
  • Large spoon
  • 8 small serving bowls


Ingredients:

  • 6 tablespoons Rice Bran oil
  • 3 cobs popping corn
  • A few sprigs rosemary
  • A few sprigs thyme
  • 50g butter
  • 1 teaspoon ground cinnamon
  • 1 teaspoon ground cumin
  • 1 teaspoon smoked paprika
  • 2 teaspoon table salt
  • 1 teaspoon sugar

What to do:

  1. Rub corncobs all over with a tea towel to remove any dust.
  2. Wash & carefully dry the herb sprigs.
  3. Pick off each corn kernel from the husk and place in the sieve. Once all removed, shake the sieve a little to dislodge the crispy end bits.
  4. Pour half the oil into each saucepan and add herb sprigs to one.
  5. Heat herbs until the oil simmers for five minutes to infuse the oil. Remove herbs.
  6. Turn heat up, add half the corn to each saucepan and immediately put lid on.
  7. Melt the butter with the spices, sugar and half the salt in the smaller saucepan and stir until the sugar has dissolved.
  8. After a minute the corn should start popping, turn heat down and wait until the noise almost stops. Then shake the saucepan while holding lid down to dislodge any tricky pieces.
  9. Only lift the lid when all popping has stopped! Then, turn heat off and lift the lid.
  10. To the herb popcorn: sprinkle the other half of the salt in, give a good stir and pour out into four small bowls.
  11. To the plain popcorn: pour over the spiced butter, stir well and pour into remaining four bowls.

Notes: What is the difference between popping corn and sweetcorn? What does savoury mean? Do you think popcorn is an old food or a modern food?

FullSizeRender


Categories: Kitchen Garden, Recipe | Tags: , , , , , , | Leave a comment

Creamy polenta with crispy sage

Image 1

This is such a vibrant and comforting dish, with the frizzled sage leaves giving everything a crispy, savoury lift.

From the garden: sage, garlic
Recipe source: Melissa
Serves: 4 or 24 tastes

Equipment:

  • Chopping board &small knife
  • 1 heavy-based saucepan & lid
  • Scales
  • Measuring jug
  • Grater
  • 1 small saucepan
  • Salad spinner
  • Paper towel
  • Wooden spoons
  • Bowls – 4 small
  • Deep-sided frying pan
  • Serving bowls
Ingredients:

  • 250ml milk plus extra 100ml on standby
  • 250ml water
  • 1 bay leaf
  • 1/2 cup fine polenta
  • 1/3 cup mascarpone
  • 50g grana padano parmesan
  • 25g butter
  • A branch of sage leaves
  • Flaked salt and black pepper

What to do:

  1. Bring the milk, water and bay leaf to the boil in the larger saucepan then remove from heat and allow to infuse for 20 minutes. Strain and discard the bay leaf, bring to the boil again, pour in the polenta and stir continuously until it thickens, about 10-20 minutes, depending on the variety of polenta.
  2. Meanwhile grate the parmesan and measure out the mascarpone.
  3. When the polenta is cooked, add the mascarpone and grated parmesan and mix until well combined. Taste for seasoning and add more salt if necessary. The polenta should be soft and creamy and only just hold its shape. You may need to add a little extra of the standby milk to loosen up the polenta if it becomes too stiff – this will also depend on what brand of polenta you use. You want a sloppy, porridge type consistency.
  4. Pick the sage leaves, then wash and spin them dry. With about a minute to go, heat the butter in the small saucepan over medium heat. Add the sage leaves and cook until they are dark green, crispy and fragrant and the butter is bubbling and turning brown.
  5. To serve, divide polenta among serving bowls. Season generously and scatter with the frizzled sage leaves & browned butter. 

Notes: What is polenta? What is cooking by ‘absorption’ method? What is mascarpone?

Categories: Kitchen Garden, Recipe | Tags: , , , , , , | Leave a comment

Nasi Goreng

IMG_1639

Nasi Goreng would have to be Indonesia’s most famous dish. It can be cooked with chicken, prawns and bacon as well as this veggie version, but always has kecap manis for that sweet kick!

From the garden: shallots, carrot, bean sprouts, celery, cabbage, garlic, eggs
Recipe source: Melissa, Kitchen Specialist at Bondi PS
Serves: 4 at home or 24 tastes

Equipment:

  • Kettle
  • Large saucepan
  • Baking tray to fit in fridge
  • Chopping boards & knives
  • Mixing bowls
  • Colander
  • Large wok & non-stick frying pan
  • Peeler
  • Measures: cup, tablespoon
  • Scales
  • Foil
  • Plate & egg slice
  • Serving bowls
Ingredients:

  • 2 cups white long grain rice
  • Rice Bran oil
  • Cooking salt
  • 5 shallots
  • 2 garlic cloves
  • 1 carrot
  • 1 celery stick
  • 40g Chinese cabbage
  • 80g bean sprouts
  • 2 tablespoons fried shallots
  • 2 tablespoons kecap manis
  • 1 tablespoon soy sauce
  • 4 eggs

What to do:

  1. Fill the kettle with at least 3 cups of water and set it to boil. Heat a tablespoon of oil in the large saucepan, add the 2 cups of rice and a pinch of salt and stir to heat. When the kettle has boiled, carefully measure 3 cups of water into the rice and stir again. Bring to the boil, the turn down to a simmer, put the lid on and cook for 14 minutes, setting the timer. When done, turn it off and leave for a few minutes with the lid on. Then fluff it up and spoon out into a tray and put in the fridge to cool completely. This rice will be used in the NEXT lesson, and your rice to use now will be in the fridge.
  2. Peel and thinly slice the garlic and shallots. Wash the carrot and celery stick. Peel the carrot and finely dice them both. Wash the cabbage and finely slice into thin shreds. Wash and drain the bean sprouts.
  3. Line the wok with oil, then heat over a low setting. Add the shallots and garlic, and stir-fry for a minute, then add the carrot and celery and stir-fry for 3 minutes until carrot is tender.
  4. Add the cabbage and stir-fry for 3 minutes until the cabbage wilts. Add cold rice, bean sprouts, half the fried shallots, the kecap manis and soy sauce. Stir-fry for 2 minutes or until heated through. Transfer to a large bowl. Cover with foil to keep warm.
  5. Heat a large non-stick frying pan over medium-high heat. Crack 2 eggs into the pan and cook, uncovered, for 2 minutes or until the white sets and the yolk is almost set (for a soft yolk) or until cooked to your liking. Transfer to a plate and repeat with remaining eggs.
  6. Spoon nasi goreng into shallow serving bowls. Top each with a fried egg and sprinkle over remaining fried shallots. Serve immediately.

Notes: What does Nasi Goreng mean? What is kecap manis? Why do we use the rice from the class before?

Categories: Kitchen Garden, Recipe | Tags: , , , , , , | Leave a comment

Bill’s sweetcorn fritters with avocado and lime salsa

IMG_1554

This classic dish from Bill’s just gets better with the addition of this herby salsa – feel free to add a drop of Tabasco or Cholula at home!

Fresh from the garden: sweetcorn, red onion, coriander, avocado, lime, eggs
Recipe source: adapted from Bill Granger’s recipe
Serves: 6 or 24 tastes

Equipment:

  • Chopping boards & knives
  • Citrus juicer
  • Salad spinner
  • Large metal spoons
  • Bowls: glass,
  • Measures: cup, ¼ cup, teaspoon, ½ teaspoon, ¼ teaspoon
  • Food processor
  • Spatula
  • Non stick frying pan
  • Soup spoon
  • Tea towel
  • Serving bowls for salsa
  • Serving plates


Ingredients:

Salsa

  • 1 small red onion
  • A small handful coriander
  • 1 large ripe avocado
  • 1 lime
  • 1 tablespoon extra-virgin olive oil

Corn fritters

  • 2 large corn cobs
  • 1 small red onion
  • 2 eggs
  • A small handful of coriander
  • 1¼ cups plain flour
  • 1 teaspoon baking powder
  • ¼ teaspoon salt
  • ½ teaspoon black pepper
  • ¼ teaspoon smoked paprika
  • ¼ teaspoon dried chilli flakes
  • Rice Bran oil for frying

What to do:

The salsa:

  1. Peel and finely chop the onion. Roll the lime on the table to soften, then cut in half and juice. Wash the coriander and spin it dry, then finely chop, reserving some leaves for garnish.
  2. Cut the avocadoes in half lengthwise, then neatly take the stone out. Using a large metal tablespoon, scoop out the flesh from half an avocado in one scoop. Place the flesh on a chopping board and slice into cubes.
  3. Place the avocado cubes in a glass bowl, spoon over 2 tablespoons lime juice & then add oil, onion and half of the coriander. Season with salt & pepper & toss gently to combine. Divide into serving bowls and reserve.

  The fritters:

  1. Strip the silks from the corn cobs and wash the cobs. Turn the cobs on one end and carefully slice the kernels from the stalk.
  2. Peel and finely chop the red onion.
  3. Toss about ½ of the corn kernels, and all of the onion, eggs, the other half of prepared coriander, flour, baking powder and spices into a food processor and whiz together until they are a thick, yellow, gloopy paste.
  4. Scrape out into a large bowl and add the rest of the corn kernels. Stir to combine.
  5. Heat up a non-stick frying pan and put about a tablespoon or two of Rice Bran oil in it. Heat it until it shimmers then dollop three mounds, each about the size of a heaped soupspoon worth of corn fritter batter into the pan.
  6. Fry them for about a minute on each side, checking that they are nicely browned before flipping. Repeat with the remaining batter, keeping the fritters warm on a plate under a tea towel. You should get about 16 fritters.
  7. Divide among serving plates and spoon on the salsa. Garnish with reserved coriander leaves and serve.

 Notes: Where does this salsa originate? What is a dollop?


Categories: Kitchen Garden, Recipe | Tags: , , , , , | Leave a comment

Kitchen news 6th April 2016

IMG_1423

We returned to a garden split between the last harvests of summer and the new plantings of winter, so we’ve an eclectic menu up on the board – Middle Eastern, Thai, Italian and olde English flavours mingling bizarrely but happily together on the tables…

The Olive group’s Quinoa tabbouleh has the knives sharpened to make light work of all the parsley, mint and basil that needs chopping and is the perfect dish to use up all the tiny baby tomatoes sprouting from absolutely everywhere in the garden!

The Tomato group is also chopping and blending frantically to make the paste for their Thai eggplant in coconut curry – and the results have been delicious and have had even the most reluctant child trying a little spoonful and agreeing it really is quite good indeed!

The Carrots have been very busy too, baking up some fabulous little parmesan biscuits and also marinating our own Bondi olives (picked in April and brining since) with orange zest, fennel and rosemary.

IMG_1425

We’ve had so much rocket rocketing up Mish has been pulling up whole clumps for the Artichokes to wash, chop and blend up with potatoes and silverbeet for a silky autumn soup, and finally the Broad Beans have been peeling, finely slicing and jamming up a ‘set’ for Mandarine marmalade – it has taken this long to be finally picking mandies from the tree at the front of the cottage. So exciting! I’m hoping there will plenty of jars of the marmalade and the olives for sale on the Kitchen Garden stall at the Halloween Fete!

 Cluck cluck! We really need ongoing help with the chickens on Saturdays and Sundays to open and feed in the morning, or close them up in the evening. Please sign up if you’re close by and can help! Please speak to Mish or email me if you can help.

IMG_1418

Categories: Kitchen Garden, News | Tags: , , | Leave a comment

Mandarine marmalade

IMG_1421

Preserving food – like making jam or pickling veggies – sounds like it’s going to be really difficult. But sometimes it isn’t! Especially if you stick to small batches of produce…

Fresh from the garden: mandarines, lemon
Recipe source: adapted from a recipe by Billy Law on atablefortwo.com.au
Makes: about 500ml

Equipment:

  • Chopping boards & knives
  • Large & med mixing bowls
  • Muslin cloth or Chux
  • Citrus juicer
  • Large stockpot
  • 3 small saucers
  • Scales
  • Cup measure
  • Spatula
  • Wooden spoon with flat end
  • 2 or 3 small jars
Ingredients:

  • 1kg mandarines
  • 600g sugar
  • 3 cups of water
  • 1/2 lemon


What to do:

  1. Peel mandarines carefully, trying to keeping peels in one piece if possible. Then cut half of the peels into thin strips (julienne strips) – as thin as possible – and set aside.
  2. Remove as much of the white pith as possible and set aside.
  3. Gently cut the mandarines in half crosswise, remove the seeds and set aside too. Use a clean muslin cloth or new piece of Chux, wrap the seeds and pith together tightly.
  4. Juice the half lemon.
  5. Add mandarines, peel strips, the parcel of pith and seeds, lemon juice, sugar and water into a large pot. Stir constantly over medium heat, without boiling, until sugar is dissolved.
  6. Bring to the boil, then reduce heat down to medium and let it bubble away for about 30 minutes, stirring occasionally until set point is reached.
  7. Set point testing: Put a saucer in the freezer and chill it. Take it out when ready to test, add a dollop of jam onto saucer. Draw a line on the jam with a knife, if it wrinkles, then the jam is ready. If not, keep boiling the mixture for another 10 minutes and test again.
  8. Once ready, remove the parcel and discard the pith and seeds. Pour the marmalade into hot sterilised jars. Seal 15 mins later, or when the jars are cool enough to handle.
  9. How to sterilise jars: Preheat oven to 160C. Wash jar with warm water and a spot of dish washing liquid, drain, leave on a baking tray right side up and put in the oven. Let it sterilise for at least 20 minutes. Time it well so you take the jars out of the oven when your marmalade is ready. DO NOT add cold food into the hot jar, or vice versa as it will shatter. Seal the jar when it’s cool enough to handle.

Notes: What does preserving mean? What is pith? What is the set point?

Categories: Kitchen Garden, Recipe | Tags: , , , , , , , , | 1 Comment

Thai eggplant in coconut curry

IMG_1417

The flavours in this curry are so pure and fresh and clean… Just be sure to mash up the herb fibres so it’s not too hairy!

Fresh from the garden: eggplants, lemongrass, kaffir lime leaves, garlic, ginger, basil, spring onions
Recipe source: adapted from a recipe on herbivoracious.com
Serves: 4 or 24 tastes

Equipment:

  • Chopping boards & knives
  • Measures: jug
  • Pastry brush
  • Oven tray
  • Rolling pin
  • Citrus juicer
  • Mini food processor
  • Frying pan
  • Serving bowls
Ingredients:

  • 4 large, long Japanese eggplants (more if smaller)
  • 100ml Rice Bran oil
  • Salt
  • 2 stalks lemongrass
  • 2 kaffir lime leaves
  • 2 cloves garlic
  • 3cm piece ginger
  • A handful Thai basil
  • 1 lime
  • 1 can of coconut milk
  • 2 spring onions

What to do:

  1. Preheat the oven to 220C.
  1. Slice the eggplants lengthwise. Score them inside deeply on the diagonal into a diamond pattern, being careful not to cut all the way through. Brush with a little olive oil and season with salt. Roast in the oven on an oven tray until completely tender and browning, at least 20 minutes.
  2. To prepare the lemongrass: remove the outer layer of each stem and trim away the bottom 1/2cm and most of the top, leaving only about a 10cm piece that should be tender enough to sink a fingernail into. Now pound it with the rolling pin to release the flavours. Once you’ve given it a good thrashing, you can finely mince it.
  3. Wash the kaffir lime leaves and basil and finely slice.
  4. Peel the garlic and ginger and finely chop. Juice the lime.
  5. Meanwhile, in a mini food processor or a mortar and pestle, combine the chopped kaffir lime leaves, lemongrass, garlic, ginger and Thai basil and 1/2 teaspoon salt. Process or pound until you have a fairly fine paste. Mix in half of the lime juice.
  6. Trim the roots and top layer from the spring onions and wash them cold water, then finely slice into thin rings.
  7. Heat 2 tablespoons of oil in a frying pan. Fry the curry paste for 1 minute. Turn off the heat and mix in the coconut milk and half of the sliced spring onions. Let it rest a few minutes, then taste and add a little more salt and lime juice if needed.
  8. When the eggplant is done, pour a little of the sauce into your serving bowls. Divide the eggplant slices into the bowls and pour the rest of the sauce over the top. Garnish with the rest of the spring onions and serve. 

Notes: What is a kaffir lime leaf? Why do we need to take care when cutting the eggplants?

Categories: Kitchen Garden, Recipe | Tags: , , , , , | Leave a comment

Quinoa tabbouleh

IMG_1419

White quinoa is the most common variety, but red quinoa is also available and has a nuttier flavour. They can be used interchangeably. Quinoa is a fab alternative to grains and is gluten-free.

Fresh from the garden: basil, parsley, lemons, mint, cucumbers, tomatoes
Recipe source: adapted from a recipe by Martha Stewart on marthastewart.com
Serves: 6 or 24 tastes

Equipment:

  • Stockpot with lid
  • Measures: cup, ½ cup, tablespoon, teaspoon, ¼ teaspoon
  • Wooden spoon, fork, teaspoon
  • Salad spinner
  • Mezzaluna
  • Microplane zester
  • Citrus juicer
  • Chopping board & knife
  • Peeler
  • Bowls – 1 large & 4 small
  • Measuring jug
  • Serving bowls
Ingredients:

Cook quinoa:

  • 1 cup quinoa
  • 1½ cups water
  • 1 teaspoon cooking salt

Make tabbouleh:

  • 4 large handfuls of parsley (about 2 cups when chopped)
  • 1 large handful mint leaves (about ½ cup when chopped)
  • 1 large handful basil leaves (about ½ cup when chopped)
  • 1 teaspoon flaked salt
  • ¼ teaspoon freshly ground black pepper
  • 2 lemons
  • 1 medium cucumber
  • 2 medium tomatoes
  • ½ cup extra-virgin olive oil

What to do:

  1. Toast quinoa in a stockpot over gentle heat, stirring frequently until fragrant for 6 to 8 minutes. Add the water and a teaspoon of cooking salt and bring to a boil. Reduce heat to medium-low, cover, and simmer until grains are tender, about 15 minutes. Remove from heat and let stand, covered, for 10 minutes, then fluff with a fork and let cool to room temperature.
  2. Wash, spin dry and pick the leaves from the stems of the herbs. Coarsely chop using the mezzaluna.
  3. Zest one lemon to yield 1 teaspoon zest then cut both lemons and squeeze through the citrus juicer to yield 4 tablespoons juice.
  4. Peel the cucumber, cut in half lengthways and scrape out the seeds with the teaspoon. Cut the cucumber into small dice about ½cm square to yield about 1 cup.
  5. Cut the tomatoes into small dice about ½cm square to yield about 1 cup.
  6. Add all the ingredients to the large bowl, measure the olive oil and pour into the bowl, mixing thoroughly to combine.
  7. Divide amongst serving bowls and serve at room temperature.

Notes: What is quinoa? Why do we toast the quinoa first? What does cutting into ‘dice’ mean?

Categories: Kitchen Garden, Recipe | Tags: , , , , , , , | Leave a comment

Blog at WordPress.com.

%d bloggers like this: