Posts Tagged With: Herbs

A simple side salad

This is a lovely salad to pair with heavily flavoured dishes and is easy and quick to assemble. You get the option too of inventing your own salad dressing!

ourkitchengarden.net

Fresh from the garden: lettuce, rocket, radishes, snap peas, edible flowers, garlic, herbs
Recipe source: Melissa
Serves: 6 tastes

Equipment:

  • Bowl – large
  • Asalad spinner
  • Tea towel, kitchen paper
  • Chopping board& knife
  • Citrus juicer
  • Jar with lid
  • Serving bowl


Ingredients:

  • A small head of lettuce
  • A few garnishing flowers
  • A couple of radishes
  • A small handful of snap peas

Salad dressing ingredients:

  • Balsamic or red wine vinegar or lemon juice
  • Extra-virgin olive oil
  • Mustard
  • Garlic
  • Honey
  • Herbs
  • Flaked salt

What to do:

  • Fill up the big bowl with cold water & wash the salad leaves & flowers separately in several changes of water, making sure that no dirt remains. Spin the leaves dry and then wipe the bowls dry.
  • Scrub the radishes clean under running water and then slice into thin discs.
  • Wash the snap peas and then top and tail each one, de-stringing as you go. Chop any large snap peas in half or even thirds.
  • Tip the leaves into a bowl, tearing large leaves into smaller mouth-sized pieces. Tear the petals from the flowers and put in bowl too with the radish slices and snap peas.
  • Make your salad dressing – you can use any combination of the ingredients listed above, and use honey, garlic or mustard if you like. The correct ratio is 3 times as much oil to vinegar – so for example 1 teaspoon of balsamic to 3 teaspoons of olive oil. If you use herbs, make sure you wash, spin dry and prepare them first.Put your ingredients in the jar and shake well to emulsify, and taste as you go!
  • Drizzle the dressing over the leaves and gently toss the leaves, then pile the salad up into the serving bowls.
  • Serve immediately.

 Notes: How do you de-string a snap pea? Why do we completely dry the leaves before adding the dressing? What does to emulsify mean? What does to top and tail mean?

ourkitchengarden.net

Categories: Kitchen Garden, Recipe | Tags: , , , , , , , | Leave a comment

Omelettes aux champignons

This appears to be an easy recipe but many top chefs are judged by their ability to execute the perfect omelette! At home you can insert a little gruyere cheese or sliced ham, but we like it here with our garlicky, slippery mushrooms.

ourkitchengarden.net

Fresh from the garden: eggs, mushrooms, garlic, chives, parsley, marjoram
Recipe source: Melissa
Makes: 1 omelette

Equipment:

  • Salad spinner
  • Bowls – 1 large, 1 medium
  • Mezzaluna or scissors
  • Fork, butter knife
  • 1 x 23cm non-stick frying pan
  • Wooden spoon
  • Garlic press
  • Tablespoon measure
  • Serving plates
Ingredients:

  • 6 eggs
  • A large handful mushrooms
  • A small handful mixed herbs: chives, parsley and marjoram
  • Flaked salt & black pepper
  • 25g butter
  • Olive oil

 What to do:

  • Trim the mushrooms of any dirt and wipe clean with a damp piece of paper towel. Chop into thin slices and reserve in the large bowl.
  • Wash and carefully dry the herbs, picking off the leaves and discarding the stalks.
  • Using the mezzaluna or scissors, gently & carefully chop the herbs without mashing them.
  • Break the eggs into the medium bowl and whisk lightly with a fork.
  • Add the chopped herbs and season with salt and pepper. Peel the garlic clove and squeeze through the garlic press.
  • Heat half the butter and 2 tablespoons of olive oil in the frying panover medium heat until foaming. Add in the mushrooms and carefully toss a few times to cover in the butter mixture. Sprinkle in a few pinches of salt, a grind of pepper and the garlic, and then sauté until slippery.
  • Wash and dry the large bowl and then scrape out the cooked mushrooms into it.
  • Add the rest of the butter to the pan and then when foaming, pour in the egg mixture and gently rotate the pan to distribute. Cook for 20 seconds or so, until it begins to bubble, then draw the egg into the centre with the wooden spoon and rotate the pan again to redistribute the uncooked egg.
  • The omelette is cooked when the base is set, but is still slightly runny in the middle.
  • Slide the mushrooms onto one half of the omelette, fold the other half over to form a half-moon and slice out on to your serving plate. Serve immediately!

Notes:In what other languages can you say mushrooms? Why do we leave the omelette slightly runny in the middle? Where does the word omelette come from?

ourkitchengarden.net

Categories: Kitchen Garden, Recipe | Tags: , , , , , | Leave a comment

Soda bread

We play around with lots of different types of dough and love them all. This one in particular is great with a chunky soup, or dipped into creamy hummus, or pungent pesto…

ourkitchengarden.net

Fresh from the garden: rosemary, parsley, sage
Recipe source: adapted from The Ballymaloe Bread Book by Tim Allen
Makes: 1 loaf

Equipment:

  • Bowls – large, small
  • Measures: jug, tablespoon, teaspoon
  • Mezzaluna
  • Chopping boards and knives
  • Sieve
  • Baking sheet
  • Serving plates
Ingredients:

  • 450g plain flour
  • 1 level teaspoon salt
  • 1 level teaspoon bread soda (bicarb soda)
  • 1 tablespoon dried rosemary
  • 1 small handful each of sage and parsley
  • 400ml buttermilk

 What to do:

  • Heat up the oven to 230 degrees C.
  • Wash and spin dry the herbs and pick the leaves, discarding the stalks. Finely chop the leaves – you’ll need about 3 tablespoons’ worth.
  • Sieve the flour, salt and bread soda into a large, wide mixing bowl. Add the freshly chopped herbs to the dry ingredients and stir well.
  • Make a well in the centre. Pour most of the milk into the flour. Using one hand with the fingers open and stiff, mix in a full circle drawing in the flour from the sides of the bowl, adding more buttermilk if necessary. The dough should be softish, not too wet and sticky.
  • The trick with all soda breads is not to over-mix the dough. Mix the dough as quickly and as gently as possible, keeping it really light and airy. When the dough comes together, turn it out onto a well-floured work surface. Wash and dry your hands.
  • Gently roll the ball of dough around with floury hands for a few seconds, just enough to tidy up. Then pat it gently into a round, about 5 cm high.
  • Place the dough on a lightly floured baking sheet. With a sharp knife cut a deep cross in the middle of it, letting the cuts go over the sides of the bread. Then prick the four triangles with your knife: according to Irish folklore this will let the fairies out!
  • Put this into your preheated oven for 10 minutes, then turn the heat down to 200 degrees C for a further 25 minutes, or until cooked. When the bread is cooked it will sound hollow when tapped.
  • Leave to cool for a few minutes, then cut into slices or chunks and divide among your serving plates.

 Notes:What is bread soda? Which country do you think this recipe comes from? What other ingredients could you add to this bread? Where do fairies live?

Categories: Kitchen Garden, Recipe | Tags: , , , , , , , , | 2 Comments

Warm salad of Nolans Road chickpeas, kale and Greek yoghurt

We love our Nolans Road organic Kabuli chickpeas – they’re so fresh they only need about half the cooking time of normal chickpeas – and so worthwhile doing from scratch! Dee Nolan suggests soaking and cooking heaps more than you need, then freezing the rest for another time as they’re easily resurrected!

ourkitchengarden.net

Fresh from the garden: kale, carrots, garlic, mint, coriander, lemon
Recipe source: inspired by the recipes of Yotam Ottolenghi

Equipment:

  • Bowls – glass, large, small
  • Saucepans – med, large & heavy
  • Sieve & colander
  • Chopping board & knife
  • Salad spinner
  • Peeler
  • Garlic press
  • Measures – ½ cup, 1/3 cup, tablespoon, teaspoon
  • Scales
  • Mezzaluna
  • Citrus juicer
  • Serving bowls
Ingredients:

  • 200g dried chickpeas
  • 1 teaspoon bicarbonate of soda
  • A large handful kale leaves
  • 1/3 cup olive oil, plus extra to finish
  • 3 medium carrots
  • 1 teaspoon caraway seeds
  • 1 garlic clove
  • A small handful mint
  • A small handful coriander
  • 1 lemon
  • Cooking salt, flaked salt and black pepper
  • 1/2 cup Greek yogurt

What to do:

  • Soak the chickpeas overnight in plenty of cold water with a teaspoon of bicarb.*
  • Next day, drain, rinse and simmer them in a big saucepan or about 25 minutes in fresh ­water until tender, then drain.
  • Meanwhile, half-fill the smaller saucepan with water and a teaspoon of salt and set it to boil.
  • Strip the kale leaves from the stalks, discarding the stalks. Roll the leaves up and cut into fine ribbons, then blanch them in the boiling water for 5 minutes. Drain then refresh under cold running water and squeeze dry.
  • Meanwhile peel then chop the carrots into small dice.
  • Wash and spin the mint (picking the mint leaves) and coriander, then finely chop.
  • Cut the lemon in two and squeeze one half. Peel then crush the garlic clove.
  • Heat up the olive oil in a large saucepan. Add the carrots and caraway seeds and sauté for 5 minutes on medium heat. Add the kale, the drained chickpeas and continue cooking for another 5 minutes.
  • Now add the garlic, herbs, a tablespoon of lemon juice and a sprinkle of salt and pepper. Remove from the heat and leave to cool for a few minutes. Taste and adjust the seasoning.
  • To serve, mix together the yogurt with a tablespoon of olive oil and another sprinkle of flaked salt and pepper. Pile the vegetables on serving dishes and spoon the yogurt on top. Sprinkle with freshly ground pepper and serve.

 Notes: Why do we soak the chickpeas overnight? What are other names for chickpeas?

*If you forget to soak the chickpeas the night before (as I have done in the cottage on more than one occasion (!) then boil the chickpeas for an hour and then leave them to soak in that same liquid for another hour. Drain, rinse, and then cook as above…

Categories: Kitchen Garden, Recipe | Tags: , , , , , , , , , , , | 1 Comment

Broccoli and lemon risotto

This lovely risotto is textural and beautifully herby, and very easy once you get past all the stirring!

ourkitchengarden.net

Fresh from the garden: broccoli, marjoram, garlic, onion, lemon
Recipe source: Melissa
Serves: 8 or 30 tastes

Equipment:

  • Saucepan
  • Salad spinner
  • Garlic press
  • Bowls – 1 large, small, med
  • Large knife & chopping board
  • Grater & microplane zester
  • Ladle & wooden spoon with a flat end
  • Heavy based stockpot
  • Metric
  • Measures: scales, jug, cup, ¼ cup, tablespoon
  • 4 soup plates to serve
Ingredients:

  • 2.3 litres  vegetable stock (or  2.3 litres boiling water with 2.5 tablespoons bouillon)
  • A small handful marjoram
  • 3 garlic cloves
  • 1 brown onion
  • 1 large head of broccoli
  • 3 tablespoons extra-virgin olive oil
  • 20g butter
  • 500g arborio rice
  • 1 lemon
  • 50g parmesan
  • Cooking salt & black pepper

What to do:

  • Pour the stock into a saucepan, and bring it to a simmer on medium heat.
  • Wash and spin dry the marjoram, strip and discard the stems.
  • Squeeze the garlic cloves through the press into a small bowl. Peel and finely chop the onion.
  • Wash the broccoli & shake dry. Chop the stalk into 5mm cubes and add to the stock, reserving the florets.
  • Heat the olive oil and butter over medium heat in the stockpot. Add the chopped onion and a cook gently until just tender, about three minutes. Do not brown. Add the garlic and cook gently for another few seconds.
  • Stir in the rice until the grains separate and begin to crackle.
  • Begin adding the simmering stock, a ladle at a time, and stir in. The stock should just cover the rice and bubble. Stir every minute or so for about 15 minutes.
  • Meanwhile, zest the lemon and grate the parmesan to yield about ½ cup.
  • After about 15 minutes, add the broccoli florets to the rice and keep stirring for about another 5 minutes. When the rice is just tender all the way through but still slightly firm, usually in about 20 minutes, it is done.
  • Add the last ladleful of stock and the rest of the broccoli to the rice. Stir in the marjoram, lemon zest and parmesan, and remove from the heat. Taste now and check the seasoning. The mixture should be creamy.
  • Serve onto the soup plates and eat right away!

Notes: What sort of rice is Arborio? Why do we use this sort of rice? Why do we fry the rice off first? What does ‘yield’ mean? What does to check the seasoning mean?

Categories: Kitchen Garden, Recipe | Tags: , , , , , , , , | 1 Comment

Greek slow-roasted leg of lamb

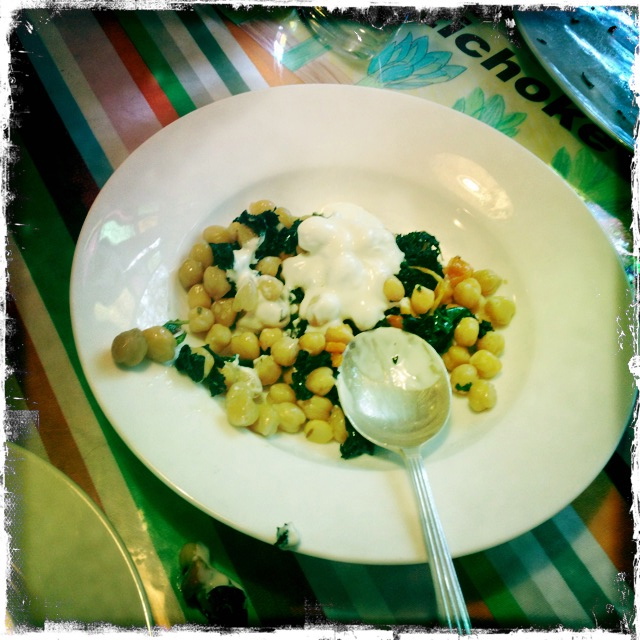
On a day like today when the rain is pelting down outside, all I can think of is popping the oven on and cooking something hearty and absolutely delicious for a few hours…  the original recipes calls for roasting potatoes on high in the lamb fat once the meat is done – so of course that is what we did – but I also made some pitta to roll around the juicy lamb, along with some tzatziki, some crunchy rocket, and also a fresh tomato, cucumber and onion salad to squash in too. Sounds like a lot of work but not really… and so worth it! Do it, do it!

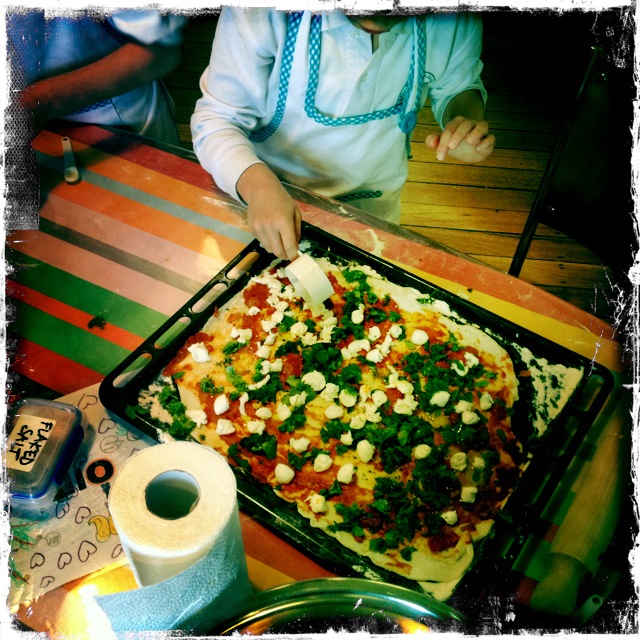
So here follows the recipe for the lamb, the potatoes, the tomato salad and the tzatziki. The pitta bread recipe has been posted separately!

ourkitchengarden.net

Recipe source: kalofagas.ca (many thanks for this recipe, it was truly scrumptious)
Serves: 8-10 (or 4 with loads left over for the next day!)

1 leg of lamb (bone in) 2½ kg to 3½ kg
1 head of garlic
fine sea salt
fresh black pepper
2 teaspoons sweet paprika
2 medium onions, peeled & quartered
1 cup dry white wine
2-3 sprigs of fresh rosemary
10 sprigs of fresh thyme
2-3 teaspoons dried Greek oregano
2-3 bay leaves
Juice of 2 lemons
1/2 cup extra-virgin olive oil
hot water or stock
salt and pepper to taste

  1. Peel the skins off the garlic clove and slice them into slivers. Stick a paring knife into the lamb and make a hole, then slip a sliver of garlic. Repeat and insert as many slivers of garlic as you can.
  2. Pre-heat your oven to the highest possible temperature and place the rack in the middle position. Drizzle your lamb with some olive oil and season with salt, pepper and paprika. Place the leg of lamb in a roasting pan that just fits the leg. Place in your pre-heated oven and roast uncovered for about 10-15 minutes or until browned, then flip the leg and roast for another 10-15 minutes.
  3. Remove the lamb from the oven and reduce the heat to 180C. Place the quartered onions around the lamb, add any remaining slivers of garlic, add the herbs (thyme, bay, rosemary, oregano) and squeeze in the lemon juice and pour the wine into the pan. Add the olive oil and enough hot water or stock to cover a third of the lamb.
  4. Cover and place the lamb back in the oven for 2 hours (add more hot water or stock if needed), baste the lamb once an hour. After two hours, flip the leg of lamb (add more water if necessary and adjust seasoning of liquid with salt and pepper).
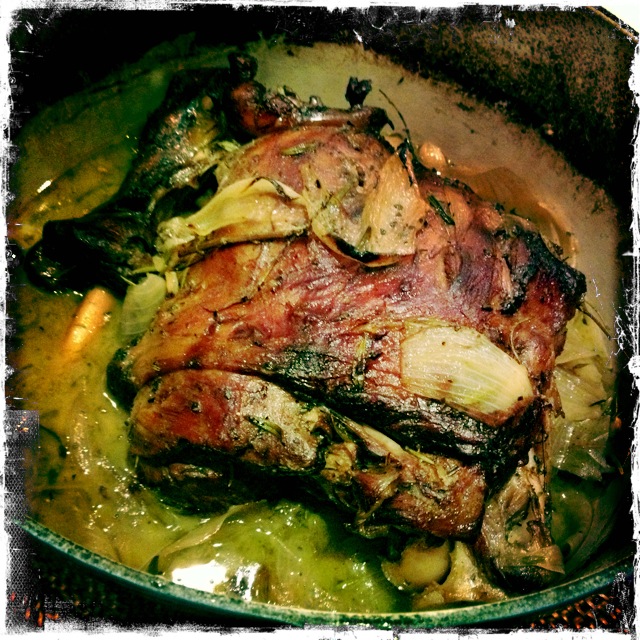
  5. After 3 hours, the leg of lamb should be a deep brown and the bones will be exposed and the meat will be falling off the bone.
  6. Remove the lamb from the oven, baste with liquid and allow to rest. Serve with roast potatoes tossed in lamb drippings* & with pita bread & tomato salad!

ourkitchengarden.net

Roast potatoes: Have some peeled & quartered potatoes to roast in another roasting pan and drizzle with olive oil and season with salt and pepper. Pour enough pan juices from the lamb leg to come up a third of the way on the potatoes and toss to coat. Taste, adjust seasoning and crank your oven up to 220C and place the potatoes in the oven to roast for 35-40 minutes or until fork-tender (the lamb will stay warm covered in the roasting pan on the stove-top).

ourkitchengarden.net

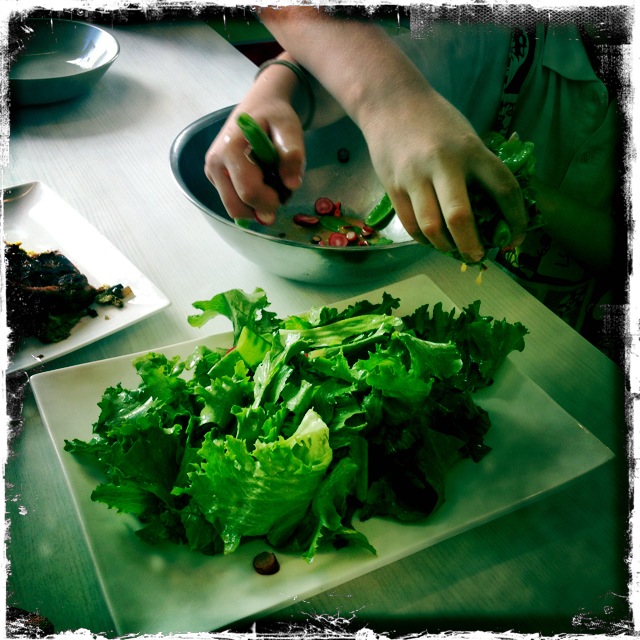
Tomato, cucumber and onion salad: Chunky-chop 2 or 3 vine-ripe tomatoes into a bowl and add a similar amount of chopped cucumber (peeled if you like or not!). Add half a finely chopped red onion, a bunch of washed and finely chopped coriander stalks and stems, a squeeze of fresh lime, a sprinkle of flaked salt, grind of pepper and half a teaspoon of chilli flakes (if you like some heat). Toss and serve.

ourkitchjengarden.net

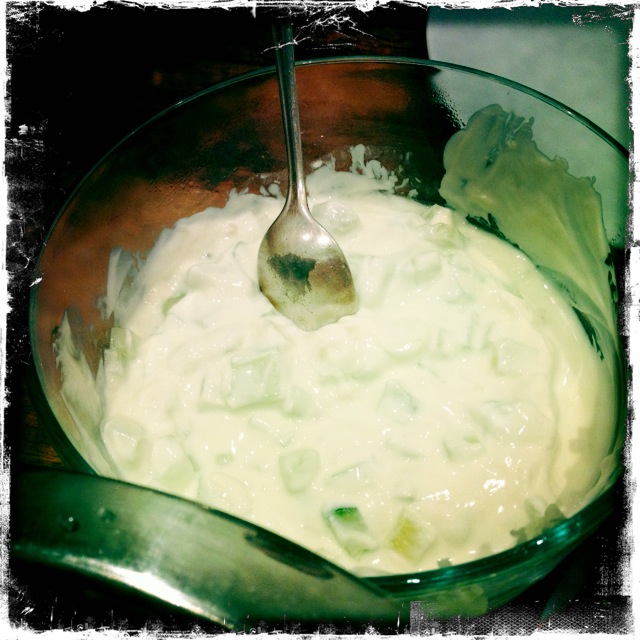
Tzatziki: Peel and finely chop half a cucumber and add to a bowl with a small tub of Greek-style yoghurt. Add a clove of garlic, very finely chopped, and a sprinkle of flaked salt and stir well. This can keep for a few days so make beforehand if you need.

ourkitchengarden.net

Categories: Kitchen Garden, Recipe | Tags: , , , , , , , , , , , , , | 2 Comments

Bocconcini and garden herb pizza

The year 1 kids came to visit – and this is what they made!

ourkitchengarden.net

Fresh from the garden: fresh herbs, onion, garlic
Recipe source: Melissa
Makes: 1 large pizza

Equipment:

  • Bowls – 1 medium, 2 small
  • Salad spinner
  • Grater
  • 1 large oven tray
  • Wide egg lifter
  • Large wooden board
  • Pizza cutter
  • Tablespoon measure, scales
  • Kitchen towel
  • Tongs
  • Metal spoons
  • Serving plates
Ingredients:For the pizza topping:

  • 1 quantity Hugh’s Magic Dough
  • ½ tub bocconcini
  • 1 tablespoon extra-virgin olive oil
  • Small handful mixed herb sprigs: thyme, marjoram, parsley
  • 20g parmesan
  • A small bowl of prepared tomato pizza sauce
  • Flaked salt and black pepper

What to do:

  • Preheat the oven to 220C. You can prepare the topping now while you wait for the oven to heat up.
  • Wash and spin-dry the herb sprigs – pick the leaves, discarding the stalks into the compost.
  • Tear each ball of bocconcini in half.
  • Grate the parmesan and reserve.

 Assembling the pizza:

  • Scatter some flour on the table and roll the dough out to form an even rectangle to cover the baking tray.
  • Assemble the pizza directly onto the tray, flouring the tray well first.
  • Using the metal spoon, swirl a couple of spoonfuls of tomato sauce onto the pizza bases, spreading so that they become totally covered.
  • Layer the bocconcini on top and season well, then scatter the herbs over the pizza.
  • Drizzle the pizza with about a tablespoon of olive oil, then slide it into the oven.

 Baking the pizza:

  • Bake the pizza for about 12 minutes or until the edges are very crusty and the cheese is bubbling.
  • You may want to slip the pizza off the tray onto the rack for the last few minutes, so that you get a really crusty base.
  • Once the pizza is done, transfer it to the large wooden board using the wide egg lifter.
  • Cut the pizzas crossways into small squares, and lift onto serving plates.
  • Sprinkle the reserved parmesan cheese over the slices and then get ready to eat!

Notes: What other sort of vegetables could you use in a pizza? What sort of other pizza could we make?

Categories: Kitchen Garden, Recipe | Tags: , , , , , , , | Leave a comment

Kitchen garden news – 13th June 2013

ourkitchengarden.net

Lemongrass, cumquat peel and apple thyme for the tisane

Ha ha! Winter has finally hit but we’re safe and secure down here in the Cottage of the Steamy Windows with ovens baking, soups stirring, eggs poaching and herbal teas brewing… the garden has been flooded with rain this week: great for our broad beans and other spring crops already planted. We still have the odd summer plant yet to give up the ghost – every time Ligia plans to pull them out they throw up another handful of delicious veggies – zucchini and their flowers, snap & snow-peas, basil… they’re hanging on for dear life!

So to our menu this week: a hearty Cabbage, barley and coriander soup, an unblended soup this time & left in all its chunky glory; Pizza with broccoli, garlic and anchovies – amazing how so many children say they don’t eat fish ‘cos they don’t like it – but then scoff this pizza in fistfuls as it comes to the table!

We are mixing the aforementioned cross-seasonal veggies in our Ragout of (winter) vegetables, and serving this alongside Creamy polenta with poached eggs & sage – I beg you to try this recipe if you haven’t already made friends with polenta! And to finish, some Lemon butter biscuits (thanks Shelley for the lemons, I must get some bikkies up to you!) & Herbal tisane: our ‘tea’ of lemongrass, cumquat peel and apple mint. Yum yum, all of it!

I will do my best to get the recipes posted by the weekend – if you’re keen to receive the recipes straight to your inbox then subscribe to this site (there is a button on the right of main screen) for all new posts – updated fortnightly!

And one last thing: next term we want to start a weekly Fruit & Veggie Box Scheme for BPS families – seasonally sourced from the Sydney area to avoid road & air miles and mainly organic with a little conventional added in (PS this is NOT our Kitchen Garden produce!).

A-one-size-fits-all-box: Fifty bucks, pick up from the Cottage on a Monday arvo, proceeds going directly to the SAKGP! Who’s in? We should be able to do up to 40 boxes – first in etc. Speak to Grace or me at school if you’re interested and we will let you know deets once we have more info.

Cheers all! Melissa

Categories: Kitchen Garden, News | Tags: , , , , , , | Leave a comment

Ragout of (winter) vegetables

Half veggie stew, half side-of-mixed-veg, this dish can be added to or subtracted as the fancy takes you… we’re clearing the beds of the last summer and autumn crops at the mo – hence zucchini, beans etc – but otherwise pop in some tasty cauliflower & cabbage?

ourkitchengarden.net

Fresh from the garden: bok choy, pencil leeks, zucchini, beans, snap peas, lemons, tarragon, parsley
Recipe source: Melissa from an idea by Stephanie Alexander
Serves: 8 or 24 tastes

Equipment:

  • Colander
  • Chopping board & knife
  • Bowls – large, med
  • Salad spinner
  • A small saucepan
  • A medium frying pan with lid
  • Scales
  • Measures – jug, ½ cup
  • Wooden spoon
  • Serving plates
Ingredients:

  • 1 or 2 heads of bok choy
  • A small handful pencil leeks
  • 1 or 2 zucchini
  • A handful of beans & snap peas
  • 8 garlic cloves
  • 30g unsalted butter
  • 1 lemon
  • ½ cup light stock (or ½ cup boiling water and a teaspoon of bouillon)
  • Small bunch French tarragon
  • Small bunch parsley
  • Flaked salt & black pepper

What to do:

  • Separate out the leaves of the bok choy and wash thoroughly to remove the dirt. Leaving small stems whole, chop the remaining stalks & leaves into large bite-sized pieces.
  • Cut the roots & the very tops from the leeks and strip back the top layer to remove any dirt. Leave whole.
  • Wash and chop the zucchini into large bite-sized pieces.
  • Wash & dry the herbs, pick from the stalks and finely chop.
  • Place the garlic cloves (in their skin) into a small saucepan and just cover with water. Bring to the boil on low-medium heat. Drain then repeat. Slip the garlic skins off & set aside.
  • Melt half the butter in the frying pan on medium heat.
  • Once frothing add the leeks and the whole cooked garlic cloves & sauté until the leeks are golden flecked.
  • Then add the 1/2 cup stock & the zucchini, the beans and snap peas and cook, covered, for about 3 minutes.
  • Uncover the pan, scatter over the bok choy pieces & cook for another minute, shaking the pan gently. Using the microplane, zest the lemon and add to the pan.
  • Should be very little liquid now, if so turn up the heat to high & continue shaking gently.
  • Add the remaining butter in cubes and the herbs and then grind over pepper and a sprinkle of salt and divide among serving bowls.

Notes: Why do we cook the garlic twice? What is bouillon? What does ragout mean? Why do we need to use French tarragon?

Categories: Kitchen Garden, Recipe | Tags: , , , , , , , , , , | Leave a comment

Creamy polenta with poached eggs and sage

This is such a vibrant and comforting dish, with the frizzled sage leaves giving everything a crispy, colourful lift. Just be sure the eggs are very fresh – and then there’s no need to add vinegar or do any of that silly swirling stuff!

ourkitchengarden.net

From the garden: eggs, sage, garlic
Recipe source: Melissa
Serves: 4 or 24 tastes

Equipment:

  • Chopping board &small knife
  • 1 heavy-based saucepan & lid
  • Scales
  • Measuring jug
  • Grater
  • 1 small saucepan
  • Salad spinner
  • Paper towel
  • Wooden spoons
  • Bowls – 4 small
  • Deep-sided frying pan
  • Serving bowls
Ingredients:

  • 250ml milk plus extra 100ml on standby
  • 250ml water
  • 1 bay leaf
  • 1/2 cup fine polenta
  • 1/3 cup mascarpone
  • 50g pecorino
  • 25g butter
  • 4 very fresh large eggs
  • A branch of sage leaves
  • Flaked salt and black pepper

ourkitchengarden.net What to do:

  • Bring the milk, water and bay leaf to the boil in the larger saucepan then remove from heat and allow to infuse for 20 minutes. Strain and discard the bay leaf, bring to the boil again, pour in the polenta and stir continuously until it thickens, about 10-20 minutes, depending on the variety of polenta.
  • Meanwhile grate the pecorino and measure out the mascarpone.
  • When the polenta is cooked, add the mascarpone and grated pecorino and mix until well combined. Taste for seasoning and adjust if necessary. The polenta should be soft and creamy and only just hold its shape. You may need to add a little extra of the standby milk to loosen up the polenta if it becomes too stiff – this will also depend on what brand of polenta you use. You want a sloppy, porridge type consistency.
  • About 5 mins before the polenta is ready, poach the eggs. Fill the deep-sided frying pan 5cm deep with water and bring to a simmer. Carefully crack each egg separately into a small bowl without breaking it and then carefully slide into the water until they’re all in. Let the pan sit on a simmer for 4 minutes.
  • Pick the sage leaves, then wash and spin them dry. Heat the butter in the small saucepan over medium heat. Add the sage leaves and cook, stirring, until they are dark green, crispy and fragrant.
  • To serve, divide polenta among serving bowls. Lift the eggs out of the water, drain, and then place one on top of each bowl. Season generously and scatter with the frizzled sage leaves & browned butter.

Notes: What is polenta? What is cooking by ‘absorption’ method? Why shouldn’t we break the eggs when poaching them? What is to simmer?

ourkitchengarden.net

Categories: Kitchen Garden, Recipe | Tags: , , , , , , , , , , , , | Leave a comment

Create a free website or blog at WordPress.com.