Kitchen Garden

Purple carrot soup

Carrot soup? Why not?! And this one is made with our beautiful purple variations – although our normal orange carrots will taste just as delicious – but I wonder if the soup will be purple too?

ourkitchengarden.net

From the garden: purple carrots, leeks, celery, potatoes, chives, coriander
Recipe source: Melissa
Serves: 6 or 24 tastes

Equipment:

  • Chopping board & knife
  • Small paring knife& scissors
  • Bowls – large, medium
  • Potato peelers
  • Kitchen paper
  • 1 heavy-based stockpot & lid
  • Wooden spoon
  • Stick blender
  • 2 teaspoons
  • Serving bowls


What to do:

Ingredients:

  • 1.5lt boiling water and 1.5 tablespoons bouillon (or vegetable stock)
  • 4 large purple carrots
  • 1 large leek
  • 1 onion
  • 3 large stalks of celery
  • 3 medium potatoes
  • 1 teaspoon ground coriander
  • 1 teaspoon ground cumin
  • 50g butter
  • Small bunch chives & coriander
  • 150ml sour cream
  • Flaked salt and black pepper
  • Fill the kettle and set it to boil.
  • Scrub the carrots under running water but don’t peel. Grate & reserve into a medium bowl.
  • Wash the leeks well, inserting a slit down the middle of each and rinsing out any dirt. Trim and chop finely. Peel and chop the onion. Wash the celery and shake dry, and snip into fine slices.
  • Peel the potatoes over the sink and wash thoroughly. Chop into 2cm cubes.
  • Melt the butter in the large thick-based saucepan, then add the prepared leeks, onion, celery, potato and carrot and sprinkle in the spices. Stir them around so that they’re coated with the melted butter.
  • Next sprinkle in some salt then cover with a lid and let the vegetables sweat over a very gentle heat for about 15 minutes, giving the mixture a good stir about halfway through.
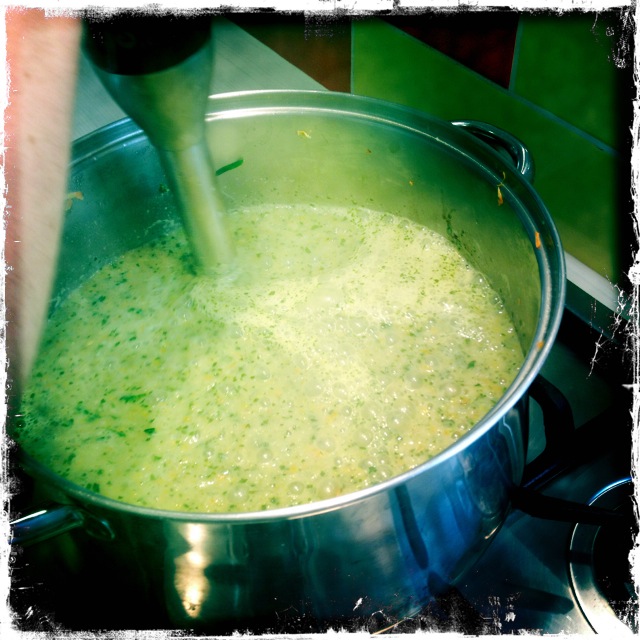
  • After that, add the hot water and bouillon, bring everything up to simmering point and simmer, covered, for about 10-15 minutes or until the vegetables are quite tender. Then remove the pan from the heat and when it has cooled a little, liquidise the soup with the stick blender and check to see if seasoned correctly.
  • Wash the chives and coriander, carefully shake dry & roll up in a piece of kitchen paper to dry. Snip or chop finely.
  • When ready to serve, stir the soup and then swirl in the sour cream. Then ladle in to bowls and garnish each one with the snipped chives and coriander.

Notes: Why don’t we peel the carrots in this recipe? What does to sweat vegetables mean?

ourkitchengarden.net

Categories: Kitchen Garden, Recipe | Tags: , , , , , , | Leave a comment

Antipasto di peperoni tricolore

A wonderful thing happens when you roast capsicum: the crunchy and slightly sour tastes make way for luscious, slippery sweetness & when matched with garlic and herbs the effect is amazing!

ourkitchengarden.net

Fresh from the garden: capsicum, garlic, thyme, marjoram, sage, rosemary
Recipe source: Melissa
Serves: 6 or 24 tastes

Equipment:

  • Paper towel
  • Plastic wrap
  • Bowls – big, medium
  • Salad spinner
  • Baking tray
  • Oven mitts
  • Large tongs
  • Serving bowls


Ingredients:

  • 2 large capsicums
  • Extra-virgin olive oil
  • A head of garlic (10 or 12 cloves)
  • A small handful of thyme sprigs
  • A small handful of marjoram sprigs
  • A small branch of sage
  • A small rosemary stem
  • Flaked salt
  • A 200g slab of Danish feta
  • A cup of pesto

What to do:

  • Preheat oven to 200C.
  • Wash the capsicums and wipe dry.
  • To blacken the capsicums, roast them directly on the gas burner of the stove, turning every minute or so with tongs until the entire surface is blackened. Once charred, set aside to cool in a medium bowl and cover with plastic wrap.
  • Meanwhile separate the garlic cloves but don’t peel them, and put them in the large bowl. Wash and spin-dry the herbs, stripping the herbs from their stalks and putting them in the big bowl.
  • When cool, remove the capsicums from the bowl and peel the charred skin under cool running water with your hands. Cut them in half and remove seeds, drain well and then cut into long thin strips and add them to the bowl.
  • Liberally douse the capsicum strips, garlic and herbs with olive oil and turn to coat.
  • Place strips onto the baking tray with the garlic and herbs scattered over and sprinkle a little flaked salt onto the whole lot and bake for about 15 minutes.
  • Carefully remove the tray from oven with oven mitts and then carefully remove from the oven.
  • To make this an Antipasto Tricolore, unwrap the feta and divide onto serving plates keeping in whole pieces. Pile little mounds of the capsicum, garlic and herbs onto the plates too and then spoon the pesto onto the plates, drizzling some onto the feta cheese. Serve with good bread to mop up!

Notes: What does Tricolore mean? What other vegetables can you use for antipasto? Why do we cover the capsicum in plastic wrap? What does to douse mean?

Categories: Kitchen Garden, Recipe | Tags: , , , , , , , | Leave a comment

Kitchen news – 27th February 2014

ourkitchengarden.net

We’re back on track for Week 5 and have loved seeing our new classes through the cottage so far – and goodness we’ve had some wonderful lessons: the children are meticulous with slicing, dicing and ricing but also with their great attitudes to teamwork, prioritising procedures and completing tasks… I’ve also seen a few in-class speed competitions going to get the dishwashers stacked in order of plate size, colour and rinsed-ness, with powder compartments filled, locked and loaded… and some little fairies even sorted and wrapped the aprons for me!

So to the menu: Little ears – or perhaps the more delicious-sounding Handmade Orecchiette – with People-powered pesto! I regularly read that it is better to tear or crush basil than to chop or snip it, and this recipe totally proves this: it is zingy and full of delicious tangy flavour. Do it and you will see! And it’s perfect for the hand-squished, moulded pasta shapes. Also: Pizzetta bianca (and its dough) – a new flavour sensation with red onion, mozzarella and thyme; our Composed salad (not Compost salad!) with roasted tomatoes, beans, boiled eggs and beautifully prepared lettuce leaves; and to finish off the remaining Asian veggies we made sticky Rice paper rolls with purple carrots, cucumber, capsicum, coriander and other things not beginning with the letter C, like pineapple sage! And with that our own homemade (obviously!) Sweet chilli sauce – no need to buy the sweet coloured gloopy stuff any more!

Hooray to that.

And we’ve plenty of space if you’re planning to come along to a session… Message me and I’ll fill you in!

Cheers, Melissa

ourkitchengarden.net

Categories: Kitchen Garden, News | Leave a comment

Sweet chilli sauce

Banish that gloopy coloured rubbish from your cupboards! This is easy-peasy to make & delish… and if you bottle up any remaining sauce in a sterilised jar, it will last for ages!

ourkitchengarden.net

Fresh from the garden: chillies
Recipe source: adapted from a recipe by Kylie Kwong
Makes: about 250ml 

Equipment:

  • Measures – jug, tablespoon
  • Small heavy-based saucepan
  • Bowls – small
  • Scales
  • Chopping board and knife
  • Wooden spoon
  • Sauce bowl
Ingredients:

  • 250ml white vinegar
  • 165g white sugar
  • 2½ tablespoons fish sauce
  • 1 large red chilli


What to do:

  • Place vinegar and sugar in the small saucepan and bring to the boil, stirring to dissolve the sugar.
  • Reduce heat and simmer, uncovered, for about 10 minutes until liquid is reduced by almost half and slightly syrupy.
  • Remove from heat and allow to cool.
  • Meanwhile, slice down the length of the chilli and carefully scrape out the seeds and white membrane and discard. Chop the chilli into super-thin slices and add to the syrup with the fish sauce.
  • Stir well, then divide among little sauce bowls and serve.

Caution:

  • Wash your hands thoroughly after coming in contact with chilli, as the capsaicin (the oil within the chilli) burns when it comes in contact with your eyes or sensitive skin.

 Notes: Why do you need to wash your hands if handling chill? What is capsaicin? What other sauces could you make at home? What does fish sauce smell like?

ourkitchengharden.net

Categories: Kitchen Garden, Recipe | Tags: , , , , , , | 1 Comment

People-powered pesto!

For a spicy alternative, rocket leaves can be added to the basil and pounded together or you might like to try a parsley combination… Cooked chickpeas can be used in place of the pine nuts in case of allergy.

ourkitchengarden.net

Fresh from the garden: basil
Recipe source: adapted from a recipe by Alice Waters in The Art of Simple Food
Makes: about 3 cups

Equipment:

  • Bowls – big, med, small
  • Scales
  • Salad spinner
  • Cheese grater
  • Medium frying pan
  • Mortar & pestle
  • Tea towel
  • Measuring jug
  • Tablespoon
  • Serving bowls if needed
Ingredients:

  • 1 big bunch basil, to yield about 100g
  • 1 large clove garlic
  • Salt
  • 80g pine nuts
  • 50g parmesan cheese
  • 200ml extra virgin olive oil


What to do:

  • Pick the basil leaves from the stalks and weigh before you wash them!
  • Then wash in several changes of water and thoroughly spin-dry the basil.
  • Grate the parmesan cheese.
  • Heat the frying pan on a medium heat and lightly dry-toast the pine nuts, shaking regularly so that they don’t stick.
  • Peel the garlic clove and place in the mortar and pestle with a good pinch of salt. Pound these to a paste.
  • Add the pine nuts to the mortar & pestle and continue to pound. Once smooth-ish, transfer to the bowl and stir in the parmesan.
  • Tear the basil leaves and put them into the mortar with a sprinkle of flaked salt. Pound the leaves to a paste. Return the pine nut mixture to the mortar and, pounding it all together, gradually pour in all the olive oil.
  • Taste for seasoning and adjust if necessary.
  • Mix into steaming hot pasta, spread on bruschetta, drizzle over tomato slices, serve as part of an antipasto plate with goats’ cheese and roasted capsicum or spoon into serving bowls to serve as a dip with flatbreads.

Notes: What else can you use with pesto? What also goes with well with basil? Why do we toast the pine nuts? Can you name any other pasta sauces?

ourkitchengarden.net

Categories: Kitchen Garden, Recipe | Tags: , , , , , , , , | Leave a comment

Composed salad

The list of ingredients we can add to a salad is endless… here at Bondi we base this Composed Salad on lettuce leaves, fresh herbs and a wonderfully zingy lemon and garlic dressing, but we are always looking to add something new and special: green beans; juicy bush tomatoes, eggs…

ourkitchengarden.net

Fresh from the garden: Salad leaves, tomatoes, eggs, lemons, cucumbers, celery, beans, basil, parsley, chives, oregano – the list goes on…!
Serves: 6 or 24 tastes

Equipment:

  • Baking tray
  • Chopping boards & knife
  • Bowls – large, medium, small
  • Small saucepan & lid
  • 2 salad spinners
  • Tea towel, paper towel
  • Mortar & pestle
  • Citrus juicer
  • Measures: 1/3 cup, teaspoon
  • Whisk, tongs
  • Serving bowls
Ingredients:

  • A handful of cherry or bush tomatoes
  • A small handful of thyme
  • A big bunch salad leaves (lettuces, rocket, tatsoi)
  • A few garnishing flowers & leaves
  • Bush tomatoes, green beans, spring onions, eggs etc

Marjoram vinaigrette dressing

  • 1 clove garlic
  • Flaked salt & black pepper
  • 1 lemon
  • 1/3 cup extra virgin olive oil
  • 2 sprigs marjoram

ourkitchengarden.net

What to do:

  • Preheat the oven to 150C. Wash and slice the tomatoes in half and place on the baking tray. Wash and pat the thyme stalks dry and strip the leaves onto the tomatoes. Drizzle with a teaspoon or two of olive oil and a pinch of salt and roast for 30 minutes.
  • Place the eggs carefully into the saucepan and fill with cold water. Set them to boil with the lid on, then once the water starts boiling, time them for 4 minutes. Drain and run cold water over them until cool, then peel and quarter.
  • Fill up 2 big bowls with cold water & wash the salad leaves in several changes of water. Spin dry and wipe the bowls dry. Wash then top-and-tail the beans.
  • Lay out the tea towel and line it with paper towel. Spread the salad leaves over the paper and roll the whole lot up like a log. Keep the rolled parcel of leaves in the fridge until needed.
  • Fill up the medium bowl with water and wash the herbs and small garnishing leaves. Dry on a piece of paper towel andreserve in a small bowl.
  • Peel the garlic clove and put it in the mortar with a large pinch of salt. Pound to a paste. Juice the lemon and add the juice to the mortar (without pips) then stir the lot with ateaspoon and scrape it into a large mixing bowl. Stir in the oil and grind some pepper, then whisk the dressing lightly. Wash and pat the marjoram dry and pick off the leaves, and add to the dressing.
  • Unwrap the parcel of salad leaves & tip them into the bowl with the dressing. Gently turn the leaves in the dressing using your hands or tongs, and then transfer the dressed leaves to the serving bowls. Add the eggs, the tomatoes, beans and any other extras and the garnishing petals & leaves and serve immediately with a last drizzle of the dressing.

Notes: Where does the word vinaigrette come from? What other salad dressings could you use? Why do we wash the leaves so well? Why do we roll the leaves up to put them in the fridge?

ourkitchengarden.net

Categories: Kitchen Garden, Recipe | Tags: , , , , , , , | Leave a comment

Rice paper rolls

Once you have mastered the art of cutting the veggies thin and short, and then soaking the rice paper wrappers for just enough time, the rest is easy! And they’re delicious served with Kylie Kwong’s home made Sweet Chilli Sauce!

ourkitchengarden.net

Fresh from the garden: cucumber, carrots, capsicum, avocado, sprouts, coriander, mint
Recipe source: adapted from a recipe on kidspot.com.au
Makes: 32

Equipment:

  • Peelers
  • Chopping board and knife
  • Bowls – large, medium, small
  • Large metal spoon
  • Scissors
  • Salad spinner
  • Measures – cup
  • Tea towel
  • Servingplates
Ingredients:

  • 1 large cucumber
  • 2 large carrots
  • 1 large red capsicum
  • 1 ripe avocado
  • A large handful bean & pea sprouts
  • A small bunch of coriander
  • A small bunch of mint
  • 32 x 22cm round rice paper wrappers

What to do:

  • Wash and peel the cucumber and carrots. Cut into short, thin strips and place in a bowl.
  • Wash the capsicum, shake dry and cut into short thin strips, discarding the seeds and membrane, and place in another bowl.
  • Cut the avocado in half length-ways and remove the stone. Using a large metal spoon, scoop out a half at a time, place on a chopping board and cut into thin slices.
  • Wash and drain the sprouts and trim the ends if needed.
  • Wash and spin-dry the coriander and mint, picking off the leaves and reserving. Finely chop the coriander stalks. You should have about 2 cups’ worth.
  • Half-fill a large bowl with hand-hot water.
  • Dip one wrapper at a time in the water for 5 seconds, until it is just soft.
  • Drain off excess water and place on a clean surface.
  • Place a few pieces of each of the ingredients on the wrapper, about 3cm from the base. Do not overfill!
  • Fold the bottom of the wrapper up over the ingredients.
  • Fold in the sides and roll up to enclose filling, keeping the wrapper tight.
  • Place on a tray and cover with damp tea towel.
  • Repeat with the remaining wrappers and ingredients, and divide among serving plates – slicing in half if needed.

Notes: Where do rice paper rolls come from? What other foods could you wrap up in a rice paper roll?

ourkitchengarden.net

Categories: Kitchen Garden, Recipe | Tags: , , , , , , , , , | Leave a comment

Pizzetta bianca

Russell writes, “This simple pizzetta is a variation on the classic Roman pizza bianca (not really a pizza at all, more like flatbread with olive oil, rosemary and salt). In this instance, it is better to use dense, cheap mozzarella rather than expensive, moist buffalo varieties. The cheaper stuff is very easy to grate and has less water content and therefore melts better.”

ourkitchengarden.net

Fresh from the garden: red onion, thyme
Recipe source: adapted from a recipe by Russell Norman in the book of his restaurant Polpo
Makes: 12 pizzette

Equipment:

  • Pizza stones or baking trays
  • Rolling pins
  • Scales
  • Graters
  • Medium bowls
  • Chopping board and knife
  • Paper towel
  • Pizza cutter
  • Serving plates
Ingredients:

  • 1 quantity pizzetta dough
  • 100g block mozzarella
  • 100g parmesan
  • A red onion
  • Small handful of thyme
  • Black pepper
  • Extra virgin olive oil

 What to do:

  • Preheat your oven to its highest setting: 250C. At the same time put a pizza stone or baking sheets in the oven to heat up.
  • Divide the dough into 8 balls and then roll them into thin 20cm discs.Weigh and grate the cheeses and peel and thinly slice the red onion. Wash and pat the thyme dry then strip the leaves, discarding the stalks.
  • Evenly distribute a handful of the cheeses, some onion and almost all of the thyme over each of the pizza bases. Be sparing – a little goes a long way. If you use too much topping, the base won’t be crisp enough.
  • Remember that your pizza will benefit from being placed directly on to a hot baking sheet or pizza stone within a preheated oven. At 250C, yours will take about 6-8 minutes.
  • Use this time to make the dough for the next class if needed.
  • Just before serving, slice the pizzette into smaller pieces, grind on some pepper, sprinkle over a little olive oil and scatter over the remaining thyme leaves.
  • Finally, please don’t worry about getting totally round and even bases for your pizzetta. In fact, it’s much better if they are not; you’ll get some lovely bubbling and occasional charring.

 Notes: What does pizzetta bianca mean? What animal is mozzarella cheese from? Why do we place the pizza stone or baking tray in the oven to preheat?

Categories: Kitchen Garden, Recipe | Tags: , , , , , | Leave a comment

Pizzette dough

Russell writes, “In the restaurant we make pizzette, which are slightly smaller than pizza, about 20cm in diameter rather than 30cm. As well as being prettier, this size is also more convenient – you might get two or three pizzette on to your pizza stone rather than a single large one. We use fresh yeast, which you can find in health food shops, bakeries and even by asking at the bakery departments of some supermarkets. Otherwise use fast-action dried (instant) yeast.”

ourkitchengarden.net

Recipe source: adapted from a recipe by Russell Norman in the book of his restaurant Polpo
Makes: 12 pizzette

Equipment:

  • Large bowl
  • Scales
  • Measures – jug, tablespoon, teaspoon
  • Clingfilm or plastic wrap


Ingredients:

  • 500g strong white flour, Italian 00
  • 2 teaspoons fine salt
  • 2 teaspoons instant yeast
  • 2 tablespoons extra-virgin olive oil
  • 300ml tepid water

What to do:

  • In a large bowl, mix the flour, salt and dried yeast with the olive oil and the water and form the mixture into a ball.
  • Now knead the dough on a floured work surface. To do this, push the dough backwards and forwards simultaneously with your two hands so that you are stretching it and then pushing it back down into a ball. Repeat this, giving the dough a good working over. You shouldn’t break into a sweat but it should feel like a little workout for your hands and forearms, and you should be feeling the dough getting more and more springy.
  • After 10 minutes of kneading, push the dough back into a ball, flour the top, place in an oiled bowl and cover with clingfilm. Leave to rise in a warm place.
  • After at least 30 minutes, but ideally when doubled in size, your dough is ready.
  • If you want to use the dough later, place the balls of dough on a tray, cover with a damp cloth and leave in the fridge for up to 12 hours. Just remember to take them out 30 minutes before you’re ready to use them.

Notes: Why do we have to wait for the dough to rise? What is this process called? Do we have to make allowances for different sorts of weather?

Categories: Kitchen Garden, Recipe | Tags: , , , , , , , | Leave a comment

Handmade orecchiette

Orecchiette resemble little ears, which is where they get their name, and is the traditional pasta of Puglia. A perfect orecchietta is just under 2cm across and has a slightly domed shaped which enables it to hold pasta sauce well.

ourkitchengarden.net

Recipe source: adapted from a recipe by Lara Scala Quinn on marthstewart.com
Serves: 4 starter serves or enough tastes for 20

Equipment:

  • Large stockpot with lid
  • Measures: cup, ½ cup, ¼ cup, tablespoon
  • Chopping board and knife
  • Baking sheet
  • Tea towel
  • Large bowl
  • Serving bowls
Ingredients:

  • 1 cup semolina flour, plus more for baking sheet
  • 1/2 cup plain flour
  • 1/2 teaspoon coarse salt
  • 1/2 cup water, plus more if needed

What to do:

  • Fill the large pot with water and set to boil with the lid on.
  • Measure semolina, plain flour and salt into a large bowl.
  • Using your fingers, swirl ingredients together until combined then create a well in centre. Pour 1/4 cup water into well and gradually incorporate flour mixture into water using your fingers.
  • Once all the water is absorbed, continue adding water, 1 tablespoon at a time, until mixture begins to form a dough.
  • Turn out onto a large, clean work surface and start to gather and knead dough, working it until no dry flour remains on work surface.
  • Continue to knead until smooth and elastic, about 5 minutes.
  • Divide dough into 8 equal portions, and cover them with a clean, damp kitchen towel.
  • Roll 1 portion of dough into a 45-cm-long rope.
  • Use a knife to cut and drag a 1cm piece of dough from end of rope facing you — a grainy wooden cutting board helps grip the dough.
  • Holding knife at a 45-degree angle to work surface, press and roll dough toward you.
  • Unfurl each piece of dough over your thumb in the opposite direction to form a concave shape, and transfer to a baking sheet lightly sprinkled with semolina flour. Repeat with remaining dough.
  • When the pot of water is boiling add the orecchiette and a tablespoon of salt, stir and replace the lid. Cook for 2 or 3 minutes until the pasta bob to the top.
  • Using a slotted spoon, scoop out into a big bowl with a little of the cooking water and then toss in a tablespoon of olive oil before adding your sauce.
  • Orecchiette can be stored at room temperature in a single layer overnight: cover with a clean kitchen towel or plastic wrap. Any extra orecchiette can be frozen up to six weeks: First, freeze them in a single layer on a baking sheet, then transfer them to a resealable plastic bag and return them to the freezer. Boil directly from the freezer.

Notes: What does orecchiette mean? Name some other pasta shapes. What do they mean?

ourkitchengarden.net

Categories: Kitchen Garden, Recipe | Tags: , , , , , , , | Leave a comment

Blog at WordPress.com.