Kitchen Garden

Apple and cinnamon compote with vanilla yoghurt

This recipe is a goody for Mothers’ Day coming up – imagine your mama waking up to the smell of this bubbling away on the stovetop, just in time for a lazy breakfast-in-bed?! You’ll have brownie points at least for the rest of the day! And if Dad’s making it just for them, tell him to splosh a tablespoon or so of Calvados or Cognac in too…

Fresh from the garden: apples, lemon
Recipe source: Compote adapted from a recipe by Martha Stewart
Serves: 6 or 24 tastes

Equipment:

  • Bowls – large, medium
  • Colander
  • Peelers
  • Chopping board & knives
  • Citrus juicer
  • Large saucepan
  • Wooden spoon
  • Measures – scales, jug, ¼ cup, tablespoon
  • Spatula
  • Small sauce bowls
  • Serving bowls & plates
Ingredients:

  • 1.5kg apples, such as Granny Smith or Pink Lady
  • 1/2 a lemon
  • 1/4 cup sugar
  • A cinnamon quill
  • 2 cloves
  • 200ml Greek yoghurt
  • 1 vanilla pod
  • 1 tablespoon caster sugar

What to do:

  • Wash the apples, then peel them, cut into quarters and then carefully cut out the inner core. You may need to ask an adult to help. Discard the cores into the compost, then chop the remaining pieces into 2cm cubes. Put the cubes into the saucepan.
  • Cut the lemon in half and juice one half to yield 2 tablespoons, measuring them into the saucepan.
  • Combine the rest of the ingredients into the saucepan. Cover, and cook over low heat, stirring occasionally, until the apples are tender, about 20 minutes.
  • Meanwhile prepare the yoghurt: halve the vanilla pod lengthways and scrape the seeds from inside each half. Mix these into the yoghurt with the tablespoon of white caster sugar, and divide into small sauce bowls. Chill until ready to serve.
  • When the compote is ready, divide it among your serving bowls. Place the bowls on a serving plate with the small yoghurt bowl and serve!

Notes: What are cloves – are they garlic? What is Greek yoghurt? What could you add to this dish to make it even yummier? What is a compote?

Categories: Kitchen Garden, Recipe, School Holiday Program | Tags: , , , , , , , , , , , | Leave a comment

Mushroom and rocket frittate

We love eggs! They are so versatile… and we also love the magic combination of eggs with mushrooms… this recipe has heaps of different things to do so great for budding chefs! The original also calls for spinach but we had heaps of rocket to use instead – the pepperiness isn’t so obvious once the rocket has wilted…

Fresh from the garden: spring onions, mushrooms, rocket, thyme, eggs
Recipe source: adapted from a recipe by Martha Stewart
Serves: 12 frittate or about 30 small

Equipment:

  • Muffin tins (12-hole large or 2 x 24-hole mini)
  • Pastry brush
  • Chopping board & knife
  • Bowls – large, medium
  • Salad spinner
  • Large frying pan
  • Wooden spoon
  • Whisk, spoons
  • Scales
  • Serving plates
Ingredients:

  • 2 tablespoons olive oil plus extra for greasing
  • 2 spring onions
  • 300g mushrooms of your choice!
  • 300g fresh rocket
  • A sprig or two of thyme
  • A good grind of pepper
  • 1 pinch flaked salt
  • 8 eggs
  • 1/3 cup milk
  • 100g feta cheese


What to do:

  • Preheat the oven to 180C. Lightly grease the muffin tin holes with a pastry brush and a teaspoon or 2 of olive oil.
  • Wash the spring onions, stripping the first layer off and trimming any dried-up ugly parts.  Thinly slice the white & green parts but keep them in separate bowls.
  • Wipe the mushrooms with a piece of paper towel – do not wash them! Slice finely.
  • Wash and spin-dry the rocket. Roll it up & slice into thin ribbons.
  • Wash and wipe the thyme dry, then strip from the stalks.
  • In the frying pan, heat oil over medium-high heat; cook the white parts of spring onions, stirring for 1 minute. Add the mushrooms, thyme, pepper and salt and cook on a low heat, stirring occasionally until no liquid remains and mushrooms are light golden for about 5 minutes.
  • Stir in the rocket and cook, stirring, until wilted for about 1 minute. Remove from heat and then stir in the green parts of green onions. Divide among the muffin cups and set aside.
  • Break the eggs into a large bowl and whisk lightly, then add the milk and beat again. Spoon the egg mixture evenly among muffin cups. Weigh the feta cheese & then crumble it up and then sprinkle into each hole.
  • Bake in 180C oven until edges are set, about 10 minutes for the large (or 7-8 minutes for the small) then let cool in pan on rack for a few minutes.
  • Divide among serving plates. Yum!

Notes: Why do we separate the spring onion parts? Why shouldn’t we wash mushrooms?What does thyme smell like? Where does the word frittate come from?

Categories: Kitchen Garden, Recipe | Tags: , , , , , , , , , , , , , , | Leave a comment

Spelt pasta

Our Kitchen Garden students love making pasta! This recipe uses spelt flour, an ancient grain that is slightly nutty. Spelt has a lower gluten content than wheat flour, and whilst not suitable for a coeliac diet, can be eaten by those with a low threshold gluten intolerance.

ourkitchengarden.net

Spelt linguine with quick pesto

Fresh from the garden: eggs
Recipe source: adapted from a recipe by Sean Moran at Sean’s Panaroma
Makes: about 600g pasta, enough for 6, or 24 tastes

Equipment:

  • Scales
  • Stand mixer, bowl & paddle
  • Pasta machines
  • Measures – tablespoon
  • Plastic film
  • Large knife
  • Pastry brush
Ingredients:

  • 570g spelt flour plus extra
  • 4 free-range eggs
  • 15ml water

 What to do:

  • Weigh the flour into the bowl of the mixer, then with the motor running, add the eggs one at a time. Process for a few minutes until the dough clings together and feels quite springy.
  • Tip the dough onto a clean, dry workbench. Knead the dough for a few minutes, then wrap it in plastic film and let it rest for about an hour at room temperature.

_______________________________________________________________

  • Get an adult to help fix the pasta machine to a suitable bench. Screw the clamp very tightly.
  • Set up your pasta hanging poles, ideally between 2 chairs.
  • Clear a large space on the workbench alongside the pasta machine. All surfaces must be clean and dry. Press the dough into a rectangle about 8 cm wide.
  • Set the rollers on the pasta machine to the widest setting and pass the dough through. The dough will probably look quite ragged at this stage. Fold it in 3, turn it 90 degrees and roll it through again. Go to the next-thickest setting and pass the dough through 3-4 times.
  • Continue in this manner (changing the settings and passing the dough through) until the dough has passed through the second thinnest setting. Don’t use the very thinnest setting, as the dough gets too fine and is hard to manage. If the dough gets too long to handle comfortably, cut it into 2-3 pieces using the large knife, and roll each piece separately.
  • Depending on which type of pasta you want, you can either lay the strips out on a lightly-floured table and cut them by hand, or you can fix the cutter attachment to the machine and carefully roll the pasta strips into strips for linguine or the thinner cutters for angel hair, gently catching them as they come through.
  • Drape the pasta over the hanging poles to dry while you make your sauce.
  • Clean the pasta machine parts by brushing them down with a dry pastry brush, pop the collected parts back into their boxes, and then clear and clean the table.

Notes: Never wash the pasta machine – it will rust! Just brush down with a strong pastry brush to remove the leftover dough.

ourkitchengarden.net

Busy hands!

Categories: Kitchen Garden, Recipe, School Holiday Program | Tags: , , , , , , , , , , | Leave a comment

Rhubarb and pear compote with vanilla yoghurt

This recipe is a goody for Mothers’ Day coming up – imagine your mama waking up to the smell of this bubbling away on the stovetop, just in time for a lazy breakfast-in-bed?! You’ll have brownie points at least for the rest of the day!

ourkitchengarden.net

Rhubarb and pear compote, vanilla yoghurt

Fresh from the garden: orange, rhubarb, pears
Recipe source: adapted from a recipe by Tracy Rutherford in Australian Good Taste
Serves: 6 or 24 tastes

Equipment:

  • Paper towel
  • Microplane zester
  • Chopping board & knives
  • Bowls – large, medium, small
  • Measures – ¼ cup, tablespoon
  • Peelers
  • Large saucepan
  • Wooden spoon
  • Colander
  • Spatula
  • Small sauce bowls
  • Serving bowls & plates
Ingredients:

  • 1 orange
  • 1/4 cup caster sugar
  • 1 bunch (about 700g) rhubarb
  • 4 ripe pears
  • 1 cinnamon stick

Vanilla yoghurt

  • 200ml Greek yoghurt
  • 1 vanilla pod
  • 1 tablespoon caster sugar

 What to do:

  • Wash and wipe the orange dry. Zest into a small bowl, then cut the orange in half and then juice to yield ¼ cup.
  • Trim the rhubarb, discarding the leaves into the rubbish (not the compost). Wash well, then chop into 3cm lengths.
  • Wash the pears and peel. Slice into quarters and then cut out the core. Slice the wedges in half again.
  • Place the orange juice and sugar in a large saucepan over low heat. Cook, stirring occasionally, for 3 minutes or until sugar dissolves.
  • Add the rhubarb, pear, orange zest and cinnamon stick. Bring to a simmer and cook, covered, for 5 minutes. Uncover and cook for a further 5 minutes or until fruit is tender and liquid thickens slightly. Remove from heat and set aside for 15 minutes to cool.
  • Meanwhile prepare the yoghurt: halve the vanilla pod lengthways and scrape the seeds from inside each half. Mix these into the yoghurt with the tablespoon of white caster sugar, and divide into small sauce bowls. Chill until ready to serve.
  • When the compote is ready, divide it among your serving bowls. Place them on a serving plate with the small yoghurt bowl and serve!

Notes: Why do we discard the rhubarb leaves into the rubbish?  What is Greek yoghurt? What could you sprinkle on to this dish to make it even yummier? What is a compote?

Categories: Kitchen Garden, Recipe, School Holiday Program | Tags: , , , , , , , , , , , | Leave a comment

OKG School Holiday Program – Tuesday 23rd April 2013

ourkitchengarden.net

Tuesday’s menu

MENU

Introduction – Knife Licences

 MORNING TEA
Carrot muffins with garlic butter*
Rhubarb and pear compote with vanilla yoghurt*
Ava’s orange Anzacs* 

Chook care – Garden Walk – Herb id
Harvesting

LUNCH
Chickpea and green veggie soup*
Spelt rags* with quick pesto*
Warm beetroot & quinoa tabbouleh*

Seedlings & seeds
Sustainability
Take home: start a herb garden!

ourkitchengarden.net

The most perfect cup of chickpea & green veggie soup!

Well! We came, we saw, we conquered! Conquered the peeling, the chopping, the boiling, blending, the baking, the eating – and the washing up! We had such a wonderful time – the children were so helpful and enthusiastic, and made super delicious food. And I think we all learnt something new… Thanks to all the wonderful kids who attended, you are all so inspiring!

ourkitchengarden.net

Warm beetroot & quinoa tabbouleh

If you’d like to try the recipes at home, click on the asterisked menu listings above to be directed…  xx

ourkitchengarden.net

OKG Knife Licence

Categories: Kitchen Garden, School Holiday Program | Tags: , , , , , , | Leave a comment

Dee Nolan’s kabuli chickpeas, leek and green veggie soup

Late last year I bumped in to Dee Nolan at Sean’s and we soon got chatting about her amazing olive oils (Sean’s pours the Nolan’s Road Extra Virgin Delicate with the malt scrolls and cracked wheat log) and her organic, South Australian kabuli chickpeas – as well as the great deeds done in the SAKGP schools… Soon after I was the beneficiary at school of a wonderful gift from Nolan’s Road: a huge box of Dee’s chickpeas! Regular readers of this site will know how much I love to blend up these quick-cooking* chickpeas for Yotam’s hummus, but I’ve also been waiting for an excuse to simmer up some seasonal soup…

Rugged up against a cold, windy and rainy autumn day? Perfect!

ourkitchengarden.net

Nolan’s Road delivery!

Fresh from the garden: potato, leeks, garlic, bok choy, cabbage, kale, spinach, silverbeet
Recipe source: Melissa
Serves: about 6 or 30 tastes

Equipment:

  • Scales
  • 2 large saucepans with lid
  • Chopping board & knife
  • Peeler
  • Grater
  • Kettle
  • Colander
  • Bowls – big, med
  • Mandoline
  • Stick blender
  • Measures – lt jug, tablespoon
  • Wooden spoon, ladle
  • Serving bowls
Ingredients:

  • 250g dried chickpeas, soaked overnight
  • 1 large potato
  • 2 large leeks
  • A bunch of leafy green veg: bok choy, cabbage, kale, spinach, silverbeet
  • 1 tablespoon extra-virgin olive oil
  • 1 knob of butter
  • 2 cloves garlic
  • Flaked salt and freshly-ground black pepper
  • 1 litre boiling water with 1 rounded tablespoon bouillon or 1 litre stock
  • 50g parmesan

What to do:

  • Rinse soaked chickpeas, cover with water, bring to the boil and simmer for 10 minutes.
  • Meanwhile, slice off tough bits of leek skin.  Slit from top to bottom and rinse thoroughly under running water to get rid of any mud trapped between layers of the vegetable.  Slice finely.
  • Peel the potato under running water and then slice finely using the mandoline.
  • Peel and finely slice the garlic. Grate the parmesan.
  • Warm a thick-bottomed pan, and add the tablespoon of oil and the knob of butter. Add the leeks and garlic to the pan and sweat gently with a good pinch of salt until tender and sweet – 5 minutes at least. Add the sliced potato and turn in the buttery mixture.
  • Drain the chickpeas and then add to the leeks and sliced potato and cook for 1 minute. Add about two-thirds of the stock and simmer for 15 minutes.
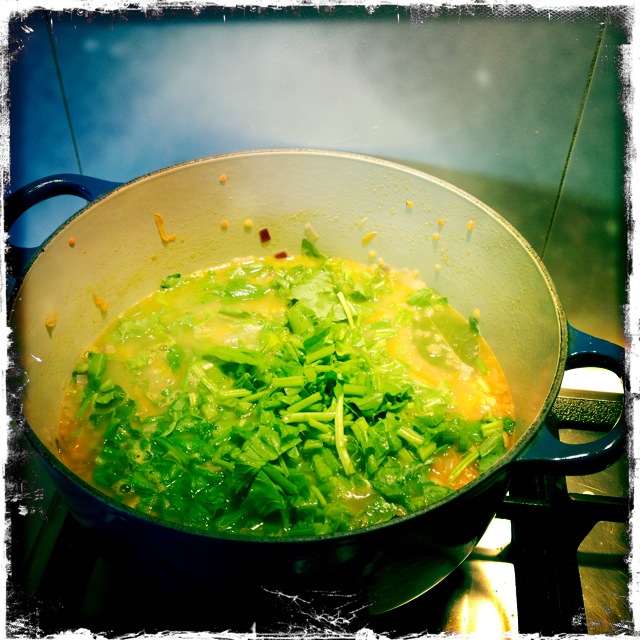
  • Meanwhile wash the leafy veg thoroughly, shake dry and chop into bite-sized pieces.
  • With about 5 minutes to go, add any veggie stalks in to the soup, and then after a minute or two add in the leaves, stirring to combine & wilt.
  • Pour half the soup out into the 2nd pot and puree with the stick blender. Leave the other half whole, and then pour back in together – pureeing half gives a lovely smooth comforting feel but also keeps a bit of texture. Now add enough of the remaining stock to achieve the consistency you like.
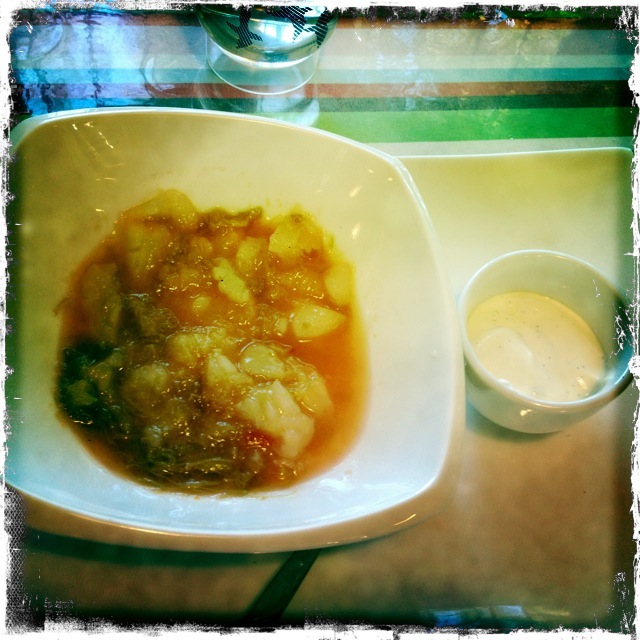
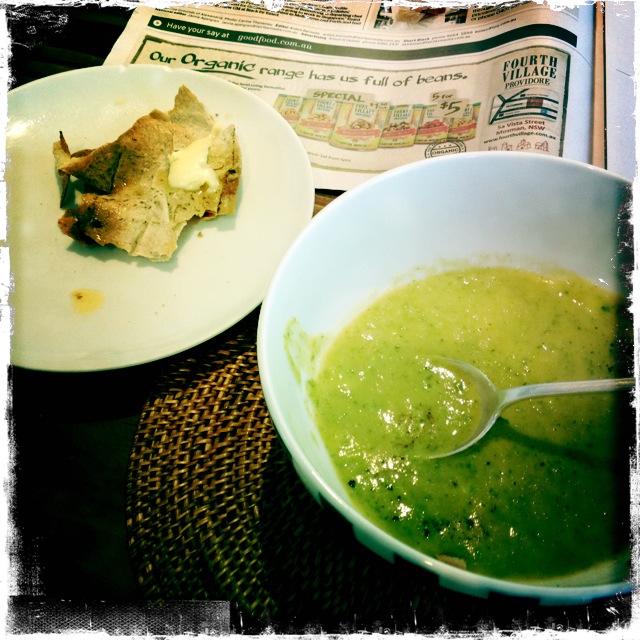
  • Check for seasoning, ladle into bowls to serve and add a sprinkle of parmesan to finish.

 Notes: Why do we soak the chickpeas overnight? What’s the number one rule with the mandoline? What is sweating the leeks?

ourkitchengarden.net

Nolan’s Road kabuli chickpea, leek & green veggie soup

*If you’re researching recipes from European or US books or websites you may read that the chickpeas, once you’ve soaked them overnight, will need an hour or more of  boiling. I find that the Nolan’s Road chickpeas take less than half that time so start checking after about 20 minutes!

And PS. If you can be organised enough to soak your chickpeas in advance, DO IT!!! Whilst I also keep tins of chickpeas, borlotti beans, cannellini et al in my pantry, there is simply nothing better than long-soaked and freshly cooked ones, plus you avoid the nasty BPA-lined tins. Hooray!


Categories: Kitchen Garden, Recipe | Tags: , , , , , , , , , , | 2 Comments

Crispy rosemary flatbread

Smittenkitchen says: Nothing could be easier than making this cracker, but that doesn’t mean you shouldn’t tell people you slaved all day over it because they’re going to be impressed, and I see no reason not to milk it. I think you could easily swap the rosemary for other herbs, such as thyme or tarragon, or punch it up with black pepper or other spices, but personally, I like it just the way it is here.

ourkitchengarden.net

Crispy crispy!

Fresh from the garden: rosemary
Recipe source: adapted by smittenkitchen.com from a recipe in Gourmet magazine
Serves: 8 or about 30 tastes

Equipment:

  • 3 heavy, large baking sheets
  • Paper towel
  • Chopping board & knife
  • Measures: cup, ½ cup, ¼ cup, tablespoon, ½ teaspoon
  • Baking paper
  • Large bowl
  • Rolling pins
  • Pastry brushes
  • Wire racks
  • Serving plates
Ingredients:

  • 3½ cups unbleached plain flour
  • 4 large sprigs rosemary
  • 1 teaspoon baking powder
  • 1 teaspoon cooking salt
  • 1 cup water
  • 1/2 cup olive oil plus more for brushing
  • Flaky sea salt

What to do:

  • Preheat oven to 230°C with 3 heavy baking sheets inside.
  • Wash, dry and chop 1 sprig of rosemary.
  • Stir together flour, 1 tablespoon chopped rosemary, baking powder, and salt in a medium bowl. Make a well in centre, then add water and oil and gradually stir into flour with a wooden spoon until a dough forms. Knead dough gently on a work surface 4 or 5 times.
  • Divide dough into 3 pieces and roll out each piece separately on sheets of baking paper into shapes large enough to fit  each baking tray (shape can be rustic; dough should be thin).
  • Lightly brush the tops with additional oil and then strip the remaining rosemary, scattering small clusters of leaves on top, pressing in slightly. Sprinkle with flaked salt.
  • Slide rounds (still on baking paper) onto the preheated baking sheets and bake until pale golden and browned in spots, 8 to 10 minutes.
  • Transfer flatbread (discard baking paper) to racks to cool.
  • Break into pieces and serve.
  • Flatbread can be made 2 days ahead and cooled completely, then kept in an airtight container at room temperature. 

Notes: Why is this called flatbread? Why is this unleavened bread? What is kneading?

Categories: Kitchen Garden, Recipe | Tags: , , , , , , , , , | 2 Comments

Moroccan carrot dip

Jill says, “Serve this warmly coloured and sweetly spiced Moroccan carrot dip as part of a tabletop spread, along with some olives, flat bread, grills and salad.” We say, “whoa there! This is super-delicious! We used purple as well as normal carrots and with the paprika dye the result was a neon and spiced-up bowl of yum!” And of course I used coriander – not that I’m necessarily anti-parsley – but you just would, wouldn’t you?!

ourkitchengarden.net

Moroccan carrot dip

Fresh from the garden: carrots, garlic, lemon, olives, parsley or coriander
Recipe source: Jill Dupleix
Serves: 6 or 24 tastes

Equipment:

  • Medium saucepan& lid
  • Scales
  • Peelers
  • Chopping board and knife
  • Citrus juicer
  • Measures: tablespoon, ½ teaspoon
  • Bowls – large, small
  • Food processor
  • Spatula
  • Salad spinner
  • Paper towel
  • Serving bowls
Ingredients:

  • 500g carrots
  • 1 garlic clove
  • Half teaspoon ground cumin
  • Half teaspoon paprika
  • Half teaspoon ground ginger
  • Half teaspoon ground cinnamon
  • Pinch of cayenne pepper
  • Flaked salt
  • 1 tablespoon honey
  • Half a lemon
  • 3 tablespoons olive oil
  • 2 tablespoons green olives
  • A small handful flat parsley or coriander leaves

What to do:

  • Fill the saucepan with water and set to boil.
  • Meanwhile peel the garlic clove, then peel the carrots, chop into large chunks and cook in simmering, salted water with the garlic for about 20 minutes or until soft.
  • Squeeze the lemon to yield 2 tablespoons juice.
  • Measure out the cumin, paprika, ginger, cinnamon, cayenne, salt, honey and lemon juice into a small bowl.
  • Drain the carrots into the colander, and return to the hot, dry pan for a minute or two over medium heat to dry them out further.
  • Mash or whiz the carrots and garlic in the food processor until smooth. Add the bowl of spices, salt, honey and lemon juice and mix well or whiz again, scraping down with the spatula when needed.
  • Add the olive oil gradually, while still beating. Allow to cool for a minute or two.
  • Wash, spin-dry and chop the parsley or coriander leaves to yield 2 tablespoons.
  • Spoon into serving bowls, scatter with olives and parsley leaves and drizzle with a little extra olive oil to serve.

 Notes: Where is Morocco? What other spices can you think of? What is cayenne?

Categories: Kitchen Garden, Recipe | Tags: , , , , , , , , , , , , | Leave a comment

Carrot muffins with garlic butter

These are wonderful straight out of the oven, with the garlicky butter melting away in a hole in the middle…It’s a great recipe to make with the kids as there’s lots of grating, mashing and snipping, measuring and weighing… If you have no cupcake cases, just melt a tablespoon of butter in a small saucepan and, using a pastry brush cover each hole with a thin film of butter. This will stop the muffins sticking to the pan. We also used chives instead of parsley – snipping them with kids’ scissors – & made them even better!

ourkitchengarden.net

Carrot muffins with garlic butter

From the garden: carrots, parsley, eggs, garlic
Recipe source: adapted from Stephanie Alexander’s Kitchen Garden Cooking with Kids
Makes: 12 large or about 30 mini muffins

Equipment:

  • 12 or 24 hole muffin tin
  • 12 large or 24 small cupcake cases
  • Peeler, grater
  • Chopping board & knives
  • Bowls – 2 medium, 1 small
  • Measures: ½ cup, ¼ cup, teaspoon
  • Scales
  • Garlic press, whisk
  • Baking paper
  • Wire rack
  • Serving plates
Ingredients:

  • 2 large or 4 medium carrots
  • 15 stalks parsley
  • 60g cheddar or gruyere
  • 220g self-raising flour
  • 1 teaspoon table salt
  • 1 egg
  • 3/4 cup buttermilk
  • 1/2 cup vegetable oil
  • 2 cloves garlic
  • 100g unsalted butter at room temperature
  • Flaked salt

ourkitchengarden.net What to do:

  • Preheat oven to 180C. Drop the cupcake cases into the tin.
  • Wash, peel and grate the carrot to yield about ½ a cup. Wash, dry and chop the parsley. Weigh the cheese & then grate it.
  • Weigh the flour then mix it with the cheese, carrot, parsley and table salt together in a medium bowl.
  • In the other medium bowl whisk the egg, buttermilk and oil together.
  • Make a well in the dry ingredients and add the liquid mixture. Mix lightly and then spoon into muffin cases to about 2/3 full. Bake for 25 minutes for the large & about 15-20 for the small muffins.
  • While the muffins are cooking, make the garlic butter: Squeeze the garlic through the garlic press into the small bowl and add the butter and a pinch of salt. Mix until smooth. Place in a log shape on a piece of baking paper, roll up lightly, sealing the edges and put in freezer until firm.
  • Remove muffins from the oven. Allow to sit for a minute before turning out onto the wire rack to cool. Remove the butter from the freezer and slice into thin discs.
  • When the muffins are cool, make a slit in the top of each insert a slice of garlic butter and place on serving plates.

 Notes: What is buttermilk? What is a well in the centre of the dry ingredients?

ourkitchengarden.net

Buttery garlic goodness…

Categories: Kitchen Garden, Recipe | Tags: , , , , , , , , , , , | 1 Comment

Autumn fridge soup

Today dawned cold, rainy and most definitely autumnal after a month of lovely Indian summer… perfect soup weather! And no better excuse to clean out the scary fridge drawers of limp & sad veggies, and freezer of half-blocks of icy stock…

ourkitchengarden.net

Fridge soup: rocket, spinach, lentil goodness

Fresh (or not!) from the fridge: I used half a Spanish onion, a brown onion, a potato, a carrot, some very floppy spring onions, garlic, some rocket from about a week ago and some spinach stalks that I was saving for the chooks (sorry girls).
Recipe source: Melissa


Equipment:

  • 1 large, 1 med saucepans with lid
  • Kettle
  • Chopping board & knife
  • Peeler
  • Mandoline
  • Sieve
  • Measures – litre jug, cup
  • Colander
  • Bowls – big, med
  • Stick blender
  • Wooden spoon, ladle
  • Serving bowls
Ingredients:

  • 1 brown onion
  • ½ a Spanish onion
  • 3 soft spring onions
  • 1 tablespoon extra-virgin olive oil
  • 1 knob of butter
  • Flaked salt and freshly-ground black pepper
  • 2 cloves garlic
  • 1 large potato
  • 1 large carrot
  • About a litre of vegetable stock
  • A cup of red lentils
  • 3 bay leaves
  • A bunch of spinach stalks
  • A small handful of rocket (refreshed in a big bowl of cold water for 10 minutes…)


ourkitchengarden.net

Fridge soup, green all over

What to do:

  • Pour the stock into the medium saucepan with lid on and heat to a simmer. (I had to semi-thaw mine before I could get it out of the container…)
  • Half fill the kettle and set to boil.
  • Measure the lentils into the sieve and give them a good rinse under the cold water tap, discarding any discoloured lentils or little stones.
  • Peel the onions and dice. Peel off the first layer of spring onion, tail and then slice into small discs.
  • Heat the olive oil and butter together in the large saucepan and then add all the onions and a sprinkle of flaked salt, stirring to coat.
  • Peel the potato under running water and then slice finely using the mandoline. Add to the sweating onions.
  • Peel and chop or slice the garlic and add that in too with the bay leaves.
  • Peel and the grate the carrot straight into the saucepan.
  • Pour the hot stock into the large saucepan, add the lentils and then simmer for about 10 minutes until the potato & lentils are tender. You may need to add a little extra hot water from the kettle, depending on how big a bunch of veggies you have.
  • Meanwhile wash the leafy veg thoroughly (discarding any manky bits), shake dry and chop into bite-sized pieces. Add any stalks into the soup to start cooking first, and then add the chopped leaves. Cook for another 5 minutes to wilt the green veggies.
  • Taste the soup to check seasoning and then puree with the stick blender.
  • Ladle into bowls to serve and add a grind of black pepper to finish.
  • Eat with buttery toasted Lebanese bread, and feel all warm and sustainable, all at the same time…

Notes: Do you have to soak lentils? What’s the number one rule with the mandoline? What does sweating do to the onions?

ourkitchengarden.net

Fridge soup, toasted pita, paper…


Categories: Kitchen Garden, Recipe | Tags: , , , , , , , , , , , | Leave a comment

Blog at WordPress.com.