Posts Tagged With: Baking

Rhubarb and rosewater Eton mess

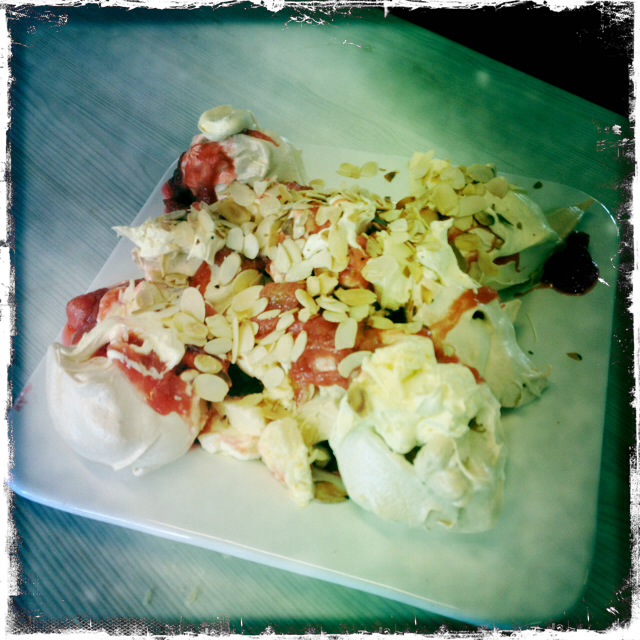
A take on the classic English dessert with gorgeous contrasting textures & flavours: crunchy, soft, creamy, hard, sweet, acid… yum yum YUM!

ourkitchengarden.net

Fresh from the garden: strawberries, rhubarb, eggs
Recipe source: Adapted from a recipe by Sophie Dahl in The Delicious Miss Dahl
Serves: 12 at home

Equipment:

  • Kitchen Aid, whisk attachment
  • Scales
  • Large baking tray
  • Baking paper
  • Measures: teaspoon
  • Chopping board and knife
  • Saucepan
  • Wooden spoon
  • Frying pan
  • 2 serving plates


Ingredients:

For the meringues

  • 8 large eggs
  • 400g raw caster sugar
  • 1 pinch salt

For the rhubarb compote

  • 200ml boiling water
  • 120g raw caster sugar
  • 1kg rhubarb
  • 2 teaspoons rose water

For the cream

  • 500ml double cream
  • 1 vanilla pod
  • Almond slivers to serve

What to do:

  • First make the meringues. Preheat the oven to 120C. Separate the eggs.
  • In a clean bowl or mixer whisk the egg whites until they reach firm peaks.
  • Gradually mix in the sugar and salt and whisk well until the mixture is thick white and glossy. This should take about 7-8 minutes.
  • Line a large baking tray with non-stick baking paper – use a little dab of the meringue mixture to stick it down.
  • Spoon the mixture into blobs on your baking tray leaving a generous gap between them. Bake for 1 hour.
  • Whilst the meringues are baking, make the rhubarb compote. Wash the rhubarb and trim any leaves away. Chop into 3cm rounds.
  • In a pan, boil the water with the sugar and add the rhubarb when it starts bubbling. Stir and let it cook for about 5 minutes on a medium heat. When the rhubarb is tender, remove from the heat. Add the rose water and leave to the side.
  • Whip the cream until it forms soft peaks.
  • Split the vanilla pod down the middle and scrape out the seeds. Stir them into the whipped cream.
  • Place the cooled meringues on the serving plate, breaking a few of them up and leaving a few whole. Spoon the cream over the top, then drizzle the compote on top of the cream.
  • Lightly toast the almond slivers in a dry frying pan and sprinkle them over the top.
Categories: Kitchen Garden, Recipe | Tags: , , , , , , , , , | Leave a comment

Pizza bianca with smashed olives and rocket

Try this for something different then – a pizza with no tomato? Crayzee…

ourkitchengarden.net

Fresh from the garden: olives, rocket, garlic
Recipe source: Melissa
Serves: 8 at home or 24 tastes

Equipment:

  • A wooden chopping board & knives
  • Bowls – large, med, small
  • Salad spinner
  • Measures – tablespoon
  • Colander, grater, garlic press
  • Scales
  • Rolling pins
  • 2 large baking trays
  • Wide egg lifter
  • Pizza cutting wheels
  • Serving plates
Ingredients:

  • 1 amount Hugh’s magic dough recipe
  • 1 cup olives
  • 1 tub bocconcini
  • 30g parmesan
  • 2 tablespoons extra-virgin olive oil
  • 2 cloves garlic
  • A large handful rocket

What to do:

  • Preheat the oven to 220C.

For the topping: 

  • Placing one olive at a time on the chopping board, smash down on it with the flat base of the smallest bowl to dislodge the pip. Discard the pip into compost and reserve the olives in a small bowl.
  • Open the tub of bocconcini and tear each ball in half.
  • Grate the parmesan. Squeeze the garlic cloves through the press.
  • Wash the rocket and spin it dry. Chop into thin ribbons.

Assembling the pizza:

  • Scatter some flour on the workbench, divide the dough into four and roll to form 4 thin ovals.
  • Once rolled, lightly flour the baking trays and place 2 ovals on each tray, side by side.
  • Layer the bocconcini and parmesan on top, spoon on the smashed olives and the squeezed garlic, then slide the pizzas into the oven.
  • Wash and dry the wooden chopping boards and set them out ready.

Baking the pizza:

  • Bake the pizzas for 12 minutes or until the edges are very crusty and the cheese is bubbling.
  • Use this time to make the dough for the next class if needed.
  • You may want to slip the pizza off the tray onto the rack for the last few minutes, so that you get a really crusty base.
  • Once the pizzas are done, transfer them to the wooden boards using the wide egg lifter.
  • Cut the pizzas into small squares, lift onto serving plates, sprinkle with the chopped rocket and eat!

Notes:Where does pizza come from? What sort of other pizza could we make?

Categories: Kitchen Garden, Recipe | Tags: , , , , , , | Leave a comment

Pizza ai funghi e rucola

Why did the mushroom go to the party? ‘Cos he was a fun-gi to be with… boom tish! And this one has some peppery rocket sprinkled over, yum yum…

ourkitchengarden.net

Fresh from the garden: mushrooms, rocket, onion, garlic, marjoram
Recipe source: Melissa
Serves: 8 at home or 24 tastes

Equipment:

  • Chopping boards & knives
  • A frying pan
  • Bowls – large, med
  • Salad spinner
  • Measures – ¼ cup, tablespoons, teaspoons
  • Colander, grater
  • Scales
  • Paper towel
  • Wooden spoon
  • 2 pizza trays
  • Metal tablespoons
  • Wide egg lifter
  • Pizza cutting wheels
  • Serving plates
Ingredients:

For the pizza topping:

  • 1 handful mushrooms
  • 1 tub bocconcini
  • 2 tablespoons extra-virgin olive oil
  • 2 cloves garlic
  • 30g parmesan
  • A handful rocket
  • Aged balsamic vinegar

Tomato sauce:

  • 1 onion
  • 2 cloves garlic
  • 3 sprigs marjoram
  • ¼ cup extra-virgin olive oil
  • 1 tin diced tomatoes
  • Flaked salt and black pepper

What to do:

  • Preheat the oven to 220C.

For the tomato sauce:

  • Peel and finely chop the onion and garlic, reserving half of the garlic for the topping.
  • Heat the olive oil in the frying pan & gently cook the onion and garlic until translucent but not brown.
  • Open the tin of tomato and add to the frying pan with a pinch of salt and a grind of pepper.
  • Wash, dry and pick the herbs. Roughly chop then add to the tomatoes.
  • Simmer gently for 10 minutes, stirring occasionally, until quite reduced.

For the topping: 

  • Wipe the mushrooms free of dirt using a piece of paper towel and finely slice. Drop them in to a big bowl, drizzle about a tablespoon of olive oil and a pinch of olive oil and toss to combine.
  • Open the tub of bocconcini and cut each ball into 3 or 4 slices.
  • Wash and spin the rocket dry and then reserve in another large bowl.
  • Grate the parmesan and add it to the rocket with a tablespoon or two of olive oil and a teaspoon of balsamic vinegar. Gently toss to combine.

Assembling the pizza:

  • Scatter some flour on the workbench, divide the dough in two and roll to form two thin shapes about 26 cm in diameter.
  • Assemble the pizzas directly onto the trays, flouring the trays first.
  • Usingthe metal spoon, swirl a couple of spoonfuls of tomato sauce onto the pizza bases, spreading so that they become totally covered with a clean border.
  • Layer the bocconcini on top, spoon on the garlicky mushrooms, then slide the pizzas into the oven.
  • Wash and dry the wooden chopping boards and set them out ready.

Baking the pizza:

  • Bake the pizzas for 12 minutes or until the edges are very crusty and the cheese is bubbling.
  • Use this time to make the dough for the next class if needed.
  • You may want to slip the pizza off the tray onto the rack for the last few minutes, so that you get a really crusty base.
  • Once the pizzas are done, transfer them to the wooden boards using the wide egg lifter.
  • Cut the pizzas in half first, and then each half into squares for each plate.
  • Lift onto serving plates and sprinkle with the rocket and parmesan.
  • Eat! 

Notes: Where does pizza come from? What other sort of vegetables could you use in a pizza? What sort of other pizza could we make? What other cheeses could we use?

Categories: Kitchen Garden, Recipe | Tags: , , , , , , , , , , , , | Leave a comment

Upside-down blood orange cake

This cake can be served warm or at room temperature. Garnish with double cream or vanilla yoghurt if desired, but the cake is great on its own!

ourkitchengarden.net

Fresh from the garden: blood oranges, eggs
Recipe source: from the 52 Kitchen Adventures blog

Equipment:

  • Large cast-iron skillet
  • Scales
  • Bowls – 1 small, 1 med, 1 large
  • Large spoon
  • Measures: cup, ½ cup, teaspoon, ½ teaspoon
  • Microplane grater
  • Chopping board&knife
  • Stand mixer
  • Spatula
  • Skewer or toothpick
  • Serving plate


Ingredients:Topping:

  • 40g unsalted butter
  • 1 cup firmly packed light brown sugar
  • ½ teaspoon ground cardamom
  • 2 blood oranges

Cake Batter:

  • 1½ cups plain flour
  • ½ teaspoon salt
  • 1½ teaspoons baking powder
  • 1½ teaspoons ground cardamom
  • 80g unsalted butter, softened
  • 1 cup sugar
  • 2 large eggs
  • ½ cup milk
  • 2 teaspoons vanilla extract

What to do:

  • Preheat oven to 180°C and position rack in centre of oven.
  • In the cast iron skillet, combine butter, brown sugar and ground cardamom over low heat.
  • Once butter has meltedthe ingredients to a single layer, remove from heat and let cool for 10 minutes or so without stirring.
  • Zest one of the blood oranges into the small bowl using the microplane, then peel both and cut them into ½cm thick slices.
  • To make the cake batter, combine the flour, salt, baking powder and ground cardamom in themedium bowl.
  • Measure the milk and vanilla extract into the small bowl with the orange zest and stir.
  • Add the softened butter & the sugar to the bowl of the stand mixer and beat until light & fluffy, then add the eggs and mix until thoroughly combined.
  • Stir in half of the dry ingredients, then all of the milk mixture.
  • Add the remaining dry ingredients and mix until just combined.
  • Lay the orange slices on top of the brown sugar mixture in your preferred design.
  • Pour the batter over the orange slices and even out if needed using a knife or spatula.
  • Bake for around 30 minutes or until the top is firm to the touch and a toothpick or skewer inserted in the middle comes out clean (be careful – that skillet handle will be very hot!).
  • Let cool for a few minutes, thenloosen the sides with the spatula or knife. Firmly hold a clean chopping board over the pan and thenturn over to flip out upside-down on to the board.
  • Cut into slices or chunks & serve warm or at room temperature.
ourkitchengarden.net

Ugly but yum

Categories: Kitchen Garden, Recipe | Tags: , , , , , | Leave a comment

Soda bread

We play around with lots of different types of dough and love them all. This one in particular is great with a chunky soup, or dipped into creamy hummus, or pungent pesto…

ourkitchengarden.net

Fresh from the garden: rosemary, parsley, sage
Recipe source: adapted from The Ballymaloe Bread Book by Tim Allen
Makes: 1 loaf

Equipment:

  • Bowls – large, small
  • Measures: jug, tablespoon, teaspoon
  • Mezzaluna
  • Chopping boards and knives
  • Sieve
  • Baking sheet
  • Serving plates
Ingredients:

  • 450g plain flour
  • 1 level teaspoon salt
  • 1 level teaspoon bread soda (bicarb soda)
  • 1 tablespoon dried rosemary
  • 1 small handful each of sage and parsley
  • 400ml buttermilk

 What to do:

  • Heat up the oven to 230 degrees C.
  • Wash and spin dry the herbs and pick the leaves, discarding the stalks. Finely chop the leaves – you’ll need about 3 tablespoons’ worth.
  • Sieve the flour, salt and bread soda into a large, wide mixing bowl. Add the freshly chopped herbs to the dry ingredients and stir well.
  • Make a well in the centre. Pour most of the milk into the flour. Using one hand with the fingers open and stiff, mix in a full circle drawing in the flour from the sides of the bowl, adding more buttermilk if necessary. The dough should be softish, not too wet and sticky.
  • The trick with all soda breads is not to over-mix the dough. Mix the dough as quickly and as gently as possible, keeping it really light and airy. When the dough comes together, turn it out onto a well-floured work surface. Wash and dry your hands.
  • Gently roll the ball of dough around with floury hands for a few seconds, just enough to tidy up. Then pat it gently into a round, about 5 cm high.
  • Place the dough on a lightly floured baking sheet. With a sharp knife cut a deep cross in the middle of it, letting the cuts go over the sides of the bread. Then prick the four triangles with your knife: according to Irish folklore this will let the fairies out!
  • Put this into your preheated oven for 10 minutes, then turn the heat down to 200 degrees C for a further 25 minutes, or until cooked. When the bread is cooked it will sound hollow when tapped.
  • Leave to cool for a few minutes, then cut into slices or chunks and divide among your serving plates.

 Notes:What is bread soda? Which country do you think this recipe comes from? What other ingredients could you add to this bread? Where do fairies live?

Categories: Kitchen Garden, Recipe | Tags: , , , , , , , , | 2 Comments

Two cheeses souffle

Cheesy, eggy – comfort food in its most simple form… and deceptively simple to do!

ourkitchengarden.net

Fresh from the garden: eggs, chives
Recipe source: adapted from a recipe on bbcgoodfood.com
Serves: 4 or 24 tastes

ourkitchengarden.net

Equipment:

  • 4 x 250ml ramekins or soufflé dishes
  • Baking paper
  • String & scissors
  • Baking tray
  • Scales
  • Paper towel
  • Bowls – 1 large, 5 small
  • Saucepan
  • Wooden spoon
  • Measuring jug
  • Stick blender
  • Metal spoon
  • 4 under-plates to serve
Ingredients:

  • 25g butter plus extra to grease the ramekins
  • 150g soft goats’ cheese
  • 100g parmesan
  • A small handful chives
  • 5 eggs
  • 25g flour
  • 250ml milk
  • Flaked salt & black pepper

 What to do:

  • Heat the oven to 200C. Butter the ramekins.
  • Make a collar for each ramekin by tearing a 40cm length of baking paper, folding it into thirds, and buttering one side. Then roll it around the ramekin, buttered side in, and tying with string to secure. Place them on the baking tray when done.
  • Measure the parmesan, then grate it. Crumble the goats’ cheese.
  • Wash the chives and pat dry with paper towel. Using the scissors, finely snip them to yield about 2 tablespoons.
  • Carefully separate each of the eggs.
  • Melt 25g butter in the saucepan, stir in the flour and gently cook on a low heat for a minute or so. Slowly add the milk, stirring all the time to make a thick sauce. Cook for a couple of minutes to cook out the flour.
  • Stir in the cheeses and chives then add 4 of the egg yolks, season generously and mix well.
  • In a clean and dry bowl, use the stick blender to whisk all the egg whites until they are stiff and form soft peaks.
  • Using a metal spoon, start folding the egg whites into the cheese mixture carefully – begin by using about 1/3 of the whites first and then adding the rest once combined – and pour into the buttered soufflé dishes.
  • Cook for 12–15 minutes until the soufflés are risen and golden.
  • Using pot holders, carefully place a soufflé on to an underplate and serve TOUT SUITE!

 Notes: What is a ramekin? Why do we separate the egg yolks and whites? Why do we need to cook out the flour? Where does the word soufflé come from?

ourkitchengarden.net

Categories: Kitchen Garden, Recipe | Tags: , , , , , , | 2 Comments

Kitchen Garden news – 1st August 2013

ourkitchengarden.net

We’re back in the swing of things in the cottage and my word, how the children have grown! I swear that they’ve all grown 20cm since last term! It is wonderful to see them again – and lovely to taste the amazing dishes they have been preparing in the last two weeks.

The garden held an interesting array of goodies for us upon our return from the holidays – a little bit of broccoli, a handful of snowpeas, a bunch of coriander, loads of parsley, some juicy radishes nudging their heads out of the soil, a few branches of kale, a forest of rhubarb, a hundred lemons, a thousand eggs, and two dozen beautifully straight carrots planted with care in term two… What to use to compile a tasty menu? This is what we cooked from the spoils: a Warm salad of Nolan’s Road chickpeas and kale with Greek yoghurt  (the unexpected hit of the week), Veggie patch frittata (with sautéed radishes and chopped snowpeas), Broccoli and lemon risotto (with our own bouillon made by 5P last week), Olive and rosemary focaccia (with the bottled Bondi olives that the classes marinated in May this year, and own dried rosemary) and Rhubarb and apple crumble tarts (the expected hit of the week…) So delicious. The recipes are up NOW btw!

We’ve had a few of our regular helpers head back off to work so we are left with quite a few spaces free…  In order to have successful sessions we would love some more volunteers across the 8 sessions a week: if you’re keen to help, please get in touch!

Categories: Kitchen Garden, News | Tags: , , , , , , , | Leave a comment

Rosemary and olive focaccia

We love preparing dough at Bondi, and this soft focaccia studded with olives and rosemary is fantastic as part of an antipasto plate or with a hearty soup. We used Our Bondi Olives that were picked in February then brined over the course of two months, marinated (olive oil, orange peel, garlic, fennel seed, bay, thyme) and bottled in May, then cupboard-aged for another 2 months… we also used a combination of fresh rosemary, picked from the stalk, with rosemary spines dried over the last 6 months. A variation:  adding halved cherry tomatoes or preserved artichokes or whatever you feel like!

ourkitchengarden.net

From the garden: olives, rosemary
Recipe source: adapted from a recipe on taste.com
Serves: 8 at home or 24 tastes

Equipment:

  • Bowls – small, med
  • Measures – jug, teaspoon, tablespoon
  • Scales
  • Stand mixer & dough hook
  • Pastry brush
  • 20 x 30cm Swiss roll pan
  • Clean tea towel
  • Chopping board
  • Serving plates
Ingredients:

  • 310ml warm water
  • 2 teaspoons dried yeast
  • 2 teaspoons caster sugar
  • 3½ tablespoons olive oil
  • 450g plain flour
  • 2 teaspoons salt flakes
  • 1 large sprig of rosemary
  • A jar of our marinated Bondi PS olives

What to do:

To make the dough:

  • Combine the water, yeast and sugar in a small bowl and set aside in a warm, draught-free place for about 5 minutes until frothy & bubbling. Then add 2 tablespoons of olive oil.
  • Place flour and half of the flaked salt in the bowl of the mixer. Make a well in the centre and pour in yeast mixture. On the lowest setting, mix for 10 minutes.
  • Turn onto a lightly floured surface and knead for another minute or so until smooth and elastic. Brush a medium bowl with a little olive oil to grease. Place dough in bowl and cover with a clean tea towel. Set aside in a warm, draught-free place for about an hour until doubled in size.

 Start of lesson:

  • Preheat oven to 200°C.
  • Brush the pan with 2 teaspoons of remaining oil. Punch down the centre of the dough with your fist. Turn onto a lightly floured surface and knead for 2 minutes or until dough is elastic and has returned to original size. Press into the prepared pan. Cover with the clean tea towel and set aside in a warm, draught-free place to prove for 20 minutes or until doubled in height.
  • Meanwhile wash & carefully dry the rosemary and pick the leaves from the stalks. Pit the olives.
  • Use your finger to press dimples into the dough. Brush with remaining oil and sprinkle over the rosemary and remaining salt. Press the olives into the dough.
  • Bake in oven for 25-30 minutes or until golden and the focaccia sounds hollow when tapped on base. Serve warm or at room temperature, carved into thin slices.
  • While the focaccia is cooking you can make the dough for the next class before cleaning up!

Notes: Why do we wait for the yeast mixture first? What is process of doubling the dough in size called?

Categories: Kitchen Garden, Recipe | Tags: , , , , , , , , | Leave a comment

Rhubarb and apple crumble tarts

Winter: the perfect time for rhubarb crumble! And here made dainty in the form of little tarts…

ourkitchengarden.net

Fresh from the garden: rhubarb, apple
Recipe source: Melissa
Serves: 4 or 24 tastes

Equipment:

  • 4 x 10cm fluted tart tins with removable bases
  • Chopping board and knife
  • Small baking tray
  • Peelers and corer
  • Large saucepan
  • Wooden spoon
  • Measures: scales, ½ cup, 1/3 cup, ¼ cup, teaspoon
  • Bowls – large, medium
  • Baking paper & baking beans
  • Serving plates
Ingredients:

  • 1 sheet (25cm) ready-rolled shortcrust pastry
  • 2 granny smith apples
  • 1/2 bunch rhubarb
  • 1/3 cup caster sugar
  • Double cream, to serve

Oaty crumble

  • 50g butter, softened
  • 1/4 cup brown sugar
  • 1/2 cup plain flour
  • 1/2 cup rolled oats
  • 1 teaspoon ground cinnamon

What to do:

  • Preheat oven to 200°C.
  • Bring the pastry out of the freezer and carefully separate one sheet from the others. (You may need to do this with a long bread knife, sliding it between the sheets to break apart). Let the sheet thaw for about 5 – 10 minutes.
  • Place the tins onto a baking tray. With the pastry sheet still on its plastic, divide into quarters, then line your tart tins with the pastry, gently pushing into the corners to shape.
  • Line the pastry with baking paper and fill with baking beans. Bake in the preheated oven for 8 minutes. Remove the paper and beans and bake for a further 5 minutes until golden and crisp. Remove from oven.
  • Meanwhile, peel and core the apples and then chop into 1cm pieces. Wash and chop the rhubarb into similar pieces.
  • Place the apple, rhubarb and sugar in a large saucepan over medium-low heat. Cook, gently stirring occasionally, for 10 minutes or until apple and rhubarb have released their juices and are just tender. Remove from heat.
  • To make the crumble, measure the sugar, flour, oats and cinnamon in a medium bowl and stir until well mixed. Then chop up the butter and place into the oat mixture, using your fingertips to rub the butter into the mixture until just combined.
  • Spoon the rhubarb mixture evenly among the crisped pastry cases, then sprinkle with the crumble mixture. Return to the oven and bake for 10 minutes or until the crumble mixture is golden brown and crisp.
  • Carefully slide out of the oven and leave to cool for a few minutes before lifting the tarts out of the cases, placing them on a clean, dry chopping board and slicing into small wedges.
  • Serve warm or at room temperature, topped with a dollop of double cream if you like!

Notes: Can you eat rhubarb leaves? Why do we bake the cases first? What is this called? What are baking beans or beans?

ourkitchengarden.net

Categories: Kitchen Garden, Recipe | Tags: , , , , , , , | Leave a comment

Bocconcini and garden herb pizza

The year 1 kids came to visit – and this is what they made!

ourkitchengarden.net

Fresh from the garden: fresh herbs, onion, garlic
Recipe source: Melissa
Makes: 1 large pizza

Equipment:

  • Bowls – 1 medium, 2 small
  • Salad spinner
  • Grater
  • 1 large oven tray
  • Wide egg lifter
  • Large wooden board
  • Pizza cutter
  • Tablespoon measure, scales
  • Kitchen towel
  • Tongs
  • Metal spoons
  • Serving plates
Ingredients:For the pizza topping:

  • 1 quantity Hugh’s Magic Dough
  • ½ tub bocconcini
  • 1 tablespoon extra-virgin olive oil
  • Small handful mixed herb sprigs: thyme, marjoram, parsley
  • 20g parmesan
  • A small bowl of prepared tomato pizza sauce
  • Flaked salt and black pepper

What to do:

  • Preheat the oven to 220C. You can prepare the topping now while you wait for the oven to heat up.
  • Wash and spin-dry the herb sprigs – pick the leaves, discarding the stalks into the compost.
  • Tear each ball of bocconcini in half.
  • Grate the parmesan and reserve.

 Assembling the pizza:

  • Scatter some flour on the table and roll the dough out to form an even rectangle to cover the baking tray.
  • Assemble the pizza directly onto the tray, flouring the tray well first.
  • Using the metal spoon, swirl a couple of spoonfuls of tomato sauce onto the pizza bases, spreading so that they become totally covered.
  • Layer the bocconcini on top and season well, then scatter the herbs over the pizza.
  • Drizzle the pizza with about a tablespoon of olive oil, then slide it into the oven.

 Baking the pizza:

  • Bake the pizza for about 12 minutes or until the edges are very crusty and the cheese is bubbling.
  • You may want to slip the pizza off the tray onto the rack for the last few minutes, so that you get a really crusty base.
  • Once the pizza is done, transfer it to the large wooden board using the wide egg lifter.
  • Cut the pizzas crossways into small squares, and lift onto serving plates.
  • Sprinkle the reserved parmesan cheese over the slices and then get ready to eat!

Notes: What other sort of vegetables could you use in a pizza? What sort of other pizza could we make?

Categories: Kitchen Garden, Recipe | Tags: , , , , , , , | Leave a comment

Create a free website or blog at WordPress.com.