Author Archives: melhm

Mandarine marmalade

IMG_1421

Preserving food – like making jam or pickling veggies – sounds like it’s going to be really difficult. But sometimes it isn’t! Especially if you stick to small batches of produce…

Fresh from the garden: mandarines, lemon
Recipe source: adapted from a recipe by Billy Law on atablefortwo.com.au
Makes: about 500ml

Equipment:

  • Chopping boards & knives
  • Large & med mixing bowls
  • Muslin cloth or Chux
  • Citrus juicer
  • Large stockpot
  • 3 small saucers
  • Scales
  • Cup measure
  • Spatula
  • Wooden spoon with flat end
  • 2 or 3 small jars
Ingredients:

  • 1kg mandarines
  • 600g sugar
  • 3 cups of water
  • 1/2 lemon


What to do:

  1. Peel mandarines carefully, trying to keeping peels in one piece if possible. Then cut half of the peels into thin strips (julienne strips) – as thin as possible – and set aside.
  2. Remove as much of the white pith as possible and set aside.
  3. Gently cut the mandarines in half crosswise, remove the seeds and set aside too. Use a clean muslin cloth or new piece of Chux, wrap the seeds and pith together tightly.
  4. Juice the half lemon.
  5. Add mandarines, peel strips, the parcel of pith and seeds, lemon juice, sugar and water into a large pot. Stir constantly over medium heat, without boiling, until sugar is dissolved.
  6. Bring to the boil, then reduce heat down to medium and let it bubble away for about 30 minutes, stirring occasionally until set point is reached.
  7. Set point testing: Put a saucer in the freezer and chill it. Take it out when ready to test, add a dollop of jam onto saucer. Draw a line on the jam with a knife, if it wrinkles, then the jam is ready. If not, keep boiling the mixture for another 10 minutes and test again.
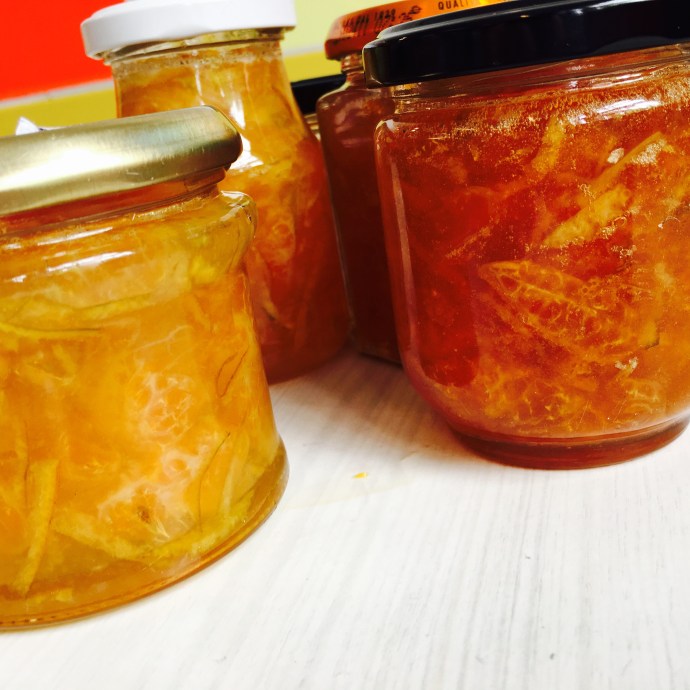
  8. Once ready, remove the parcel and discard the pith and seeds. Pour the marmalade into hot sterilised jars. Seal 15 mins later, or when the jars are cool enough to handle.
  9. How to sterilise jars: Preheat oven to 160C. Wash jar with warm water and a spot of dish washing liquid, drain, leave on a baking tray right side up and put in the oven. Let it sterilise for at least 20 minutes. Time it well so you take the jars out of the oven when your marmalade is ready. DO NOT add cold food into the hot jar, or vice versa as it will shatter. Seal the jar when it’s cool enough to handle.

Notes: What does preserving mean? What is pith? What is the set point?

Categories: Kitchen Garden, Recipe | Tags: , , , , , , , , | 1 Comment

Thai eggplant in coconut curry

IMG_1417

The flavours in this curry are so pure and fresh and clean… Just be sure to mash up the herb fibres so it’s not too hairy!

Fresh from the garden: eggplants, lemongrass, kaffir lime leaves, garlic, ginger, basil, spring onions
Recipe source: adapted from a recipe on herbivoracious.com
Serves: 4 or 24 tastes

Equipment:

  • Chopping boards & knives
  • Measures: jug
  • Pastry brush
  • Oven tray
  • Rolling pin
  • Citrus juicer
  • Mini food processor
  • Frying pan
  • Serving bowls
Ingredients:

  • 4 large, long Japanese eggplants (more if smaller)
  • 100ml Rice Bran oil
  • Salt
  • 2 stalks lemongrass
  • 2 kaffir lime leaves
  • 2 cloves garlic
  • 3cm piece ginger
  • A handful Thai basil
  • 1 lime
  • 1 can of coconut milk
  • 2 spring onions

What to do:

  1. Preheat the oven to 220C.
  1. Slice the eggplants lengthwise. Score them inside deeply on the diagonal into a diamond pattern, being careful not to cut all the way through. Brush with a little olive oil and season with salt. Roast in the oven on an oven tray until completely tender and browning, at least 20 minutes.
  2. To prepare the lemongrass: remove the outer layer of each stem and trim away the bottom 1/2cm and most of the top, leaving only about a 10cm piece that should be tender enough to sink a fingernail into. Now pound it with the rolling pin to release the flavours. Once you’ve given it a good thrashing, you can finely mince it.
  3. Wash the kaffir lime leaves and basil and finely slice.
  4. Peel the garlic and ginger and finely chop. Juice the lime.
  5. Meanwhile, in a mini food processor or a mortar and pestle, combine the chopped kaffir lime leaves, lemongrass, garlic, ginger and Thai basil and 1/2 teaspoon salt. Process or pound until you have a fairly fine paste. Mix in half of the lime juice.
  6. Trim the roots and top layer from the spring onions and wash them cold water, then finely slice into thin rings.
  7. Heat 2 tablespoons of oil in a frying pan. Fry the curry paste for 1 minute. Turn off the heat and mix in the coconut milk and half of the sliced spring onions. Let it rest a few minutes, then taste and add a little more salt and lime juice if needed.
  8. When the eggplant is done, pour a little of the sauce into your serving bowls. Divide the eggplant slices into the bowls and pour the rest of the sauce over the top. Garnish with the rest of the spring onions and serve. 

Notes: What is a kaffir lime leaf? Why do we need to take care when cutting the eggplants?

Categories: Kitchen Garden, Recipe | Tags: , , , , , | Leave a comment

Quinoa tabbouleh

IMG_1419

White quinoa is the most common variety, but red quinoa is also available and has a nuttier flavour. They can be used interchangeably. Quinoa is a fab alternative to grains and is gluten-free.

Fresh from the garden: basil, parsley, lemons, mint, cucumbers, tomatoes
Recipe source: adapted from a recipe by Martha Stewart on marthastewart.com
Serves: 6 or 24 tastes

Equipment:

  • Stockpot with lid
  • Measures: cup, ½ cup, tablespoon, teaspoon, ¼ teaspoon
  • Wooden spoon, fork, teaspoon
  • Salad spinner
  • Mezzaluna
  • Microplane zester
  • Citrus juicer
  • Chopping board & knife
  • Peeler
  • Bowls – 1 large & 4 small
  • Measuring jug
  • Serving bowls
Ingredients:

Cook quinoa:

  • 1 cup quinoa
  • 1½ cups water
  • 1 teaspoon cooking salt

Make tabbouleh:

  • 4 large handfuls of parsley (about 2 cups when chopped)
  • 1 large handful mint leaves (about ½ cup when chopped)
  • 1 large handful basil leaves (about ½ cup when chopped)
  • 1 teaspoon flaked salt
  • ¼ teaspoon freshly ground black pepper
  • 2 lemons
  • 1 medium cucumber
  • 2 medium tomatoes
  • ½ cup extra-virgin olive oil

What to do:

  1. Toast quinoa in a stockpot over gentle heat, stirring frequently until fragrant for 6 to 8 minutes. Add the water and a teaspoon of cooking salt and bring to a boil. Reduce heat to medium-low, cover, and simmer until grains are tender, about 15 minutes. Remove from heat and let stand, covered, for 10 minutes, then fluff with a fork and let cool to room temperature.
  2. Wash, spin dry and pick the leaves from the stems of the herbs. Coarsely chop using the mezzaluna.
  3. Zest one lemon to yield 1 teaspoon zest then cut both lemons and squeeze through the citrus juicer to yield 4 tablespoons juice.
  4. Peel the cucumber, cut in half lengthways and scrape out the seeds with the teaspoon. Cut the cucumber into small dice about ½cm square to yield about 1 cup.
  5. Cut the tomatoes into small dice about ½cm square to yield about 1 cup.
  6. Add all the ingredients to the large bowl, measure the olive oil and pour into the bowl, mixing thoroughly to combine.
  7. Divide amongst serving bowls and serve at room temperature.

Notes: What is quinoa? Why do we toast the quinoa first? What does cutting into ‘dice’ mean?

Categories: Kitchen Garden, Recipe | Tags: , , , , , , , | Leave a comment

Kitchen news April 6th 2016

IMG_1163

We have made it! Term 1: ticked off the list of things to do. We’ve gone out with a bang this week with several new recipes that knocked our socks off with deliciousness. I love it when a new recipe works – success mainly due to the wonderful helpers who watch over our young students by encouraging, guiding and gently suggesting whenever needed. We know your time is limited and that you’re needed in a hundred places at once, but it’s worth coming along , even if once or twice, to see the magic that actually happens in your child’s lesson. Can the older students work by themselves in groups without adult supervision? Well yes, a few of them certainly can, but even they benefit from your support and experience in the class. And goodness knows there’ll be a time very soon that they won’t want you around much at all, so why not take us up on the offer soon?

Eggplant chips with fennel yoghurt was a new starring recipe this week – lots of work for the Artichoke team who sliced perfectly rectangular batons, dipped them in the holy trinity of flour, egg and panko crumbs and then fried them until crispy. A freshly whipped fennel and coriander seed mayo and yoghurt dip totally perfected the dish. The Carrots this week chopped up a fabulous Pistou soup  – a French soup of zucchini, carrot, potato and celery with macaroni and the addition of a super-aromatic basil, garlic and parmesan pistou sauce dolloped on at the end. The Olives whipped up an eggy batch of Veggie patch and feta fritatte, using up all the last odds and sods of the remaining summer crops. The Tomato group punched and pummelled their way through a recipe of Rosemary and tomato focaccia and sliced up perfect squares of fluffy warm bread, and the Broad Beans zested and rolled up some of the famous Ava’s orange Anzac biscuits, just in time for the big day on the 25th April.

And a group of Year 6 boys also helped me process a huge bowl of just-picked olives by slicing, brining and bottling the little black jewels. They will be ready to do the next stage of marinating and preserving when we come back!

Talking of which, the schedule for next term is being finalised as we speak and will be emailed out to current volunteers as soon as it’s done. I will also include it in the first Class News of Term 2 so please look out for it there too. Have a great holiday and see you next term!

Holiday chickens? We have spaces over the Saturday, Sunday and Anzac day slots of the holidays to open and feed the school chickens in the morning, or close them up in the evening. Please sign up if you’re not going away and can help! Message me if interested.


Categories: Kitchen Garden, News | Tags: , , | Leave a comment

Eggplant chips with fennel yoghurt

IMG_1147

Crispy eggplant is wonderfully paired with fennel yoghurt in this flavourful vegetarian dish.

Fresh from the garden: eggplant, coriander seed, lemon, eggs
Recipe source: adapted from a recipe by Russell Norman of Polpo restaurants
Serves: 6 or 30 tastes

Equipment:

  • Measures: teaspoon
  • Non-stick frying pan
  • Mortar and pestle
  • Chopping boards and knives
  • Mixing bowls – 2 large, 3 med
  • Citrus juicer
  • Deep-sided heavy bottom saucepan
  • Paper towel
  • Scales
  • Oil thermometer
  • Baking tray
  • Serving bowls for the chips and for the yogurt dip


Ingredients:

For the fennel yoghurt

·       1 teaspoon coriander seed

·       1 teaspoon fennel seed

·       200g Greek yoghurt

·       125g mayonnaise

·       ½ a lemon

·       A large pinch of sea salt

·      Black pepper

For the eggplant chips

·       2 teaspoon coriander seeds

·       2 teaspoon fennel seeds

·       100g plain flour

·       1 teaspoon fine salt

·       3 medium free-range eggs

·       150g panko breadcrumbs

·       2 teaspoon sesame seeds

·       2 eggplant

·       Rice Bran oil, for deep frying

What to do:

  1. Toast both lots of coriander and fennel seeds by putting all 6 teaspoons in a non-stick frying pan and dry frying gently for a few minutes until you can smell them. Remove and grind in a mortar and pestle.
  2. For the yoghurt: Add 2 teaspoons of the ground seeds to the yoghurt. Squeeze the lemon to yield 1 teaspoon juice and combine with the remaining yoghurt ingredients.
  3. For the eggplant chips: Wash the eggplants and wipe dry. Slice the eggplants into 10cm long chips, approximately ½ cm wide. Mix the flour, salt and grind of pepper in a bowl. In a second bowl beat the eggs. In a third bowl mix the breadcrumbs, the remaining ground seeds and the sesame seeds.
  4. Dip the eggplant chips in the flour and cover well. Shake off the excess and then dip into the egg and shake off any drips and finally coat in the breadcrumbs. Set aside on a baking tray.
  5. Heat the oil in a deep-sided, heavy bottomed pan to 190C, or until a breadcrumb sizzles and turns golden-brown when dropped into it. CAUTION: hot oil can be dangerous. Do not over-fill the pan or leave unattended. Fry the eggplant in batches for 2-3 minutes until golden-brown. Remove and drain on paper towel.
  6. Divide into bowls, sprinkle with flaked salt and serve with the fennel yoghurt on the side.

Notes: What is eggplant also known as? Why do we need to be careful with hot oil?

Categories: Kitchen Garden, Recipe | Tags: , , , , | Leave a comment

Pistou soup

IMG_1137

French pistou sauce is like Italian pesto except has no pinenuts, and is a classic accompaniment to this rich veggie soup.

Fresh from the garden: potatoes, carrots, celery, zucchini, beans, basil, onion, garlic, bay
Recipe source: adapted from a recipe on jamieoliver.com
Serves: 6 or 24 tastes

Equipment:

  • Chopping boards and knives
  • Mixing bowls – 2 lge, 3 med
  • Colander
  • Medium stockpot
  • Measures – litre jug, ½ cup
  • Scales
  • Mortar and pestle
  • Serving bowls


Ingredients:

  • 1 onion
  • 3 cloves of garlic
  • 2 leeks
  • 3 potatoes
  • 3 carrots
  • 1 stick of celery
  • 3 zucchini
  • A small handful green beans
  • 2 sprigs of fresh flat-leaf parsley
  • 2 fresh bay leaves
  • Olive oil
  • 1 x 400g tin chopped tomatoes
  • 1 x 400g tin cannellini beans
  • 1 x 400g tin borlotti beans
  • ½ cup small macaroni

Pistou sauce:

  • 5 cloves of garlic
  • 6 sprigs of fresh basil
  • 60g parmesan or grana padano
  • 3 tablespoons extra virgin olive oil

What to do:

  1. Peel and finely chop the onion and garlic, then trim, clean and slice the leeks.
  2. Wash the potatoes, carrots, celery and zucchini, then chop them all into small cubes by slicing lengthways first and then into dice (peeling the carrots but not potatoes).
  3. Wash the beans and drain them, then tail them and chop into 1cm lengths.
  4. Wash the parsley, pat dry then pick the leaves and roughly chop.
  5. Pour a film of olive oil into a medium stockpot over a medium heat and sauté the onion, garlic and leek for 5 minutes.
  6. Add all the rest of the chopped ingredients, the bay leaves and the tin of tomatoes.
  7. Drain and rinse the cannellini and borlotti beans then add them in.
  8. Cover with a litre of water, season and simmer for 10 minutes or so until the vegetables are tender – check by piercing a piece of potato with a sharp knife.
  9. Add the macaroni and simmer for another 8 to 10 minutes until cooked, adding a little more water if the soup is too thick.
  10. Meanwhile, for the pistou sauce: Peel the garlic and add to a pestle and mortar. Sprinkle in some flaked salt then start to pound to break down.
  11. Wash the basil and spin it dry, then pick off the basil leaves and add to the garlic. Pound until puréed, then finely grate in the parmesan (weighing the piece first) and muddle in the extra virgin olive oil to make a paste.
  12. Divide the soup into bowls and serve with a dollop of pistou on the top.

Notes: What is pistou? Why do we weigh the parmesan before starting to grate it?

Categories: Kitchen Garden, Recipe, Uncategorized | Tags: , , , , , , | Leave a comment

Rosemary and tomato focaccia

IMG_1149

We love preparing dough, and this soft focaccia studded with tomatoes and rosemary is fantastic as part of an antipasto plate or with a hearty Italian-style soup. In class we use the previous class’s dough, and then make the new dough for the next class.

From the garden: tomatoes, rosemary
Recipe source: dough from a recipe by Hugh Fearnley-Whittingstall
Serves: 4 or 24 tastes

Equipment:

·       Bowls – small, med, flat small

  • Measures – jug, teaspoon, tablespoon
  • Scales
  • Stand mixer & dough hook
  • Pastry brush
  • 20 x 30cm Swiss roll pan
  • Clean tea towel
  • Chopping board & knife
  • Serving plates
Ingredients:

For the topping:

·       Salt flakes

  • 1 large sprig of rosemary

·       A cup of cherry tomatoes

For the magic dough:

·       250g plain white flour

·       250g strong white flour

·       1½ level teaspoons fine sea salt

·       1 teaspoon instant dried yeast

·       1 tablespoon olive oil, plus a little extra for oiling

What to do:

  1. Preheat oven to 200°C.

For the focaccia:

  1. Brush the pan with 2 teaspoons of oil. Punch down the centre of the dough with your fist. Turn onto a lightly floured surface and knead for 2 minutes or until dough is elastic and has returned to its original size. Press into the prepared pan. Cover with the clean tea towel and set aside in a warm, draught-free place to prove for 20 minutes or until doubled in height.
  2. Meanwhile wash the rosemary & pat dry and pick the leaves from the stalks.
  3. Wash the tomatoes but leave any sepals on, and carefully dry on a piece of paper towel.
  4. Use your finger to press dimples into the dough. Brush with remaining oil and sprinkle over the rosemary and a sprinkle of salt. Gently press the tomatoes into the dough.
  5. Bake in oven for 25-30 minutes or until golden and the focaccia sounds hollow when tapped on base. Serve warm or at room temperature, carved into thin slices.
  6. While the focaccia is cooking you can make the dough for the next class before cleaning up!

IMG_1134

Now make the magic dough for the next class:

  1. Put the two flours into the bowl of the stand mixer with the salt and yeast. Mix well using the dough hook. Add the oil and 325ml warm water and mix to a rough dough. Knead for 5–10 minutes, until smooth. This is quite a loose and sticky dough, which is just as it should be – you get better-textured bread this way – so try not to add too much flour if you can help it, it will become less sticky as you knead.
  2. Trickle a little oil into a clean bowl, add the kneaded dough and turn it in the oil so that the bottom is covered with a light film. Cover with plastic wrap and leave in a warm place to rise until doubled in size – at least an hour, probably closer to two.

 Notes: What is process of doubling the dough in size called? What is a tomato sepal?

IMG_1145

Categories: Kitchen Garden, Recipe | Tags: , , , , , , , | Leave a comment

Veggie patch and feta frittate

IMG_1146

So we come to the last weeks of term and need to use up a little bit of this and bit of that growing in the garden. This recipe is perfect to do just that!

Fresh from the garden: eggplant, squash, capsicum, eggs, rocket, parsley
Recipe source: Melissa
Makes: 30 individual frittate

Equipment:

  • Pastry brush
  • 3 x 12-hole large cupcake tins
  • Mixing bowls – 2 large, 2 med
  • Chopping board & knives
  • Potato peeler
  • Salad spinner & paper towel
  • Large frying pan or wok
  • Grater, scales
  • Wooden spoon
  • Tongs, whisk
  • Serving plates
Ingredients:

  • A small selection of ripe veggies: eggplant, squash, capsicum, leek
  • 1 large sweet potato
  • Large handful of rocket
  • Small handful marjoram and parsley
  • Olive oil
  • Flaked salt and black pepper
  • 200g feta cheese
  • 25g parmesan
  • 12 large eggs
   

What to do:


  1. Preheat the oven to 180C. Pour a little olive oil into one cupcake hole in each tin and using the pastry brush, spread it into 30 of the holes.
  2. Peel the sweet potato, and then chop flesh evenly into 1cm cubes. Wash the others veggies and chop into thin slices or small cubes.
  3. Wash the rocket leaves in several changes of water and spin dry. Chop the stalks and leaves into very thin ribbons.
  4. Wash the herbs and pat dry with paper towel. Strip the leaves from the stalks & chop finely.
  5. Heat the frying pan with the oil and toss in the sweet potato, leek and veggies. Season well with salt and pepper. Cook, turning occasionally, for about 4 minutes over medium heat until the cubes are just tender and lightly golden at the sides. Add in the rest of the veggies and cook for another few minutes, then add the rocket and cook until wilted.
  6. Meanwhile, cut the feta into small cubes and grate the parmesan.
  7. Then add the cubed feta and gently stir to mix in.
  8. In the large bowl, lightly beat the eggs with the herbs, parmesan, a pinch of salt and a grind of pepper.
  9. Divide the veggie and feta mixture evenly into the cupcake holes, spoon the eggy herb mixture over and bake in 180C oven for about 20 minutes.
  10. Carefully prise out with a plastic knife if sticking, then divide onto serving plates.

 Notes: Why do we need to preheat the oven? What is feta cheese? What does to prise mean?

Categories: Kitchen Garden, Recipe | Tags: , , , , , , , | Leave a comment

Kitchen news March 22nd 2016

IMG_0585

It has been ‘Leftovers Fortnight’ in the Cottage with the Movie Night dough being reused for the pizza and the tomato sauce also being used for spinach and ricotta cannelloni as well as the pizza. Some of the children have been learning to make homemade ricotta from scratch too, patiently waiting a whole hour for the temperature to gradually reach 95C and the curds separate from the whey. And what do we do with the whey? Well apparently as it is a fermented product it’s great to splash on your skin (on your face OR your feet!) or to drink when you’ve an upset tummy. Or to use as the water part when making bread or pizza dough. And most of all it’s great for citrus trees. So that’s where ours has been going!

Last week we also harvested a massive watermelon from the desert-like bed that runs between the Cottage and D Block. The watermelon was orange when we opened it up! Pale but juicy, perfumed and ripe – and I lifted a fab recipe from Ottolenghi’s Plenty for it: Watermelon and feta salad with red onion and rocket. Try it and see what a great combination it is!

And a massive hit again with the kids has been the Sean’s Panaroma sweetcorn chowder: a tricky recipe with a few twists and turns. But that’s how we roll baby.

Some lucky students got to flex their knife-wielding muscles this week too and reprised the Cornersmith’s bouillon recipe to replenish our bare shelves. Chopping onions, celery, carrots and their green tops, parsley, coriander, fennel and loads of garlic (and other secret herbs and spices, natch) and then blending it all up into a paste with lots of salt to make into our version of stock cubes, and then squishing into sterilised jars to waterbath and preserve. The bouillon keeps for at least 6 months, unopened in a dark and cool cupboard, and at least 3 or 4 months in the fridge once opened.


Categories: Kitchen Garden, News | Tags: , , | Leave a comment

Sweetcorn chowder

IMG_0583

In the restaurant Sean’s Panaroma, Sean makes this soup with a super-intense prawn stock and serves it with velveted prawns, spicy Italian sausage & chilli oil. This version is great for Bondi students who may prefer it vegetarian & not so spicy!

Fresh from the garden: sweetcorn, basil, potatoes, spring onions
Recipe source: adapted from a recipe by Sean Moran in Let it Simmer
Serves: 4 or 24 tastes

Equipment:

  • Saucepans – 1 heavy based, 1 medium
  • Small frying pan
  • Mortar and pestle
  • Chopping board and knife
  • Wooden spoon
  • Measures: 1/2 cup, 1/3 cup, ½ teaspoon
  • Measuring jug
  • Garlic press, potato peeler
  • Salad spinner
  • Stick blender, ladle
  • Serving bowls


Ingredients:

  • ½ teaspoon cumin seeds
  • 2 large onions
  • 3 corn cobs
  • 1/3 cup extra-virgin olive oil, plus extra for drizzling
  • 100ml white wine or verjuice
  • 1.5lt vegetable stock or boiling water with 2 tablespoons bouillon paste
  • 5 garlic cloves
  • 1 large branch of basil
  • 2 waxy potatoes (about 120g each) ideally kipfler
  • 2 spring onions
  • Pinch of saffron threads or ground turmeric

What to do:

  1. Pour the stock into the smaller saucepan and heat to a simmer, or fill the kettle to the 1.5litre mark and set it to boil.
  2. In the small frying pan dry toast the cumin seeds over a low flame until fragrant, then grind with the mortar & pestle. Peel and finely chop the onions. Remove the ears and silk from the corn, then carefully slice the kernels off the cobs by standing on one end and cutting don each side of the cob.
  3. Heat olive oil in the heavy-based saucepan over gentle heat, add onion and stir occasionally until lightly coloured. Add the ground cumin and sauté for another few minutes until fragrant.
  4. Add most of the corn (saving a handful for later) and sauté briefly. Deglaze the pan with the wine or verjuice, then add stock or hot water and bouillon and bring to the boil.
  5. Meanwhile peel and crush the garlic cloves and add to the pot, then reduce heat and simmer for about 10 minutes.
  6. Meanwhile wash, spin dry and pick the basil leaves to yield about ½ cup loosely packed. Wash and peel the potatoes and cut into 1cm dice. Wash and trim the spring onions and slice thinly on the diagonal.
  7. When soup has finished simmering, add the basil to the pan, then using the stick blender blend to form a smooth soup.
  8. Add potato, saffron or turmeric and remaining corn and simmer over medium-high heat until the potato is tender for about 10 minutes.
  9. Ladle into serving bowls, and serve hot scattered with the sliced spring onion.
Categories: Kitchen Garden, Recipe | Tags: , , , | Leave a comment

Blog at WordPress.com.