Posts Tagged With: dough

Spelt pasta

Our Kitchen Garden students love making pasta! This recipe uses spelt flour, an ancient grain that is slightly nutty. Spelt has a lower gluten content than wheat flour, and whilst not suitable for a coeliac diet, can be eaten by those with a low threshold gluten intolerance.

ourkitchengarden.net

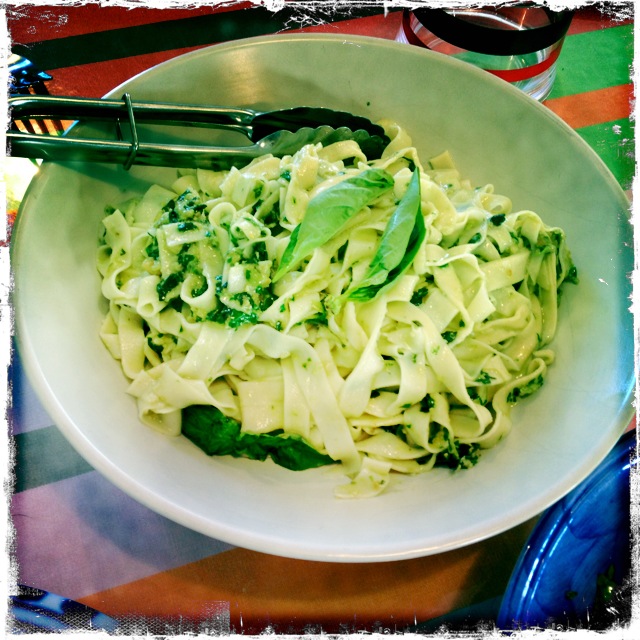
Spelt linguine with quick pesto

Fresh from the garden: eggs
Recipe source: adapted from a recipe by Sean Moran at Sean’s Panaroma
Makes: about 600g pasta, enough for 6, or 24 tastes

Equipment:

  • Scales
  • Stand mixer, bowl & paddle
  • Pasta machines
  • Measures – tablespoon
  • Plastic film
  • Large knife
  • Pastry brush
Ingredients:

  • 570g spelt flour plus extra
  • 4 free-range eggs
  • 15ml water

 What to do:

  • Weigh the flour into the bowl of the mixer, then with the motor running, add the eggs one at a time. Process for a few minutes until the dough clings together and feels quite springy.
  • Tip the dough onto a clean, dry workbench. Knead the dough for a few minutes, then wrap it in plastic film and let it rest for about an hour at room temperature.

_______________________________________________________________

  • Get an adult to help fix the pasta machine to a suitable bench. Screw the clamp very tightly.
  • Set up your pasta hanging poles, ideally between 2 chairs.
  • Clear a large space on the workbench alongside the pasta machine. All surfaces must be clean and dry. Press the dough into a rectangle about 8 cm wide.
  • Set the rollers on the pasta machine to the widest setting and pass the dough through. The dough will probably look quite ragged at this stage. Fold it in 3, turn it 90 degrees and roll it through again. Go to the next-thickest setting and pass the dough through 3-4 times.
  • Continue in this manner (changing the settings and passing the dough through) until the dough has passed through the second thinnest setting. Don’t use the very thinnest setting, as the dough gets too fine and is hard to manage. If the dough gets too long to handle comfortably, cut it into 2-3 pieces using the large knife, and roll each piece separately.
  • Depending on which type of pasta you want, you can either lay the strips out on a lightly-floured table and cut them by hand, or you can fix the cutter attachment to the machine and carefully roll the pasta strips into strips for linguine or the thinner cutters for angel hair, gently catching them as they come through.
  • Drape the pasta over the hanging poles to dry while you make your sauce.
  • Clean the pasta machine parts by brushing them down with a dry pastry brush, pop the collected parts back into their boxes, and then clear and clean the table.

Notes: Never wash the pasta machine – it will rust! Just brush down with a strong pastry brush to remove the leftover dough.
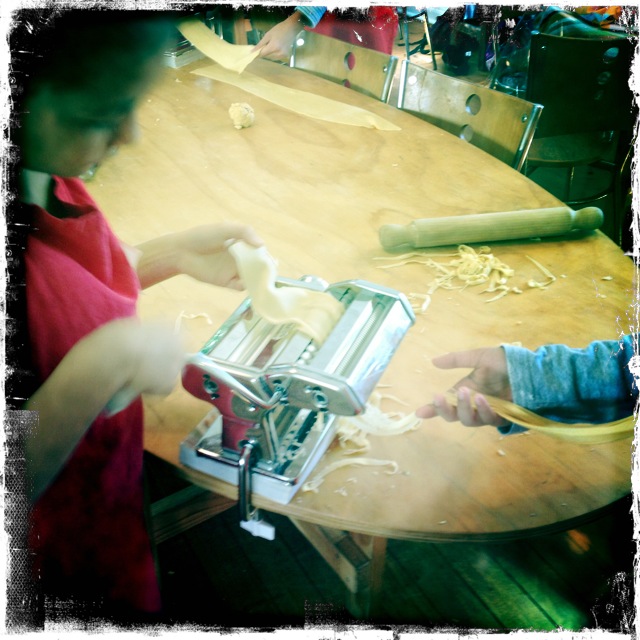
ourkitchengarden.net

Busy hands!

Categories: Kitchen Garden, Recipe, School Holiday Program | Tags: , , , , , , , , , , | Leave a comment

Crispy rosemary flatbread

Smittenkitchen says: Nothing could be easier than making this cracker, but that doesn’t mean you shouldn’t tell people you slaved all day over it because they’re going to be impressed, and I see no reason not to milk it. I think you could easily swap the rosemary for other herbs, such as thyme or tarragon, or punch it up with black pepper or other spices, but personally, I like it just the way it is here.

ourkitchengarden.net

Crispy crispy!

Fresh from the garden: rosemary
Recipe source: adapted by smittenkitchen.com from a recipe in Gourmet magazine
Serves: 8 or about 30 tastes

Equipment:

  • 3 heavy, large baking sheets
  • Paper towel
  • Chopping board & knife
  • Measures: cup, ½ cup, ¼ cup, tablespoon, ½ teaspoon
  • Baking paper
  • Large bowl
  • Rolling pins
  • Pastry brushes
  • Wire racks
  • Serving plates
Ingredients:

  • 3½ cups unbleached plain flour
  • 4 large sprigs rosemary
  • 1 teaspoon baking powder
  • 1 teaspoon cooking salt
  • 1 cup water
  • 1/2 cup olive oil plus more for brushing
  • Flaky sea salt

What to do:

  • Preheat oven to 230°C with 3 heavy baking sheets inside.
  • Wash, dry and chop 1 sprig of rosemary.
  • Stir together flour, 1 tablespoon chopped rosemary, baking powder, and salt in a medium bowl. Make a well in centre, then add water and oil and gradually stir into flour with a wooden spoon until a dough forms. Knead dough gently on a work surface 4 or 5 times.
  • Divide dough into 3 pieces and roll out each piece separately on sheets of baking paper into shapes large enough to fit  each baking tray (shape can be rustic; dough should be thin).
  • Lightly brush the tops with additional oil and then strip the remaining rosemary, scattering small clusters of leaves on top, pressing in slightly. Sprinkle with flaked salt.
  • Slide rounds (still on baking paper) onto the preheated baking sheets and bake until pale golden and browned in spots, 8 to 10 minutes.
  • Transfer flatbread (discard baking paper) to racks to cool.
  • Break into pieces and serve.
  • Flatbread can be made 2 days ahead and cooled completely, then kept in an airtight container at room temperature. 

Notes: Why is this called flatbread? Why is this unleavened bread? What is kneading?

Categories: Kitchen Garden, Recipe | Tags: , , , , , , , , , | 2 Comments

Potato, rosemary & rocket pizza

I think it’s a law that every child should love pizza… and mine certainly do! This one’s a very different style to the usual however, as there’s no tomato nor mozzarella – or even pineapple! But delish nevertheless, and is also a leeeetle bit healthy…

ourkitchengarden.net

Potato, rosemary & rocket pizza

Fresh from the garden: potatoes, rosemary, rocket
Recipe source: adapted from Stephanie Alexander Kitchen Garden Cooking with Kids
Serves:  8 or 24 tastes

Equipment:

For the pizza dough:

  • Bowls – 1 small, 2 large
  • Fork
  • Scales
  • Measures: cup, ½ cup, tablespoon, teaspoon
  • Stand mixer with dough hook
  • Pastry brush
  • 2 large oven trays
  • Wide egg lifter
  • Large boards for cutting pizza
  • Pizza cutter

For the pizza topping:

  • Salad spinner
  • Scales
  • 2 clean, dry tea towels
  • Kitchen paper
  • Chopping board
  • Grater & peelers
  • Mandoline & mezzaluna
Ingredients:

For the pizza dough:

  • 1 cup lukewarm water
  • 3 teaspoons instant dry yeast
  • 1 teaspoon sugar
  • 1½ tablespoons extra virgin olive oil, plus extra for greasing
  • 400g plain flour, plus extra for flouring
  • 2 teaspoons cooking salt

For the pizza topping:

  • 3 handfuls rocket leaves
  • 100g parmesan cheese
  • 4 sprigs rosemary
  • 3 medium-to-large potatoes
  • 1/2 cup extra-virgin olive oil


What to do:

To make the dough:

  • Place the water, yeast and sugar in the small bowl. Mix with the fork and leave for 5–10 minutes until the mixture looks frothy.
  • Add the 2 teaspoons of oil to the yeast mixture and mix well.
  • Place the flour and salt and yeast mixture in the bowl of the stand mixer and beat for at least 8 minutes, until the dough looks smooth.
  • Brush the inside of a large bowl with a little of the extra virgin olive oil, using the pastry brush.
  • Turn the pizza dough into the oiled bowl. Cover with a clean, dry tea towel and put in a draught-free place until the dough has doubled in size. This process, which is called ‘proving’, will take at least 1 hour.

What to do:

Start of lesson:

  • Tip the risen dough onto the workbench and knead briefly, then shape it into a round ball and return it to the bowl.
  • Cover the bowl with the tea towel and leave again, this time for at least 20 minutes.
  • Preheat the oven to 200C. You can prepare the topping now while you wait for the oven to heat up.

For the topping:

  • Rinse the rocket leaves and dry them in the salad spinner. Shred the rocket into fine strips. Lay a piece of kitchen paper on a dry tea towel and spread the dry leaves over the paper and then roll the whole lot up like a log. Keep the rolled parcel of leaves in the refrigerator until needed.
  • Shave off pieces of parmesan using either a grater (if it has a wide slicing option) or a normal potato peeler.
  • Pull the rosemary needles from the stalks and chop them using the mezzaluna.
  • Peel the potatoes, washing them as you go, and slice them very thinly and very carefully using the mandoline & guard.
  • Tip the sliced potatoes into the large bowl and drizzle with most of the oil.
  • Add the rosemary and salt and pepper, then mix together so that all the slices are lightly oiled.

Assembling the pizza:

  • Scatter some flour on the workbench, divide the dough in two and roll to form two thin rectangles to fit the baking trays.
  • Assemble the pizzas directly onto the trays, flouring the trays first.
  • Arrange the slices of potato on the pizzas, overlapping them.
  • Sprinkle most of the Parmesan over the potato, keeping some aside.
  • Drizzle the pizzas with the last of the oil, then place the pizzas in the oven for about 10 minutes or until the edges are very crusty and the cheese is bubbling. 

Finishing off:

  • While the pizzas are baking you can make the dough for the next class (see above).
  • You may want to slip the pizza off the tray onto the rack for the last few minutes, so that you get a really crusty base.
  • Once the pizzas are done, transfer them to the wooden chopping boards using the wide egg lifter.
  • Cut the pizzas in half, and then into small slices or squares and then slide half a pizza onto each plate.
  • Top each with a handful of the shredded rocket leaves and remaining parmesan.

Notes: Where does pizza come from? What type of potatoes will you use here? What other sort of vegetables could you use in a pizza? What sort of other pizza could we make?

ourkitchengarden.net

Yes please, I’ll have another

Categories: Kitchen Garden, Recipe | Tags: , , , , , , , , , , | Leave a comment

Apricot, cranberry and cardamom hot cross buns

‘… if you have no daughters, give them to your sons…’ At this time of year it is possible to buy hot cross buns anywhere – but I think there is nothing better than freshly made ones!

ourkitchengarden.net

Warm cross dough

Recipe source: adapted from a recipe by Jeremy Strode in Good Living 2011
Makes: 12 large or 24 small buns

Equipment:

  • Stand mixer & dough hook
  • Bowls – large, small
  • Measuring – ½ teaspoon, tablespoon
  • Small saucepan
  • Fork
  • Spatula
  • Plastic wrap & baking paper
  • Large baking tray
  • Chopping board & knife
  • Small snap lock bags
  • Scissors
  • Pastry brush
  • Serving plates
Ingredients:

  • 20g dried yeast
  • 100g caster sugar plus a pinch
  • 100g butter at room temperature
  • ½ teaspoon salt
  • ½ teaspoon ground cardamom
  • 500g plain flour
  • 2 eggs
  • 150g apricots
  • 50g dried cranberries

Crosses

  • 90g self-raising flour
  • 10g skim milk powder

Glaze

  • 1/3 cup water
  • 2 tablespoons caster sugar

What to do:

The dough mixture:

  • Mix yeast with 200ml warm water & pinch of sugar in a small bowl and leave in a warm place for 5 minutes to activate.
  • Chop the apricots.
  • Place butter, salt, cardamom, the rest of the sugar and the plain flour in the mixer and combine.
  • Add eggs and yeast mixture and beat until smooth.
  • Add apricots and when combined, leave in a warm place for 1 to 1½ hours to double in size.

Start of lesson:

  • Line a large baking tray with non-stick baking paper. Punch dough down to its original size. Knead on a lightly floured surface until smooth. Divide into 12 even portions. Shape each portion into a ball. Place balls onto baking paper-lined tray so that the balls just touch. Cover with plastic wrap. Set aside in a warm, draught-free place to prove for 30 minutes. Preheat oven to 190°C.
  • Whilst the buns are proving you can make the next dough mixture (above) for the next class.
  • After the 30 minutes is up, mix self-raising flour, milk powder and 100ml water together in a small bowl until smooth. Spoon into a small snap-lock bag. Snip off a tiny hole in 1 corner of bag. Pipe flour paste over tops of buns to form crosses. Bake for 20 minutes until buns are cooked through.
  • Meanwhile make the glaze: Place 1/3-cup water and sugar into a small saucepan over low heat. Stir until sugar dissolves. Bring to the boil. Boil for 5 minutes. Brush warm glaze over warm hot cross buns. Divide among serving plates – slicing if needed – & then eat!

Notes: If you have no skim milk powder for the crosses then the self-raising flour will work with milk or even water!

ourkitchengarden.net

Hot cross bunsters

Categories: Kitchen Garden, Recipe | Tags: , , , , , , , , , | 2 Comments

Kitchen Garden news – 1st April 2013

Well goodness me, I was so busy with class preparations, the school Easter Hat Parade, travelling to the south coast to visit Granny for her birthday and my lovely aunt Rose & Uncle Paul, and planning Olly’s birthday extravaganza (!) that I completely forgot to write my news for the newsletter last week…!

I also forgot the wine, cheese & dips at home in the fridge and the kids’ back-bubbles for swimming (as well as clean underwear, but that’s another story) so I’m going with the flow now and purposefully trying not to stress about it all… and hoping that it’s not just old age (or young riesling) kicking in…

ourkitchengarden.net

Spot the double-yolker!

So anyway – on to what’s been happening! We thought we might have had a quieter fortnight this menu than the last Chinese Banquet one… but no! We pushed the boundaries yet again and had everyone cooking up a feast every lesson… on Wednesday morning’s class we found a double-yolker too! What better miracle of food life is there than an egg with too yolks? So we poached it and plopped it into an Autumn salad with poached eggs & creamy tarragon and landcress mayo… We kneaded dough & sliced spuds for Potato and rosemary pizza, and whizzed up one of our favourites: Ottolenghi’s hummus with our Rosemary and thyme grissini and Crudités, and rolled out superfine Handmade linguine with Rocket and basil pesto. And then to finish – of course we had to squeeze in some freshly baked Apricot, cranberry and cardamom hot cross buns just in time for Easter!

ourkitchengarden.net

Ottolenghi’s hummus

ourkitchengarden.net

Rosemary & thyme grissini, crudites

And the result? Clean plates – poor chooks – and happy kids! We had some very wonderful comments – and also some beautiful manners and sharing from, in particular, my lunch compadres in Year 3 one Wednesday arvo. Delicious, delicious!

ourkitchengarden.net

Handmade linguine, rocket & basil pesto

All the other recipes will be up here in the next few days – and even perhaps the one for Banoffee Pie that Olly requested for his 4th party! Mmmmmmmm… Watch this space!

Categories: Kitchen Garden | Tags: , , , , , , , , , | Leave a comment

Gluten-free pizza dough

This dough is great for a coeliac’s pizza, calzone or flatbreads – just follow the instructions below and use with any of our recipes. They turn out a treat!

ourkitchengarden.net

Recipe source: Melissa
Makes: 2 large pizza or 2 calzone

Equipment:

  • Scales
  • Stand mixer, bowl & dough hook
  • Measures – cup, ½ cup, tablespoon
  • Bowls – large, medium
  • Cling film
Ingredients:

For the magic dough:

  • 2½ cups gluten-free plain flour
  • 7g dried instant yeast (GF)
  • A pinch of salt
  • 1 cup warm water
  • 1 tablespoon extra-virgin olive oil plus extra for greasing

What to do:

  • Sift flour into the bowl of the stand mixer. Add the yeast and salt and mix to combine.
  • Make a well in the centre and add measured water and oil. Mix to form a soft dough and knead for about 5-7 minutes or until smooth and elastic.
  • Place in a lightly greased bowl and cover with cling film. Stand in a warm place for 45 minutes to 1 hour or until the dough has doubled in size.
  • Using your fist, punch dough the down. Knead on a lightly floured surface until smooth and then use with your favourite pizza or flatbread recipe.

Notes: Why do we leave the dough to rise? What is this process called?

ourkitchengarden.net

Categories: Kitchen Garden, Recipe | Tags: , , , , , , , , | 2 Comments

Hugh’s Magic Dough

Bondi kids love making dough: bread, pizza and pasta regularly grace our table! This ‘magic’ dough recipe can form the base for pizza, flatbreads, breadsticks etc…

Recipe source: Hugh Fearnley-Whittingstall, Veg Every Day
Makes: 2 large pizza or 2 calzone

Equipment:

  • Scales
  • Stand mixer& dough hook
  • Measures – tablespoon, teaspoon, ½ teaspoon
  • Bowls – large, medium
  • Cling film
Ingredients:

For the magic dough:

  • 250g plain white flour
  • 250g strong white flour
  • 1½ level teaspoons fine sea salt
  • 1 teaspoon instant dried yeast
  • 1 tablespoon olive oil, plus a little extra for oiling

What to do:

For the magic dough:

  • Put the two flours into the bowl of the stand mixer with the salt and yeast. Mix well using the dough hook. Add the oil and 325ml warm water and mix to a rough dough. Knead for 5–10 minutes, until smooth. This is quite a loose and sticky dough, which is just as it should be – you get better-textured bread this way – so try not to add too much flour if you can help it, it will become less sticky as you knead.
  • Trickle a little oil into a clean bowl, add the kneaded dough and turn it in the oil so it is covered with a light film. Cover with a tea towel or cling film and leave in a warm place to rise until doubled in size – at least an hour, probably closer to two – or if using the next day, wrap bowl in cling film and put straight into the fridge to prove slowly.
  • When the dough is well risen and puffy, tip it out and ‘knock it back’ by poking it with your outstretched fingers until it collapses to its former size. It’s now ready to be shaped to your will.

Notes: Why do we leave the dough to rise? What is this process called?

Categories: Kitchen Garden, Recipe | Tags: , , , , , , , , , | 3 Comments

River Cottage garlicky flatbreads

Bondi kids love making dough: bread, pizza and pasta regularly grace our table! And we also love, love, love garlicky anything! This dish is great for mopping up any dip, sauce or soup, but especially good for the broad bean puree…

ourkitchengarden.net

Fresh from the garden: garlic
Recipe source: Hugh Fearnley-Whittingstall, Veg Every Day
Serves: 8 or 30 tastes

Equipment:

  • Measures – jug,tablespoon, teaspoon, ½ teaspoon
  • Stand mixer
  • Scales
  • Bowls – large, medium
  • Heavy non-stick frying pan
  • Rolling pins
  • Tongs
  • Tea towels
  • Plate & paper towel
  • Serving plates
Ingredients:For the magic dough:

  • 250g plain white flour
  • 250g strong white flour
  • 1½ level teaspoons fine sea salt
  • 1 teaspoon instant dried yeast
  • 1 tablespoon olive oil, plus a little extra for oiling

For the garlic oil:

  • About 120ml olive oil
  • 1 fat garlic clove

What to do:

For the magic dough:

  • Put the two flours into the bowl of the stand mixer with the salt and yeast. Mix well using the dough hook. Add the oil and 325ml warm water and mix to a rough dough. Knead for 5–10 minutes, until smooth. This is quite a loose and sticky dough, which is just as it should be – you get better-textured bread this way – so try not to add too much flour if you can help it, it will become less sticky as you knead.
  • Trickle a little oil into a clean bowl, add the kneaded dough and turn it in the oil so it is covered with a light film. Cover with a tea towel and leave in a warm place to rise until doubled in size – at least an hour, probably closer to two.
  • When the dough is well risen and puffy, tip it out and ‘knock it back’ by poking it with your outstretched fingers until it collapses to its former size. It’s now ready to be shaped to your will.

For the garlic oil:

  • Peel the garlic clove and very finely chop it. Combine the olive oil and garlic in a frying pan and place over a medium heat. You’re not going to fry it, just warm it through to take the edge off the garlic. So as soon as you see the first signs of a sizzle, pour the oil and garlic out of the pan into a small bowl to infuse. Wipe the frying pan clean.

For the flatbreads:

  • After ‘knocking back’ the risen dough, take lemon-sized balls and roll them into 8 flat circles, 2mm thick. Leave to rest for 5 minutes.
  • Meanwhile heat a heavy-based, non-stick frying pan over high heat until smoking hot.
  • Carefully lay one flatbread in the pan and cook for about 2 minutes, until bubbly on top and patched with brown spots on the base. Flip over and cook for 1-2 minutes more. Remove immediately to a plate and trickle with some of the garlicky oil. Scatter with a little flaked salt too. Repeat with all the dough. Cut the oiled flatbreads into wedges to serve.

Notes: Why do we leave the dough to rise? What is this process called?

ourkitchengarden.net

Categories: Kitchen Garden, Recipe | Tags: , , , , , , , , , , , , , | 1 Comment

Linguine with broad beans, lemon and garden herbs

Our Kitchen Garden students love making pasta – and this recipe sings of spring! It includes the dough mixture as well as instructions on how to use a pasta machine.

ourkitchengarden.net

Fresh from the garden: eggs, rocket, broad beans, lemon, marjoram, parsley, coriander, thyme
Recipe source: Melissa
Serves: 6 at home or 24 tastes

Equipment:

  • Salad spinner
  • Pasta machine
  • Scales, garlic press
  • Measures – teaspoon
  • Food processor
  • Plastic wrap
  • Chopping board & knife
  • Pastry brush, grater
  • Large stock pot & saucepan
  • Tongs, large & small bowls
  • Serving bowls
Ingredients:

  • 500g plain flour
  • 5 free-range eggs
  • Salt
  • 1kg broad beans in pod
  • A large handful of herbs
  • 1/2 cup extra-virgin olive oil
  • A lemon
  • 4 garlic cloves
  • Flaked salt & black pepper
  • 50g parmesan

What to do:

To make the pasta:

  • Weigh the flour, then combine it with a teaspoon of salt in the large bowl.
  • Crack the eggs carefully into the small bowl, discarding any shell, then add them to the flour. Mix thoroughly, then tip the dough onto a clean, dry workbench.
  • Knead the dough for a few minutes, then wrap it in plastic film and let it rest for 1 hour at room temperature.

_________________________________________________________________

  • Fill the large stockpot and the saucepan with water and set to boil on high with the lids on.
  • Fix the pasta machine to a suitable bench or table – if the surface is not thick enough you may need to place a thick book under the machine. Screw the clamp very tightly.
  • Clear a large space on the workbench alongside the pasta machine. All surfaces must be clean and dry. Press or roll the dough into a rectangle about 8 cm wide.
  • Set the rollers on the pasta machine to the widest setting and pass the dough through. The dough will probably look quite ragged at this stage. Fold it in 3, turn it 90 degrees and roll it through again. Go to the next-thickest setting and pass the dough through 3-4 times.
  • Continue in this manner (changing the settings and passing the dough through) until the dough has passed through the second thinnest setting. Don’t use the very thinnest setting, as the dough gets too fine and is hard to manage. If the dough gets too long to handle comfortably, cut it into 2-3 pieces using the large knife, and roll each piece separately.
  • Lay the pasta strips on a lightly floured surface & dust with a little more flour. Attach the pasta cutter to the machine and pass through the largest rollers, draping it in your hands to catch.
  • Carefully separate each strip and hang over a pole to dry.
  • Clean the pasta machine by brushing it with a dry, wide pastry brush & putting back in its box.  

To finish the dish:

  • Check that the stockpot & saucepan have been filled with water and are set on high to boil.
  • Pod the broad beans, discarding the outer shell into the compost and add beans to the boiling water. Fill a large bowl with cold water and have ready.
  • Boil the broad beans for 3 minutes, drain and then immediately refresh in the bowl of cold water. Drain again and double-pod by slipping the outer shell off into the compost. Put the beans into the big bowl.
  • Wash and dry the lemon and zest it. Cut the lemon in half and squeeze its juice into the big bowl too.
  • Peel the garlic cloves and squeeze them through the garlic press into the bowl too.
  • Measure the parmesan and grate what you need. Wash and spin dry the herbs and strip their leaves, chopping with the mezzaluna, then add them into the garlicky broad bean bowl.
  • Measure 1/3 cup of olive oil into the bowl and sprinkle on a few pinches of flaked salt and toss to incorporate.
  • When the stockpot has started a fast boil, gather your drying pasta on a large baking tray. Add  a tablespoon of cooking salt and then the pasta to the pot, stir once and quickly put the lid back on.
  • As soon as the pot begins to boil again, take the lid off. The pasta should only take 1 or 2 minutes to cook from boiling. Taste to check – it’s important that the pasta remains al dente and is not overcooked!
  • Using tongs, carefully pull the pasta (and some of its cooking liquid) out and into the big lemony bowl, sprinkle half the parmesan on and toss thoroughly to incorporate.
  • Divide into serving bowls, sprinkle the remaining parmesan on and eat immediately!

Notes: Never wash the pasta machine – it will rust! Just brush down with a strong brush to remove the leftover dough.


Categories: Kitchen Garden, Recipe | Tags: , , , , , , , , , , | Leave a comment

Rocket linguine with broad beans, lemon and marjoram

ourkitchengarden.net

Our Kitchen Garden students love making pasta – and this recipe sings of spring! It includes the dough mixture as well as instructions on how to use a pasta machine.

Fresh from the garden: eggs, rocket, broad beans, lemon, marjoram
Recipe source: Melissa

Equipment:

  • Salad spinner
  • Pasta machine
  • Scales, garlic press
  • Measures – teaspoon
  • Food processor
  • Plastic wrap
  • Chopping board & knife
  • Pastry brush, grater
  • Large stock pot & saucepan
  • Tongs, large bowls
  • Serving bowls
Ingredients:

  • 500g plain ‘00’ flour
  • 5 free-range eggs
  • Salt
  • 2 handfuls of rocket
  • 500g broad beans in pod
  • A handful of marjoram sprigs
  • 1/3 cup extra-virgin olive oil
  • A lemon
  • 3 garlic cloves
  • Flaked salt & black pepper
  • 50g parmesan

What to do:

To make the pasta:

  • Wash a handful of rocket thoroughly and spin dry. Discard any tough stalks and chop roughly.
  • Weigh the flour, then combine it with 1½ teaspoons of salt in the bowl of the food processor. With the motor running, add the eggs and the chopped rocket. Process for a few minutes until the dough clings together and feels quite springy.
  • Tip the dough onto a clean, dry workbench. Knead the dough for a few minutes, then wrap it in plastic film and let it rest for 1 hour at room temperature.

_________________________________________________________________

  • Fill the large stockpot and the saucepan with water and set to boil on high with the lids on.
  • Fix the pasta machine to a suitable bench or table – if the surface is not thick enough you may need to place a thick book under the machine. Screw the clamp very tightly.
  • Clear a large space on the workbench alongside the pasta machine. All surfaces must be clean and dry. Press or roll the dough into a rectangle about 8 cm wide.
  • Set the rollers on the pasta machine to the widest setting and pass the dough through. The dough will probably look quite ragged at this stage. Fold it in 3, turn it 90 degrees and roll it through again. Go to the next-thickest setting and pass the dough through 3-4 times.
  • Continue in this manner (changing the settings and passing the dough through) until the dough has passed through the second thinnest setting. Don’t use the very thinnest setting, as the dough gets too fine and is hard to manage. If the dough gets too long to handle comfortably, cut it into 2-3 pieces using the large knife, and roll each piece separately.
  • Lay the pasta strips on a lightly floured surface & dust with a little more flour. Attach the pasta cutter to the machine and pass through the largest rollers, draping it in your hands to catch.
  • Carefully separate each strip and hang over a pole to dry.
  • Clean the pasta machine by brushing it with a dry, wide pastry brush & putting back in its box.  

To finish the dish:

  • Check that the stockpot & saucepan have been filled with water and are set on high to boil.
  • Pod the broad beans, discarding the outer shell into the compost and add beans to the boiling water. Fill a large bowl with cold water and have ready.
  • Boil the broad beans for 3 minutes, drain and then immediately refresh in the bowl of cold water. Drain again and double-pod by slipping the outer shell off into the compost. Put the beans into the big bowl.
  • Wash and dry the lemon and zest it. Cut the lemon in half and squeeze its juice into the beans.
  • Peel the garlic cloves and squeeze them into the bowl too.
  • Measure the parmesan and grate what you need. Wash and spin dry the marjoram and strip leaves into the garlicky broad beans.
  • Wash and spin the remaining rocket dry and add that to the bowl.
  • Measure 1/3 cup of olive oil into the bowl and sprinkle on a few pinches of flaked salt and a good grind of pepper and toss to incorporate.
  • When the stockpot has started a fast boil, gather your drying pasta on a large baking tray. Add  a tablespoon of cooking salt and then the pasta to the pot, stir once and quickly put the lid back on.
  • As soon as the pot begins to boil again, take the lid off. The pasta should only take 2 minutes or so to cook from boiling. Taste to check – it’s important that the pasta remains al dente and is not overcooked!
  • Using tongs, carefully pull the pasta (and some of its cooking liquid) out and into the big lemony rocket bowl and toss to thoroughly incorporate.
  • Divide into serving bowls, sprinkle the parmesan on and eat immediately!

Notes: Never wash the pasta machine – it will rust! Just brush down with a strong brush to remove the leftover dough.

Categories: Kitchen Garden, Recipe | Tags: , , , , , , , , , , | Leave a comment

Create a free website or blog at WordPress.com.